
AstraERP — All-in-One Reference
This page combines every help article into a single document for easy searching (Ctrl/Cmd+F) and printing. Generated automatically — do not edit; the individual pages in the sidebar remain the primary docs.
Employee Portal
Overview & Signing In
The employee self-service side of AstraERP: everything an employee does themselves — attendance, leave, payslips, timesheets, appraisals, cash requests, food orders, discipline, tickets — from a browser or phone, always scoped to their own records.
Signing in
Your HR team sends a portal invitation email; activate, set your password, and sign in at your company's portal address. Forgot your password? Use the reset link — it verifies you by email/OTP.
The dashboard
Your day at a glance: last pay, leave balance, pending requests, leave by type, company announcements, upcoming birthdays and work anniversaries, and the next public holidays. Tiles link into their sections.
What's in the menu
| Section | You can… |
|---|---|
| My profile | See what the company holds on you |
| Attendance | Clock in/out, see your records and monthly hours |
| Leave | Check balances, request leave, follow approval |
| Timesheet | Log time on your assigned tasks |
| Pay | Pay summary and payslips |
| Appraisal | Complete self-assessments |
| Cash requests | Request and track cash advances |
| Food orders | Order from the day's menu |
| Discipline & grievances | Respond to queries, acknowledge outcomes, appeal, raise grievances |
| Tickets & tasks | Work items assigned to you from CRM |
| Vehicles | Request vehicles, log trips (where fleet is used) |
Everything you submit is recorded under your own account — the portal never lets you see or act on another employee's records.
My Profile
Your employee file as the company holds it: personal details, contact, employment (department, job title, rank, manager, dates), statutory & bank details, and My records — job history, qualifications, identifications, promotions and accidents.
Spot something wrong? Profile data is corrected by HR — contact them; the portal shows, it doesn't edit, your master record.
Attendance
Clock in / clock out from the attendance page — where your company uses location verification, allow the browser's location prompt; clock-in checks you're within the mapped premises.
Records shows your days: clock in/out, status, computed hours. Monthly summary rolls up your regular, overtime and weekend/holiday hours — the same numbers payroll uses, so query anything odd before month-end confirmation.
Leave
Check your balances, request leave, follow the approval, and withdraw a request you no longer need. Everything here is yours alone: nobody else's leave is visible to you, and yours is not visible to colleagues.
Your balances
One card per leave type. The chip says how many days you have left: green with two or more, amber below two, red at zero. Tap a card for the detail: allocated, taken, remaining, and how many requests you have made.
No leave allocation set up yet means HR has not given you days for that type. Ask them.
Request leave
- Press Request leave.
- Pick the leave type, the start date and the end date. Working days are counted for you: weekends and public holidays do not count.
- For a single day, tick Half day only if you need just the morning or afternoon.
- Write a reason your approver should know, and Submit request.
The request goes to your supervisor, department head or HR, whichever your leave type requires. Your remaining balance drops only when it is approved.
Following a request
Under Your requests, each one shows:
| Line | Meaning |
|---|---|
| Awaiting decision (amber) | Nobody has decided yet |
| Approved (green) | Agreed. Underneath: Scheduled (not started), In progress (you are on leave), Ended |
| Rejected (red) | Not agreed. Nothing was deducted |
| Withdrawn / Expired / Cancelled (grey) | Closed without being taken: you withdrew it, the start date passed undecided, or an approver cancelled approved leave |
| with Supervisor — Ama Mensah | Whose desk it is on right now. Awaiting an approver means the stage has nobody assigned yet; tell HR |
Changing your mind
While a request is Awaiting decision you can Edit it (it is sent round again with the new dates) or Withdraw it. A withdrawn request stays on your record, marked Withdrawn; it is not deleted.
Once a request has been decided, you cannot edit or withdraw it yourself. Ask HR: they can revert a decision or cancel approved leave.
Why is my balance lower than I expected?
Approved leave comes off your balance as soon as it is approved, even if it starts next month. Leave that is still awaiting a decision is shown but not deducted. If a figure still looks wrong, HR can show you exactly how it was calculated.
Timesheet
Tasks assigned to you appear with project, activity, description, duration and priority. Log your work: pick the task, record duration and notes, and mark completion. Filters cover project, activity, priority and status; Monthly Review shows your month as a calendar; Productivity summarises completed hours.
Log as you go — entries record when they were made, and late logging is visible to reviewers.
Pay & Payslips
Pay summary — your earnings and deductions & contributions per period, and pay-day information.
Payslips — every period's slip: basic, allowances, SSNIT, Tier 2, tax, gross, net. Open any period → Payslip for the printable version. Totals across periods show at the top.
Appraisal
When HR opens an appraisal cycle, your self-assessment appears here: score yourself per assessment item and add comments, then submit for your supervisor's side. Your final rating and comments become visible when the cycle closes.
Cash Requests
Request a cash advance/imprest: amount, purpose and details. Track every request's status — Pending, Approved (with the approved amount), Processed or Rejected — under Your requests, with filters per status.
Food Orders
The day's menu (as set by HR) on one side, my orders on the other: pick items for the date, place the order, and see its confirmation status. Orders close per the company's daily cut-off.
Discipline & Grievances
Your side of the discipline process — see the full guide for detail. In short, from here you can:
- See your cases — the charge as served, deadlines, disclosed evidence, hearing invitations and outcomes. Nothing about anyone else, ever.
- Respond to a query in your own words before the deadline shown; tick the admission box only if you mean it.
- Confirm transcriptions where HR recorded a verbal response — the case waits for your confirmation.
- Acknowledge a sanction — or decline; both are recorded. Acknowledging confirms receipt, not agreement.
- Appeal within the window shown on the sanction, with your ground and written submission.
- Comment on counselling notes and acknowledge the conversation happened.
- Raise a grievance — your complaint to the organisation, handled confidentially by HR with its progress visible here.
Tickets & Tasks
CRM work assigned to you: tickets (with due dates and status), tasks due now and coming up, and recent activity. Update task status and log activity as you work — the CRM side sees your updates live.
Vehicles
Where your company runs the fleet module:
- Request a vehicle — date, departure/destination, purpose, passengers, approximate distance; dispatch assigns the vehicle and driver.
- Trip log — record trips on a vehicle you use: odometer start/end, route, purpose.
- My vehicle — the vehicle assigned to you and its details.
Web App
Getting Started
AstraERP runs your whole business from one place — inventory & supply chain, sales & POS, accounting & banking, HR & payroll, CRM, and fleet — with a web app for the back office, an employee self-service portal, and a mobile app.
This guide takes you from signing in to understanding how the pieces fit, so the module guides make sense.
What you need
| Recommended | |
|---|---|
| Browser | Google Chrome (latest). Firefox, Safari and Edge also work |
| Connection | 10 Mbps or better |
| Screen | 1366 × 768 or higher |
Signing in
Open your AstraERP address and sign in with your email or phone number and password.
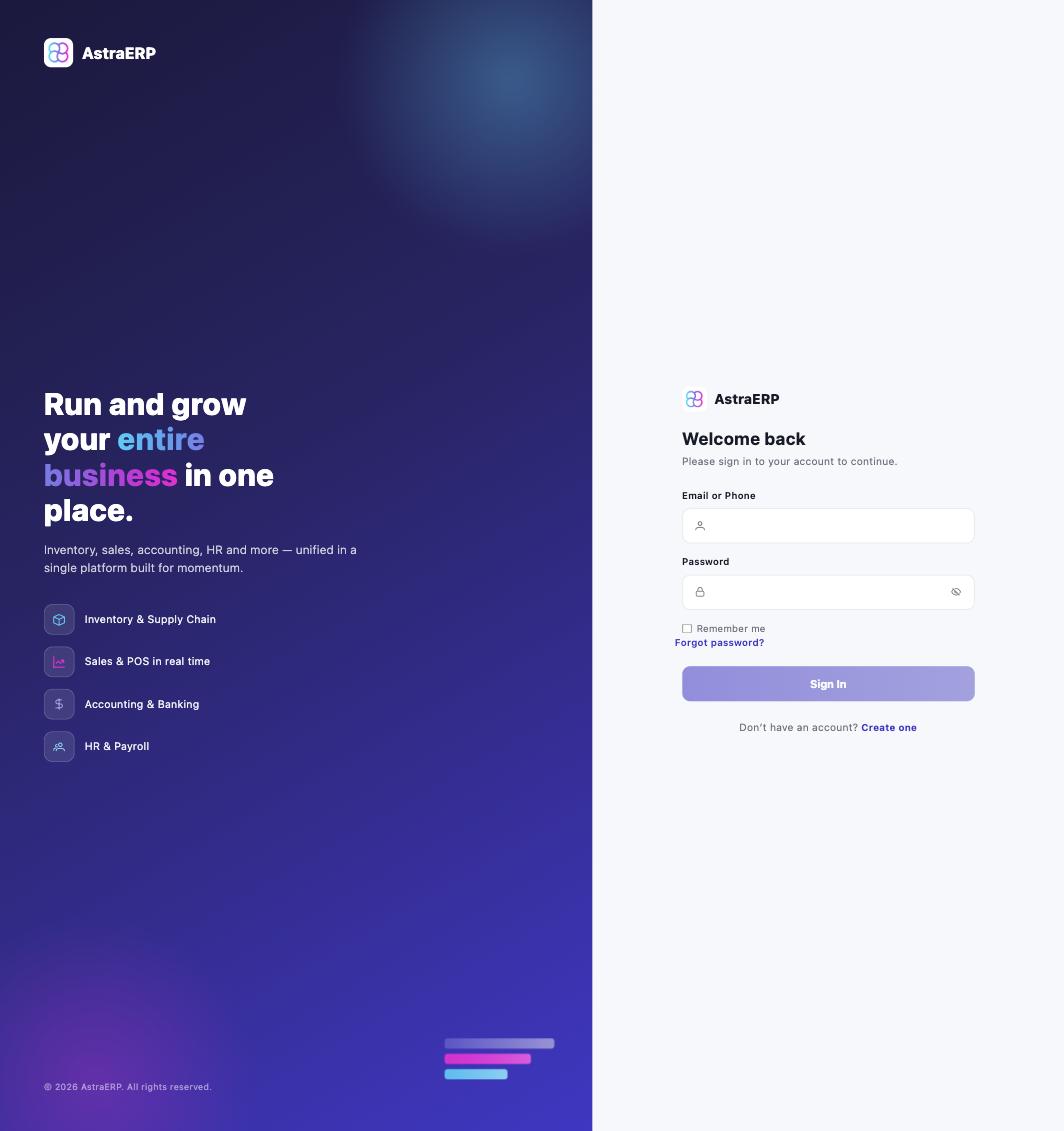
- Forgot password? starts a reset by email/OTP.
- New accounts are created by your administrator (or Create one where self-registration is enabled for your organisation).
- First sign-in on a temporary password takes you straight to a change-password screen — nothing else works until you set your own.
Companies and switching
Everything in AstraERP belongs to a company. A user account can be attached to more than one company (an accountant serving several businesses, a group with subsidiaries). After sign-in you act within one company at a time; switch from the user menu — every list, report and document you see belongs to the company you're switched into.
How the app is laid out
- Home shows the modules you have access to; each module (HR, Inventory, Account, CRM, Payroll, Fleet, POS) opens its own workspace with a sidebar menu on the left.
- The sidebar shows only the pages you've been granted (see permissions below), grouped the way work happens — e.g. HR groups Employees, Discipline, Leave, Attendance.
- Most pages follow one pattern: a header (title, description, action buttons on the right), filters, and a list; clicking a row opens the record or a detail panel.
See Navigating AstraERP for a screen-by-screen tour.
Users, pages and permissions
Access is per page, per user, per company:
- Every screen in AstraERP is a registered page under its module.
- An administrator grants a user the pages they need (and, where a page has them, individual actions on that page).
- The user's menu is built from those grants — no grant, no menu entry.
So "give Ama access to Leave but not Payroll" is exactly what the security screens do. Grants also serve as the rollout switch for new features: a new module appears to nobody until its pages are granted.
Locations
Users are assigned to one or more locations (branch, office, warehouse). Stock, sales and several HR features are location-aware; if you see "no location assigned" after sign-in, an administrator needs to assign you one.
First-day checklist for a new company
- Company profile — details, logo, letterhead (Config → Letterhead; letters and exports print on it).
- Locations — create your branches/warehouses.
- Users — add your team, grant pages, assign locations.
- Module setup — each module has its own setup screens (Chart of accounts, Products & stock, HR employees, Discipline catalogue, Payroll items). The module guides start with their setup page.
- Templates — email/SMS message templates and document numbering are under Settings.
Getting help
- These docs — use the search box, it covers every page.
- Support: support@astraerp.com · call/WhatsApp +233 (0)244-896-544 / +233 (0)256-290-530.
Inventory
Initial Set-up
The order that makes stock work:
- Locations — every warehouse/shop that holds stock (Config → company locations). Stock is counted per location; users see the locations they're assigned.
- Products — create or bulk-upload the catalogue: codes, names, units, prices, product groups. Packages/bundles where you sell them.
- Opening stock — stock upload per location as at cut-over, so on-hand starts true.
- Prices — selling prices on the product (or price upload / price lists at scale).
- Suppliers & customers — the partner register shared with Accounts/CRM.
From there the daily flow (buy → receive → sell) keeps counts current by itself.
Inventory Dashboard
Stock health at a glance: value on hand by location, fast/slow movers, low-stock and reorder signals, and the period's movement volumes — with drill-through into the lists behind each figure.
Where: Inventory → Dashboard 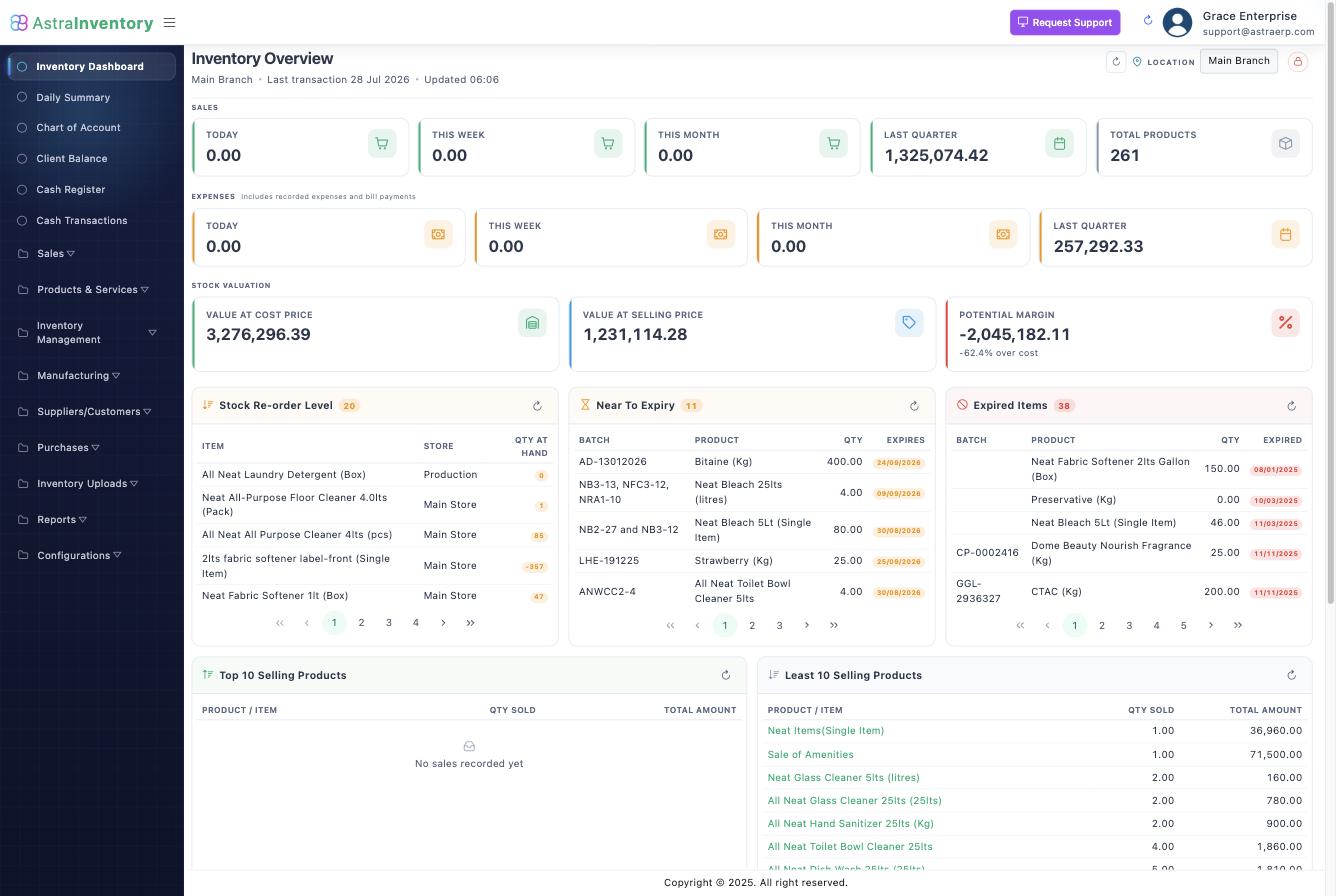
Daily Summary
A concise report that provides a snapshot of fnancial transactions and activities that occured within a single day. It serves as a crucial tool for monitoring and managing the financial health of a business on a day-to-day basis
Components of Daily Summary
| Fields | Description |
|---|---|
| Date | The date of the summary which is usually the end of the business day |
| Stock @ Cost | This is the total value of inventory on hand at its purchase |
| Stock @ Selling | This represents the total value of on hand at its selling prices which include any markup or profit margin applied to the cost price. |
| Total Stock Received | This includes the total quantity and value of inventory received during the day. It is important for tracking inventory inflows. |
| Gross Sale Amount | This is the total revenue generated from sales before deductions. It includes the selling prices of all goods sold during the day. |
| Discount Amount | If any discounts were offered to customers during the day, this figure reflects the total amount of those discounts. |
| Net Sale Amount | This is the actual revenue earned by the busines after substracting discounts and retruns. It represents the money that the business actually received. |
| Amount Receivable | Any outstanding invoices or accounts receivables that were collected during the day |
| Tax amount | Details of any tax payments or tax-related transactions made during the day such as sales tax |
| Cost Price | The cost price of all goods sold during the day. It helps in calculating the cost of goods sold(COGS), which is essential for profit determination |
| Profit | It provides a measure of the day's profitability. It is calculated by substracting the cost price from the net sale amount |
How to RUN Daily Summary
- Navigate to the Daily Summary page
- Select the Date from - Date to if the daily summary has not been ran in a while
- Click Run
- Wait for daily summary to complete
- Refresh page
How to REVERSE Daily Summary
- Navigate to the Daily Summary page
- Select the Date from - Date to (period you want to reverse)
- Click Reverse
- Wait for reversal to complete
- Refresh page
Chart of Account
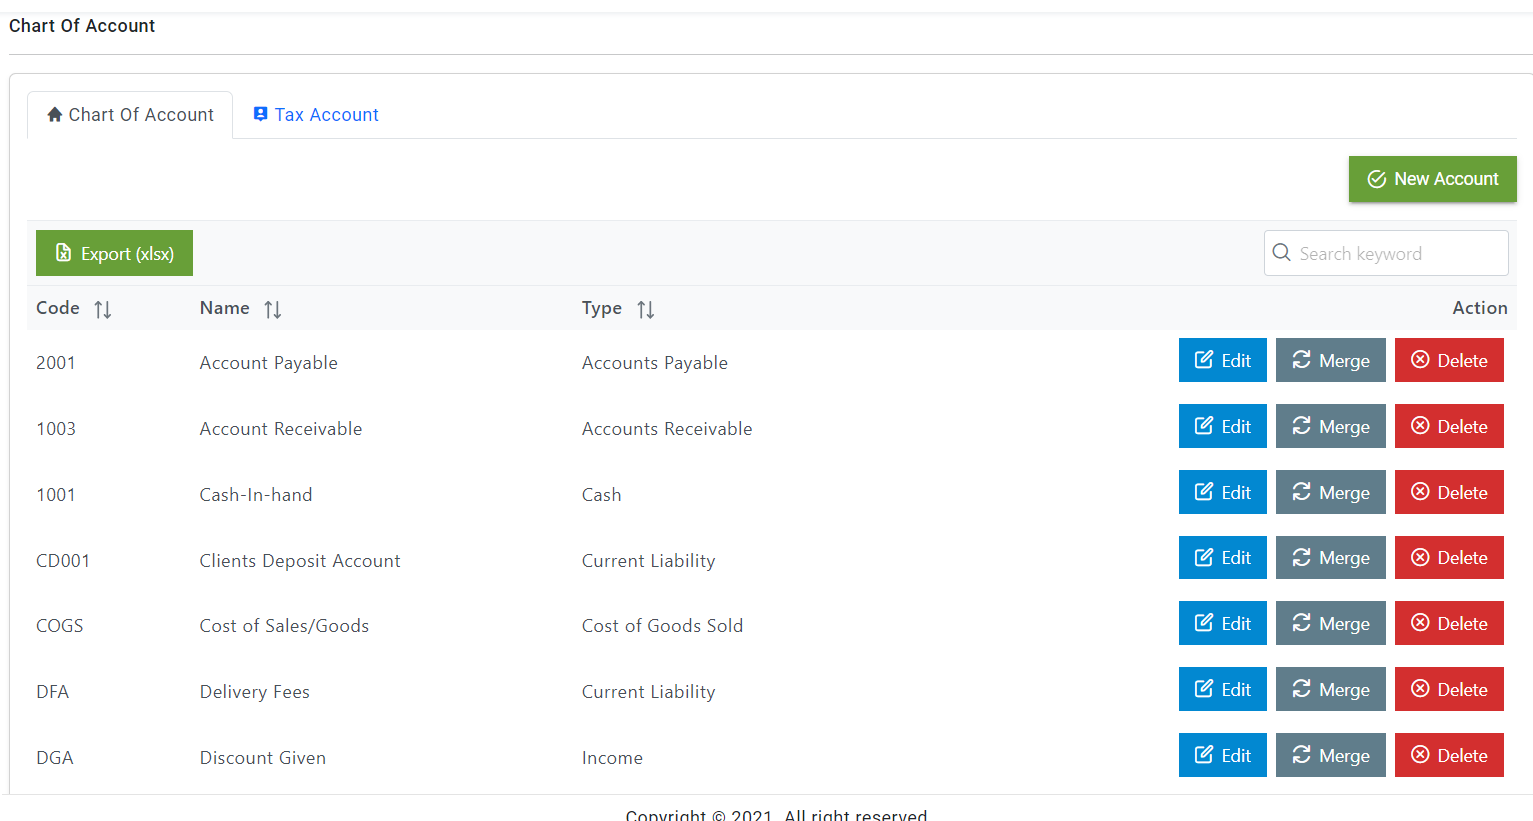
- The Chart of Account is used to manage and organize all accounts used in AstraERP. With functionalities such as adding new accounts, editing existing ones, merging duplicates and deleting unnecessary accounts.
Components of Chart of Account
- Chart of Account: THis is the main tab where you manage the defaults accounts in the system
- Tax Account: This tab also allows you to manage accounts related to taxes
- New Account: Click this green button to create a new account. After clicking New Account, enter the account name and select the account type. Save changes when after completing those details.
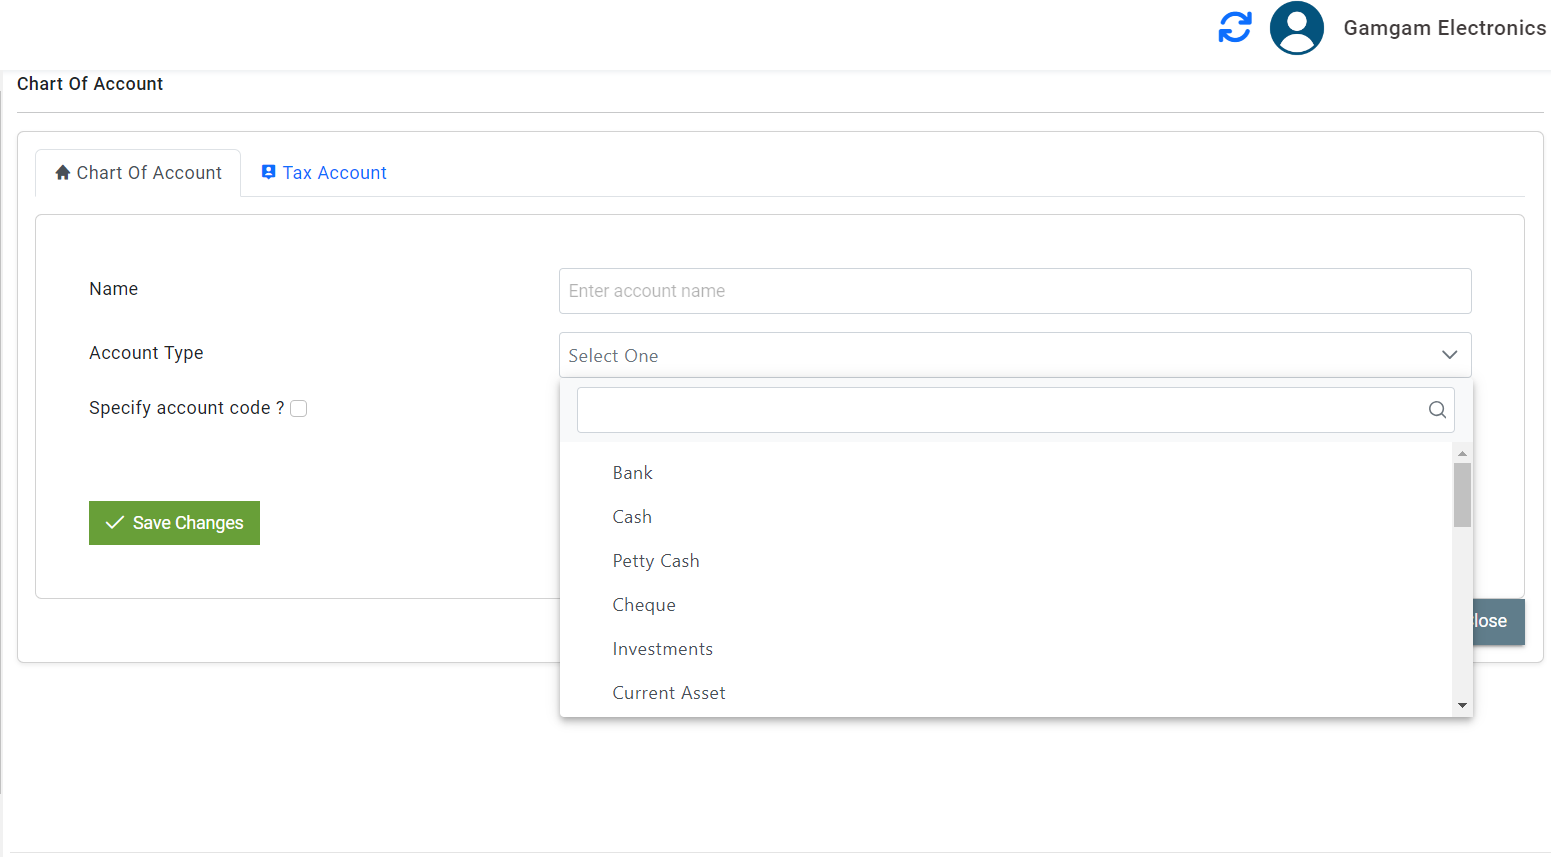
Account Types
- Account Paybale: Represents the company's obligations to pay off debts to its creditors
- Account Receivable: Represents money owed to the company by its customers.
- Cash: Represents the company's cash on hand
- Current Liability: Represents the company's short0term financial obligations that are due within one year
- Cost of Goods Sold( COGS): Represents the cost of goods attributable to the production of the goods sold by the company.
- Bank: Represents the company's funds held in financial instituins.
- Petty Cash: Tracks small accounts of cash kept on hand for minor expenses and incidentals
- Cheque: Tracks cheques issued or received that will are still outstanding (not yet cleared by the bank)
- Investments Represents funds that have been invested in financial instruments or other assests to generate returns
- Current Assets: Includes all assets that are expected to be converted into cash or used up within one year.
- Fixed Assets: Long term tangible assets that are used in the operations of a business and are not expected to be consumed or converted within a year
- Inventory Assets: Accounts for goods and materials a company holds for the purpose of resale
- Other Assets: Includes assets that do not fit into the current or fixrf assets categories
- Income: Represents revenue earned from the compnay's core business activities
- ExpenseTracks the costs incurred in the process of earning revenue
- Other Expense Records costs that are not directly related to the main operations of the Expense.
- Captial Represents the owners's investments in the business.
- Long-term Liability: Obligations that the company expects to pay off beyond one year
- Contingent: Potential obligations that may arise based on the outcome of a future events. eg lawsuit liabilities, product warranties
- Equity Represents the residual interest in the assets of the business after deducting liablities. It includes retained earnnings and contributed capital
Client Balance
This refers to a summary of the financial records that indicate the amount of money owed to or byclients in a business context. This helps businesses track the financial relationshipsthey have with their clients and ensures accurate accounting of transactions.
How to check Client Balances
- Navigate to client balance on the left side bar
- Select Client Balance
- Click Customers/Suppliers/Others/All(This provides information of balances based on user selection)
- Search customer(This feature provides you financial records for individual customers)
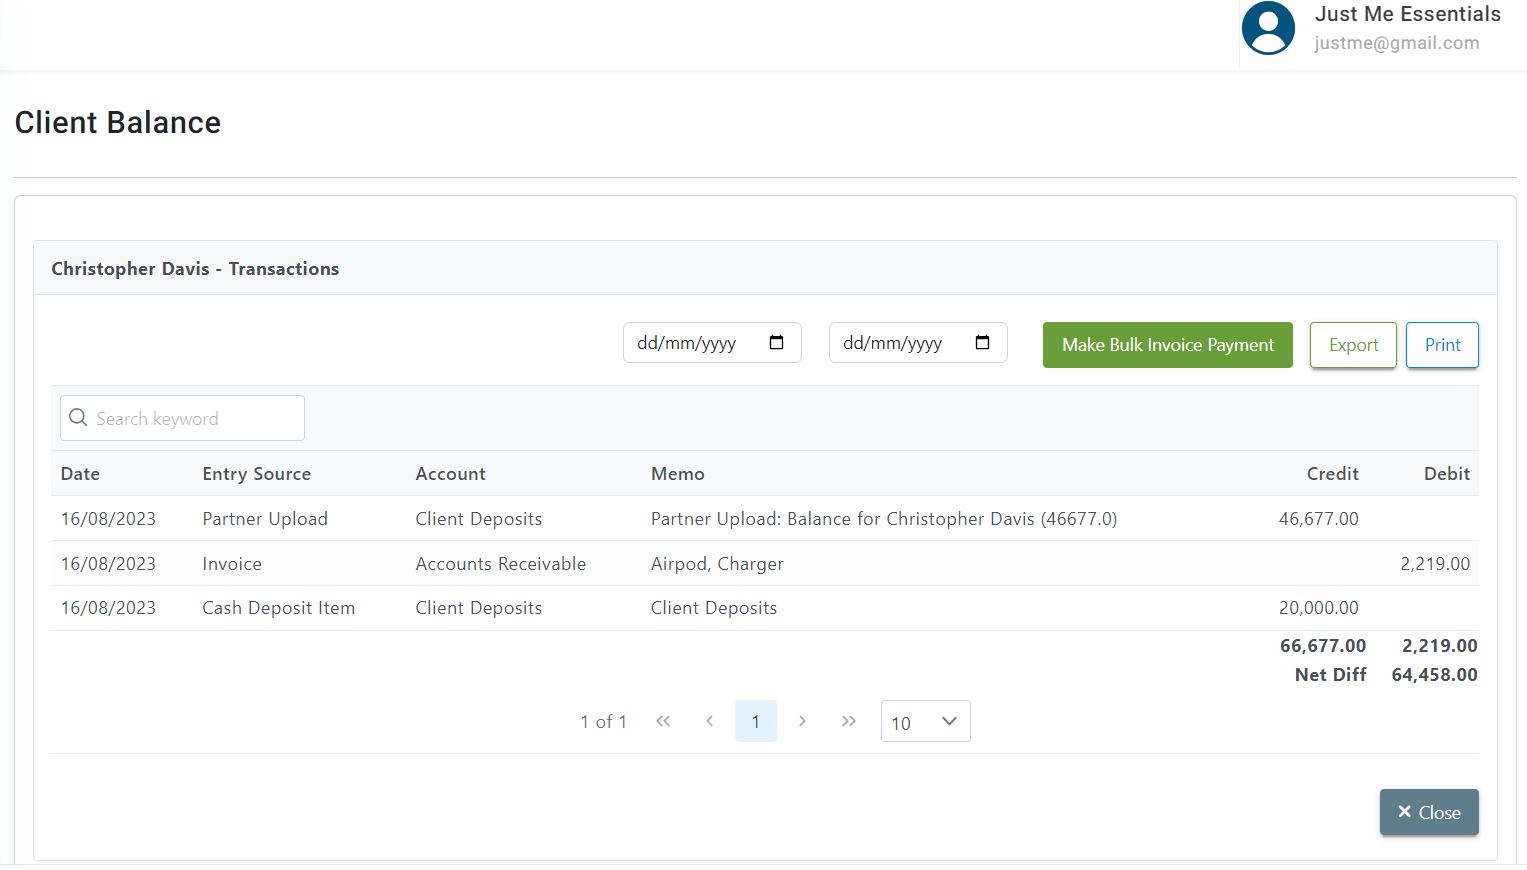
- Click on client's name
- View client balance
Uploading Client Balances
- Complete the Astra Partners Excel template
- Create a chart of account with the name Customer Deposits and Account type: Current liability
- Select Upload under Suppliers/customers
- Click on Account Options
- Complete all required fields
- Choose file (the completed Excel template)
- Upload and Save
Tracking Additional Customer Deposits
- Go to Deposits
- Select New Bank/Cash Deposits
- Under the Deposit Account, Select Cash in Hand
- Select the client who is making the deposit to the company
- Account – Select Customer deposits (the one you created in the charts of accounts)
- Description (if any)
- Amount (Enter the amount of money the customer gave)
- Save the changes
Confirming Customer Deposits
- Click on the Client Balances,
- Click on Customers
- Search customers name
- Click on Customer’s name
- Print statement (if necessary)
Other Actions of Client Balance
- View client balances
- Filter balances(customers, suppliers, others, all, and date)
- Searching for customers
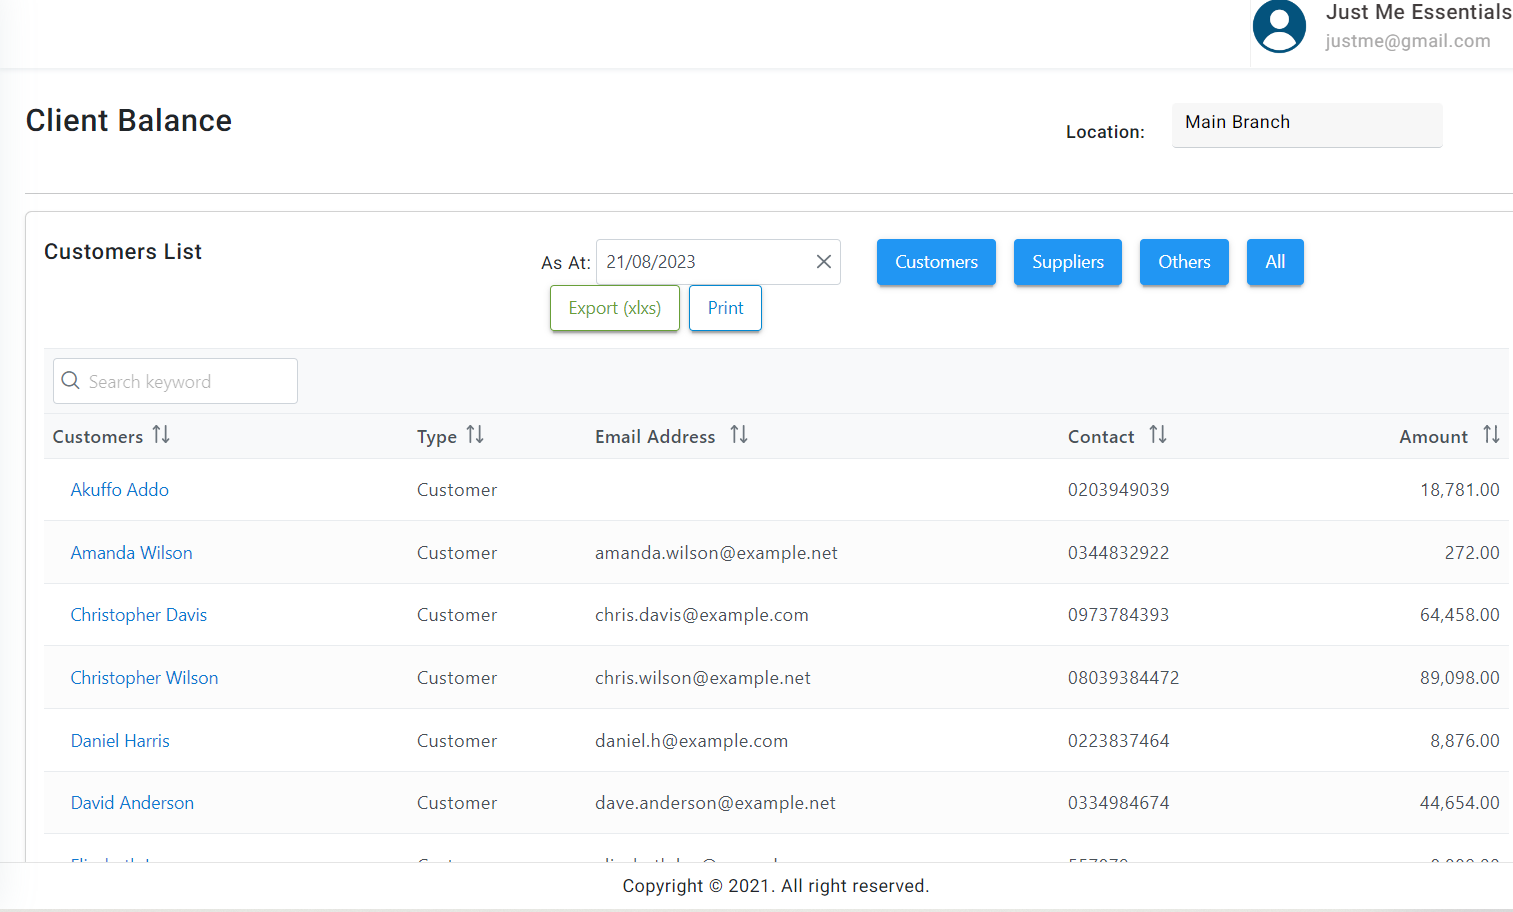
- Exporting balances
- Printing balances
Cash Register
The cash register feature in the inventory module of an ERP system enables efficient recording and tracking of financial transactions related to inventory operations. It provides a clear view of cash and bank transactions, ensuring accurate documentation and easy reconciliation for improved financial management.
Step-by-Step Guide to Using the Cash Register Feature
- Navigate to the Cash Register Section
- Select Location:Ensure you are operating in the correct location.
- Choose a Cash/Bank Account: Click on the dropdown menu labeled Cash/Bank Account. This will display a list of available cash and bank accounts.
- Select the appropriate account you want to manage or view transactions for.
- Choose the date for which you want to view or manage the cash transactions
Cash Transactions
- The Cash Transactions feature in AstraERP allows users to manage and track cash movements such as transfers, withdrawals, and deposits. This module is essential for maintaining accurate financial records and ensuring transparency in cash management. Below is a guide on how to use this feature effectively.
Components of Cash Transaction
Transaction List View
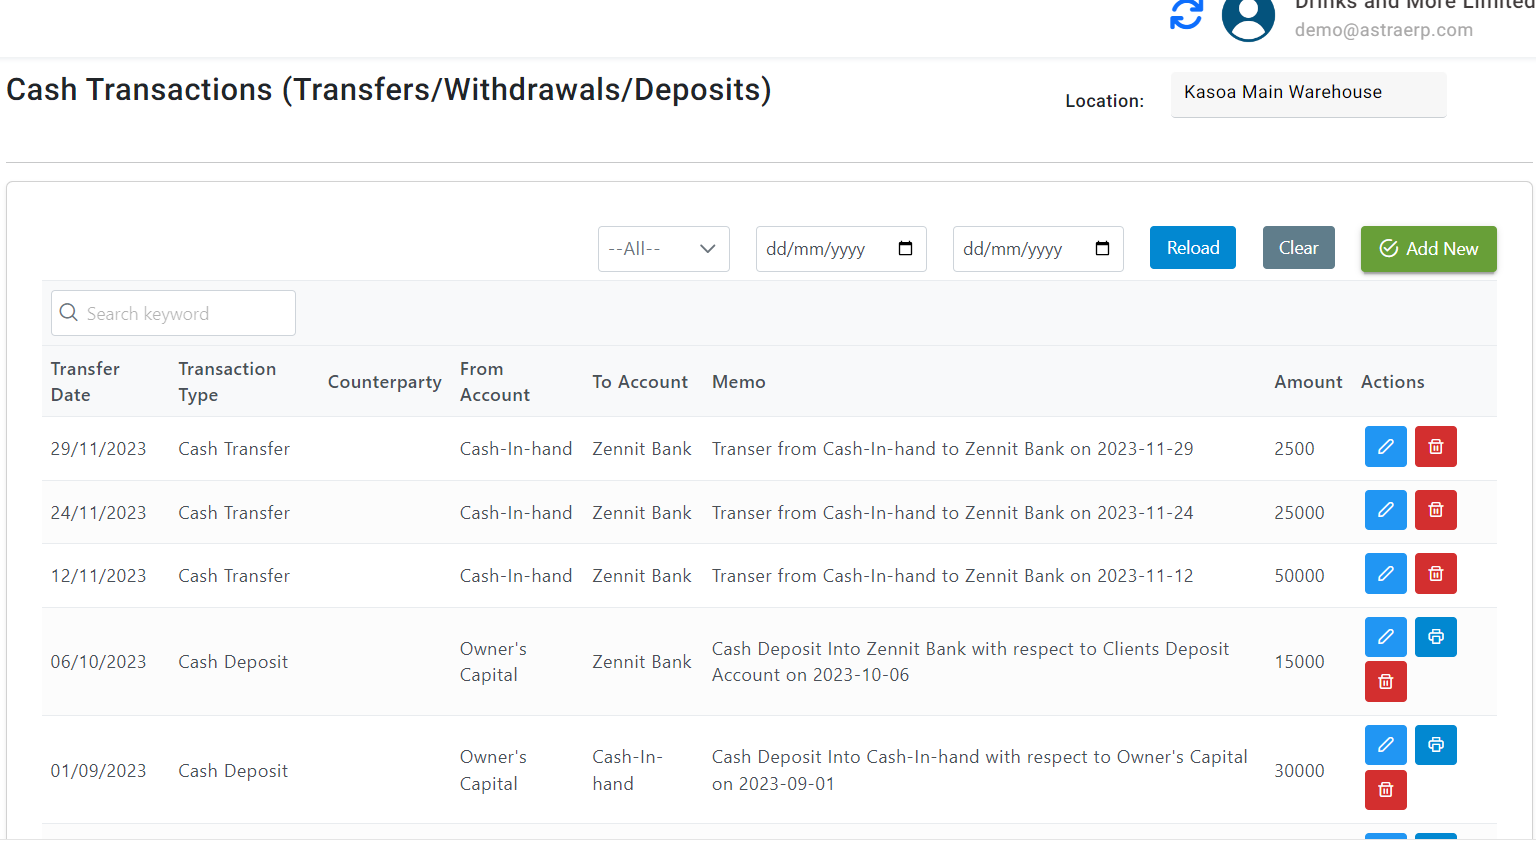
This is the main view where all cash transactions are listed. Each transaction record includes details such as the transfer date, transaction type, counterparty, from account, to account, memo, and amount. Users can also perform actions like editing or deleting transactions from this view.
Columns in the Transaction List:
- Transfer Date: The date when the transaction occurred.
- Transaction Type: Indicates whether the transaction is a cash transfer, withdrawal, or deposit.
- Counterparty: The other party involved in the transaction.
- From Account: The account from which cash is transferred or withdrawn.
- To Account: The account to which cash is transferred or deposited.
- Memo: A brief note or description of the transaction.
- Amount: The monetary value of the transaction.
- Actions: Options to edit or delete the transaction.
Filters and Search
- Search Keyword: A search bar to quickly find specific transactions by keywords.
- Date Filters: Options to filter transactions by date range.
- Transaction Type Filter: A dropdown to filter transactions by type (e.g., cash transfer, cash deposit).
Buttons and Actions
- Reload: Refreshes the list of transactions.
- Clear: Clears the current filters and search criteria.
- Add New: Opens a form to create a new cash transaction.
- Edit (Pencil Icon): Opens the selected transaction for editing.
- Delete (Trash Icon): Deletes the selected transaction.
How to Use the Cash Transactions Module
Viewing Transactions
- Navigate to the Cash Transactions module from the main menu.
- Use the search bar to find specific transactions by entering keywords.
- Apply date filters to view transactions within a specific time range.
- Use the transaction type filter to narrow down the list by type.
Adding a New Transaction
- Click on the "Add New" button.
- Fill in the transaction details in the form:
- Transfer Date: Select the date of the transaction.
- Transaction Type: Choose the type of transaction (cash transfer, withdrawal, or deposit).
- Counterparty: Enter the name of the other party involved.
- From Account: Select the account from which the cash is coming.
- To Account: Select the account to which the cash is going.
- Memo: Add a brief description or note about the transaction.
- Amount: Enter the amount of money involved.
- Click "Save" to add the transaction to the list.
Editing a Transaction
- In the transaction list, locate the transaction you want to edit.
- Click the pencil icon (Edit) next to the transaction.
- Update the transaction details in the form.
- Click "Save" to apply the changes.
Deleting a Transaction
- In the transaction list, locate the transaction you want to delete.
- Click the trash icon (Delete) next to the transaction.
- Confirm the deletion when prompted.
Example Transactions
- Cash Transfer: Moving funds from Cash-In-Hand to Zennit Bank.
- Cash Deposit: Depositing owner's capital into Zennit Bank or Cash-In-Hand.
- Cash Withdrawal: Withdrawing funds from Zennit Bank to Cash-In-Hand.
Sales
Credit/Cash Sales
The revenue side: raise a sale/invoice, stock reduces, the customer owes (or pays), the ledger records it.
Where: Inventory/Account → Sales · Fast counter sales: POS · Orders first: Sales Orders
- New sale: customer, date, then lines — product, quantity, price (discounts/taxes per your setup).
- Save/post: on-hand falls at the selling location; the invoice carries the balance until payment is received.
- Print/share the invoice; recurring arrangements use Recurring Sales; quotes start life as estimates/proforma and convert.
Sales orders → fulfilment → dispatch is the fuller pipeline for businesses that pick and deliver: order what's promised, fulfil what's picked, dispatch what leaves — with stock and paperwork aligned at each step.
Daily Sales Sheet
The daily sales sheet captures key sales data for each day, including the initial quantity in stock, quantity sold, amount sold. This sheet helps businesses maintain accurate sales records, streamline inventory management, and generate valuable insights for decision-making.
Steps to Use the Daily Sales Sheet
- Navigate to the Daily Sales Sheet Section
- Select Location and Date
- Record New Sales:Click the "Record Sales" button. This will open a new entry form where you can input sales data for that date.
- Add Sales Transactions: To add a sale, identify the product and enter the quantity to sell in the "Qty To Sell" field next to the desired product.
- Click the green "+" button in the "Action" column to record the sale.
- Repeat the process for other customers
- Close the page
Additional Actions
View Detailed Records
- Click the blue "View" button to see detailed sales records for a specific date. This will provide more granular information about each transaction.
Generate Cash Sale
- For each date, there is a "Generate Cash Sale" link. Click this link to create a cash sale entry for that day's sales transactions.
Actions
- Use the "Actions" dropdown menu for each date to access more options such as generating cash sale or deleting the sales records.
Recurring Sales
Recurring Invoice
This is an invoice that is sent to your customer in regular intervals of time.It can be created daily, monthly, weekly or a schedule can be workedout with the buyer.There is no change to the order information, customer information, product(s) ordered on the invoice itself.
How to create a recurring sale
- Go to Credit/Cash Sale
- Identify invoice you want to make recurring
- Click more and select Make recurring
- Complete all required fields
- Process and Save. ###Alternatively
- Go to recurring sale
- Select New Recurring Sale
- Complete all required fields
- Process and save
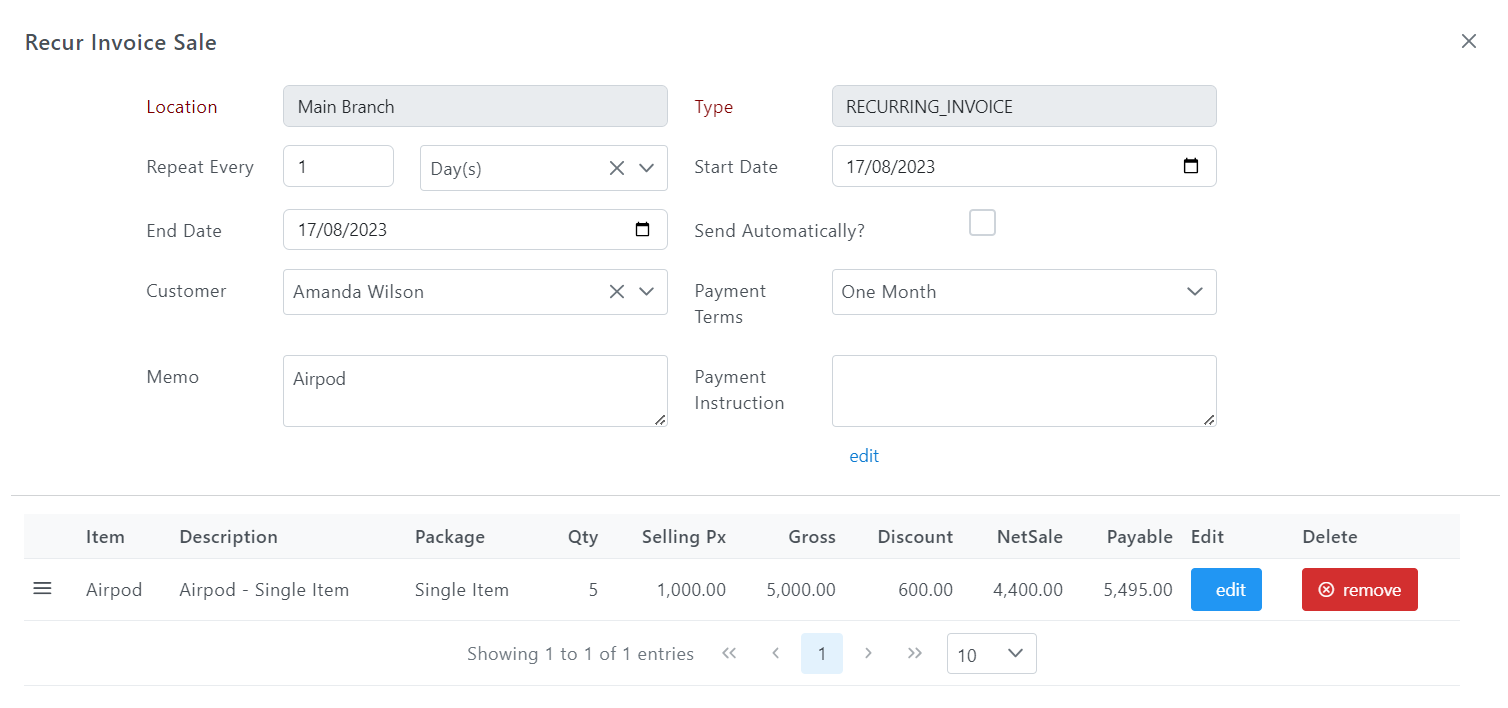
- After you create a recurring invoice, the next recurring invoice will be automatically generated over the period of ime set
- Stop a recurring invoice if you no longer wish to generate it
Other Actions in the Recurring invoice
- Filter Recurring Invoice
- Edit Recurring Invoice
- Printing Recurring Invoice
- Send Recurring Invoice to clients
- Deleting Recurring Invoices
Fulfill Sales
Fulfilling sales is completing the process initiated by a customer's purchase request. This process involves various steps from the moment a customer places an order to the point of delivering the product or service. When sales is done, all the records will show at the fulfill sales.
To fulfill sales
On the Account page, select sales
- Select fulfill sales
- Select Fulfill
- Select supply Entry
You can change the quantity to supply, if there is change in the quantity that was supply to the customer
- Select supply You can unfulfill or delete fulfill sales
- Select unfulfill
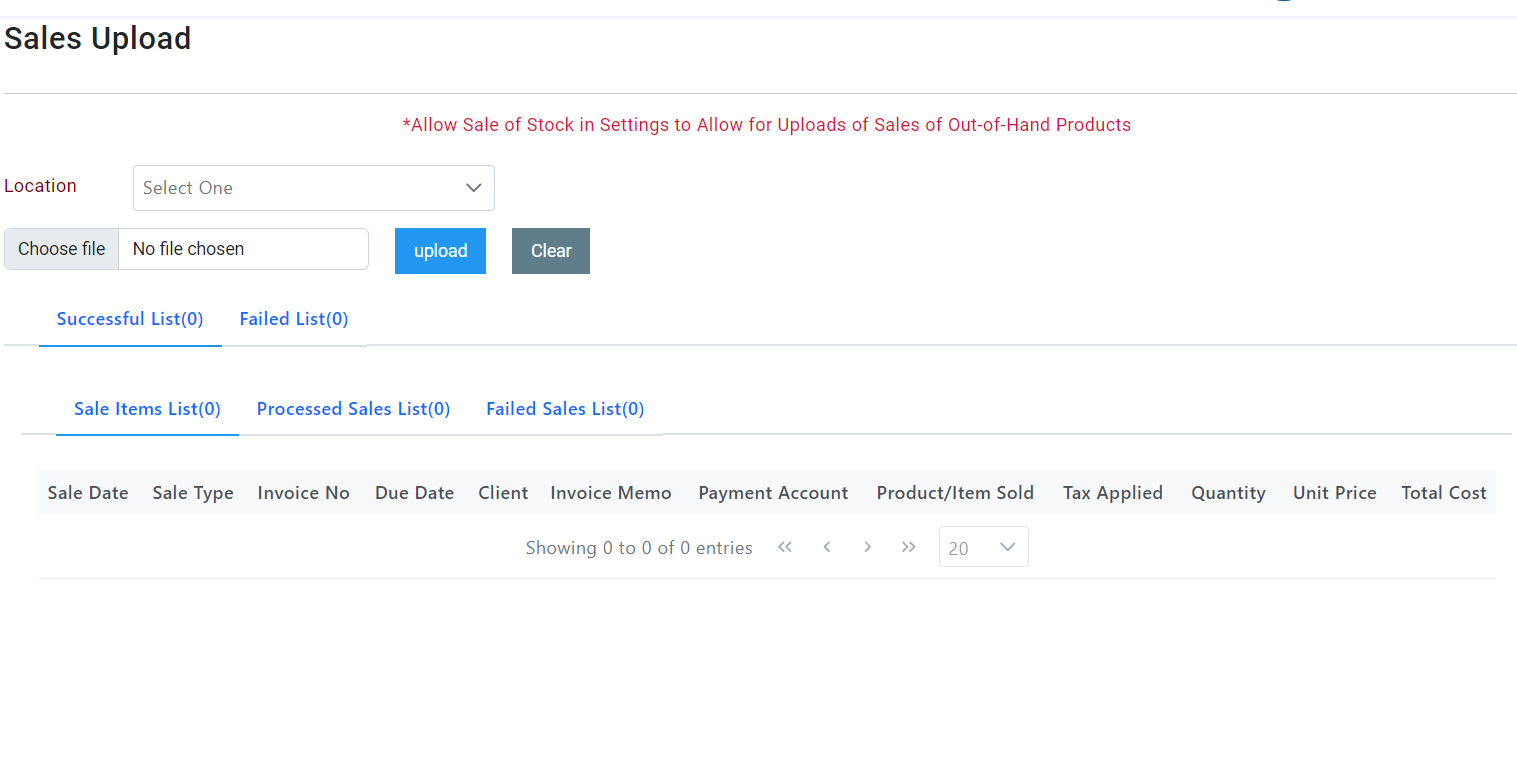
Sales Upload
- A powerful feature that allows users to upload sales data in bulk, manage the upload process and view the results. You will need to complete an Excel template in the right format before you start the upload process.
Steps to Upload Sales Data
- Select Location (if you have multiple locations in the system)
- Choose the appropriate location from the dropdown menu. This is required to proceed with the upload.
- Choose File
- Click on the "Choose file" button to open a file dialog.
- Select the file containing your sales data from your computer.
- Upload File
- After selecting the file, click the "Upload" button to start the upload process.
- Wait for the upload to complete. The interface will update to show the results.
- Review Results
- Check the Successful List tab to see the sales records that were successfully uploaded.
- Check the Failed List tab to review any errors and understand why certain records failed to upload.
- Clear File (Optional)
- If you need to upload a different file, click the "Clear" button to reset the file selection and start over.
Other Components of Sales Upload
Upload Results
- Successful List: This tab displayss the list of succeessfully uploaaded sales records
- Failed Lists: It shows the records that failed to upload, along woth error messages explaining the reason for the failure
Detailed Lists
- Sale Items List:This tab provides a detailed list of individual sale items included in the uploaded file.
- Processed Sales List: This tab displays a list of processed sales records.
- Failed Sales List:This tab shows detailed information about the sales records that failed to process.
Sales Data Table
- The sales data table is located at the bottom of the interface. This table displays detailed information about the sales records, including:
- Sale Date: The date the sale was made.
- Sale Type: The type of sale (e.g., cash sale, credit sale).
- Invoice No: The invoice number associated with the sale.
- Due Date: The due date for payment of the sale.
- Client: The client or customer to whom the sale was made.
- Invoice Memo: Additional notes or memos related to the invoice.
- Payment Account: The account used for receiving payment.
- Product/Item Sold: The product or item that was sold.
- Tax Applied: Any tax applied to the sale.
- Quantity: The quantity of items sold.
- Unit Price: The unit price of the item sold.
- Total Cost: The total cost of the sale.
Tips and Best Practices
- File Format: Ensure that your sales data file is in a compatible format (e.g., CSV, Excel) and follows the required template.
- Data Accuracy: Double-check the accuracy of your data before uploading to minimize errors.
- Error Handling: Use the Failed List tab to identify and correct any issues with your sales data. Correct the errors and re-upload the corrected file.
- Settings: Enable the "Allow Sale of Stock" option in the settings if you need to upload sales of out-of-hand products.
Estimates/Quotes/Proforma
Estimates
- An estimate is an approximate calculation of the cost of a project or order. It provides a rough idea of the potential expenses based on the available information. Estimates are used to give clients an early indication of the costs involved in a project or purchase. They are often preliminary and subject to change as more details become available
Quotes
- A quote is a formal document that specifies the exact cost for goods or services. Quotes provide a fixed price for a specific period, allowing clients to understand the exact cost before committing to a purchase.
Proforma
- A proforma invoice is a preliminary bill of sale sent to buyers before delivery of goods. It outlines the terms of the transaction and the amount due. Proforma invoices are used to declare the value of goods and to inform the buyer of the amount to be paid.
Managing Estimates/Quotes/Proforma
- Go to the "Estimates/Quotes/Proforma" section in your Inventory
- Select between Proforma Invoices, Quotes, and Estimates
- Complete all required fields
- Process and Save page
Actions Menu
- Click on the "More..." button in the "Action" column to perform various actions on a record:
- Edit: Modify the details of the record.
- Duplicate: Create a copy of the record.
- Generate Invoice: Convert the record into a formal invoice.
- Send to Client: Email the record to the client.
- Print (GHS): Print the record in Ghanaian Cedi currency format.
- Delete: Remove the record from the system.
Exporting Data.
- Use the "Export (xlsx)" button to download the records in Excel format for further analysis or record-keeping.
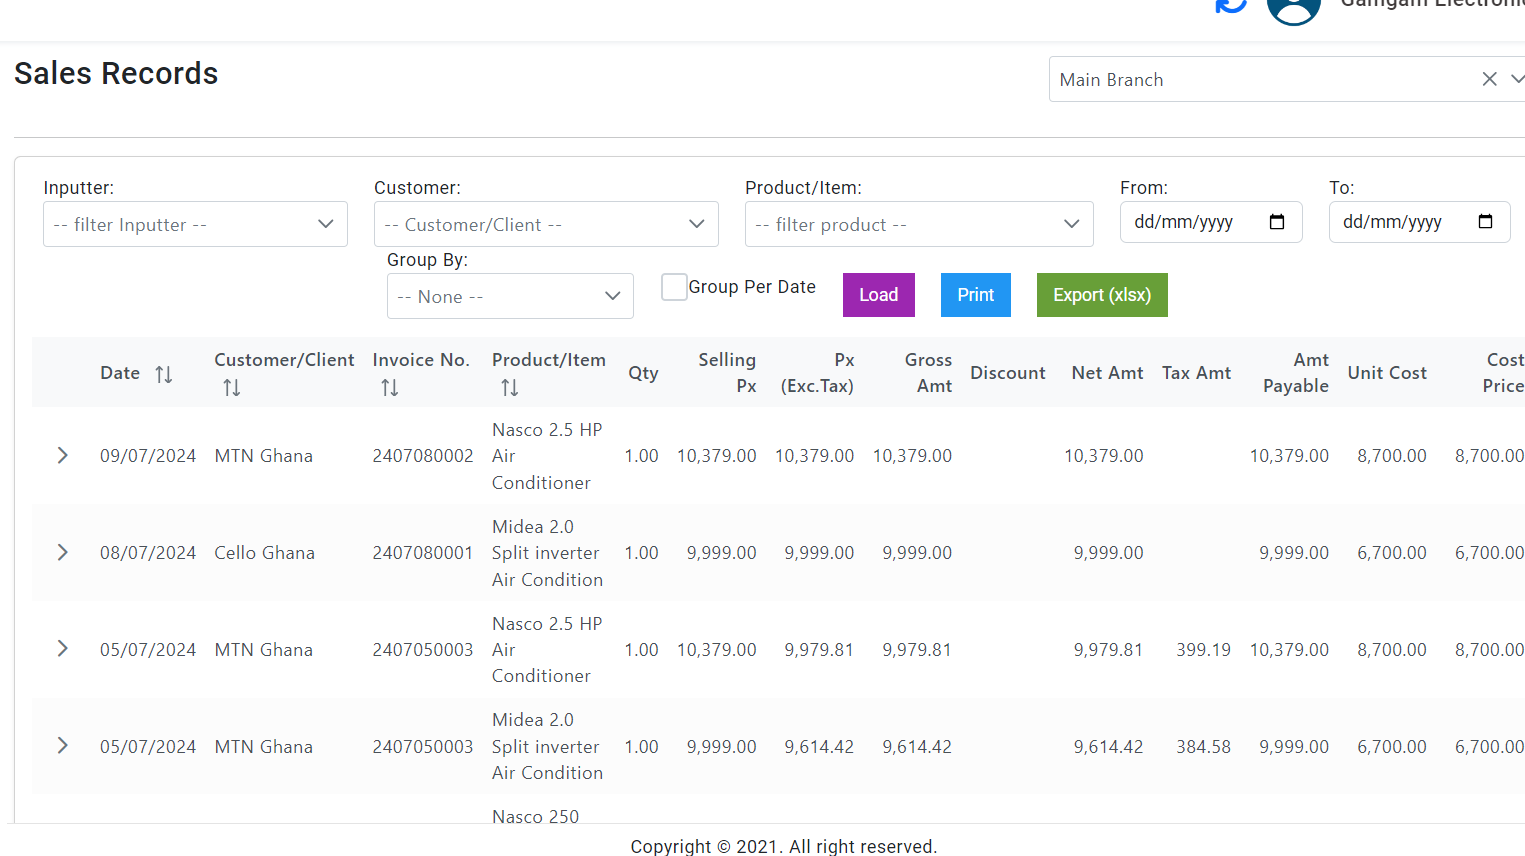
Sales Records
The Sales records in AstraERP provides a comprehensive view of all sales transactions. This page offers a detailed explanation of the feature, allowing users to efficiently manage and analyze sales data.
Components of Sales Records
- Filter Options
Inputter: Filter sales records by the person who entered the data. Customer/Client: Select a specific customer to view sales related to them. Product/Item: Filter sales records by specific products or items. Group By: Group the sales records by a selected criterion (e.g., date, customer). Date Range (From/To): Specify the date range for the sales records you want to view. Group Per Date: Check this option to group sales records by date.
- Actions Buttons
- Load: Click this button to apply the selected filters and load the corresponding sales records.
- Print: Click this button to print the displayed sales records.
- Export (xlsx): Click this button to export the displayed sales records to an Excel file.
Steps to View and Manage Sales Records
- Applying Filters
- Filter by Inputter: Select an inputter from the dropdown to view sales entered by a specific person.
- Filter by Customer/Client: Choose a customer from the dropdown to view their sales transactions.
- Filter by Product/Item: Select a product from the dropdown to see sales records for that specific item.
- Set Date Range: Use the date pickers to set the start and end dates for the records you want to view.
- Group Sales Records: Choose a grouping criterion from the "Group By" dropdown, if desired, and check "Group Per Date" if you want to group records by date.
- Loading Records
- After setting your desired filters and grouping options, click the "Load" button to display the sales records that match your criteria.
- Printing Sales Records
- To print the displayed sales records, click the "Print" button. A print dialog will appear, allowing you to choose your printing preferences.
- Exporting Sales Records
- To export the displayed sales records to an Excel file, click the "Export (xlsx)" button. The file will be downloaded to your computer for further analysis or record-keeping.
Payments Received
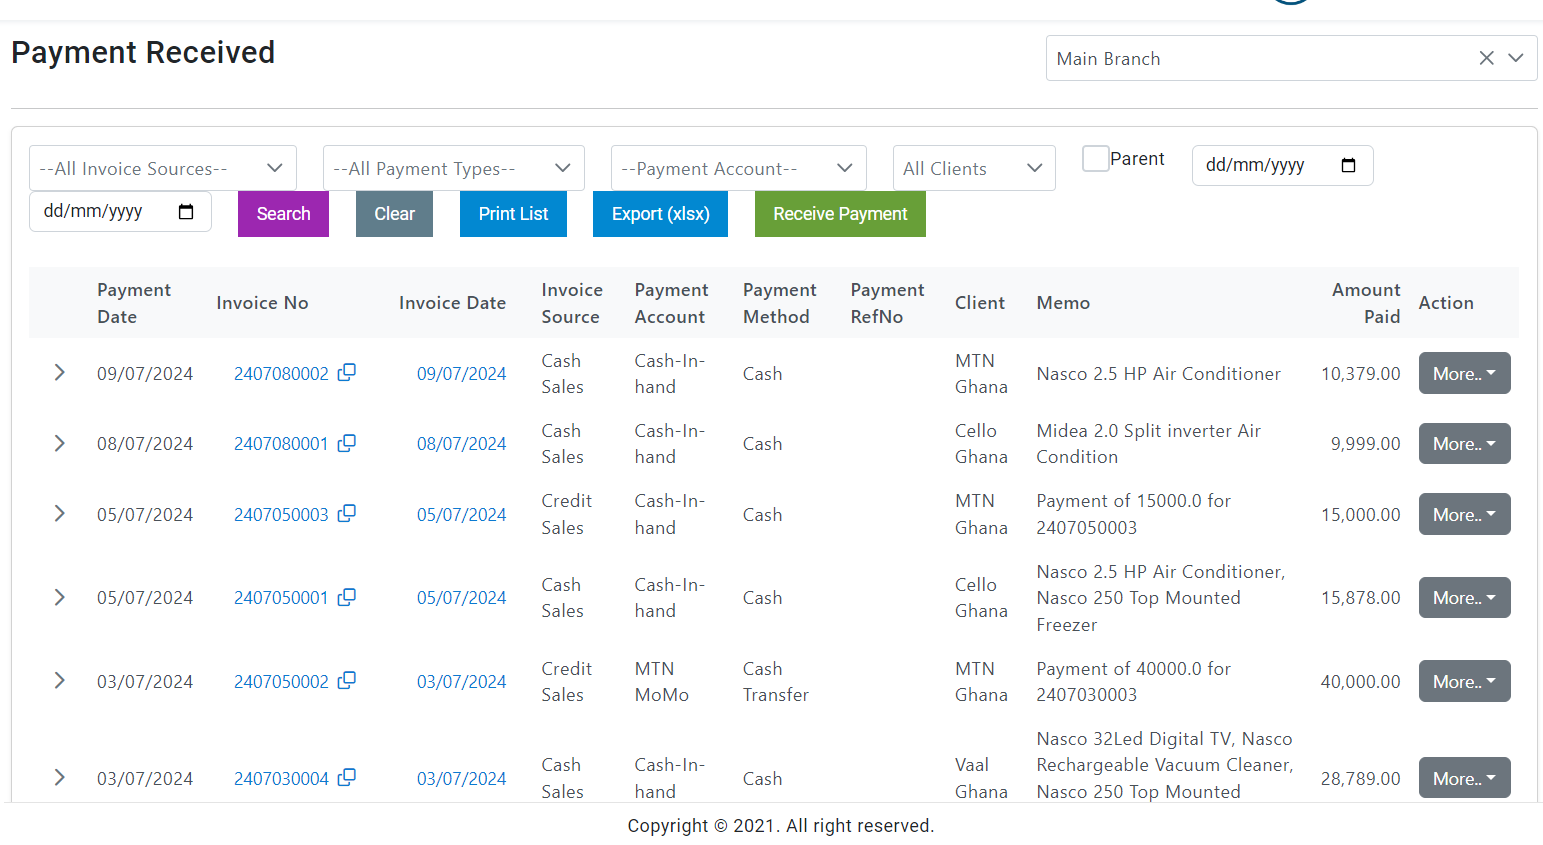
Overview - Payments Received
Payment received allows you to view all the payments you have recieved from your customers. You can view the payments recorded for your invoices.
Basic Functions in Payments Received
- View Payments Received
- Record Payments Received
- Print Payments Received
- Email Payments Received
Manage Payments Received
- Filter payments by:
- All invoice sources
- All payments types
- All clients
- Payments account
- Custom view
Other Actions for Payments Received
- Print payments received
- Download as PDF
- Mail payments Received
How to Receive Payment
- Go to Payments Received
- Select Receive Payment
- Select Counterparty (This automatically generate the counterparty deposits and all of its outstanding invoices)
- Enter amount of money you are recieving
- Indicate the Payment Account
- Make payment
Products & Services
Simple View
Editing product information
- Navigate to Product/Services
- All products are displayed
- Search product by entering the product name in the search keyword.
- Click on the blue pencil icon button
- User can edit any of the following information
- Product name
- Description
- Product Category
- Accounting Information (Sales Information; Purchase Information; Inventory Information)
- Save Changes
Adding new product package
- Navigate to Product/Services
- Search the product
- Click on the yellow plus icon button
- Complete all fields
- Save Changes
Converting Non-Trackable product to Trackable
- Navigate to Product/Services
- Identify the product you want to converting by searching
- Click on the grey double arrow icon
- Select (Yes) in the pop up
Merging Duplicate Products
- Navigate to Product/Service
- Search Product you want to merge into
- Click on the green rotating arrows
- Select Merge with
- Click Merge Products
Advanced View
The catalogue record everything else references.
Where: Inventory → Products → Add
| Field group | What it holds |
|---|---|
| Identity | Product code, name, description, product group/category, unit of measurement |
| Pricing | Selling price(s); cost tracks from receipts |
| Behaviour | Whether it's stocked (tracked on hand) vs a simple/service item; package definitions for bundles |
| Images | Product picture for POS/lists |
Simple products (services, non-stocked charges) skip stock tracking but still sell and post income. Packages bundle components into one sellable unit; component stock moves when the package sells.
Bulk alternatives: product upload for the catalogue, price upload for repricing.
Inventory Management
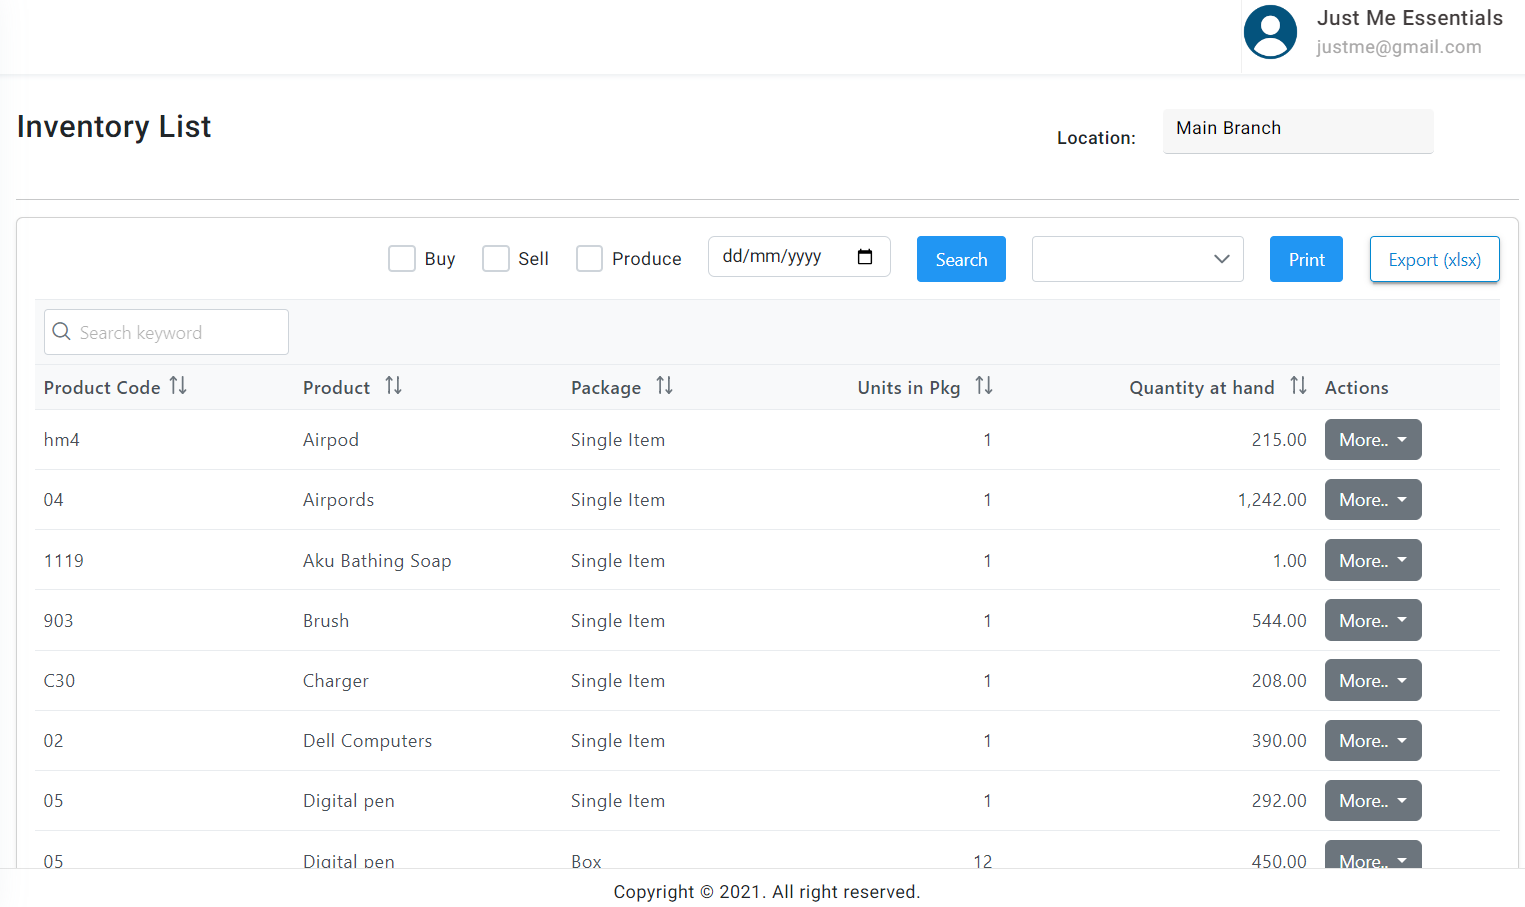
Inventory List
This is a detailed page that provides an organised and systematic account of all your productsIt serves as a reference point for tacking and managing stock at any given time
Our inventory list has the following information:
| Field | Description |
|---|---|
| Product code | A unique identifier assigned to a specific product in your inventory |
| Product Name | This is the name or title of the product |
| Package | This field indicates how the product is packaged or sold |
| Units in Package | This tells you how many individual units of the product are included in a single package. |
| Quantity at hand | This represents the current stock level or inventory of the product that you have on hand or in your warehouse. |
How to view the quantity of goods in stock
- On the inventory module, select inventory listing
- Select the Warehouse and Load
Receive Stock
Goods in the door → counted on hand → cost in the books.
Where: Inventory → Receive Stock · History under Stock Receipt History
- Choose the supplier and (ideally) the purchase order — lines prefill with outstanding quantities.
- Enter what actually arrived: quantities and unit costs per product, into the receiving location.
- Post. On-hand rises at the location, item costs update, and the supplier liability posts to Accounts (the bill side).
Partial deliveries: receive what came; the PO keeps the balance open. Wrong goods? Don't force it through — receive what's right and take the rest up with the supplier.
Stock Taking
The periodic full count: freeze a moment, count the shelf, reconcile.
Where: Inventory → Stock-taking
- Start a count for a location — the sheet lists expected on-hand per product.
- Enter counted quantities (count blind if you can — enter what's on the shelf, not what the screen says).
- Review variances; post the reconciliation — differences become adjustments with the stock-take as their reason.
Little and often beats annual heroics: cycle-count the fast movers monthly.
Converted Stock Records
Turning one product into another in stock terms: breaking bulk (a carton into pieces), repacking, or simple assembly — source quantity down, output quantity up, values carried.
Where: Inventory → Stock Conversion
Define the conversion (from-product, to-product, ratio), enter the quantity converted, post. For made-to-order production with estimates and orders, see Manufacturing.
Stock Adjustment
Correcting the system's count to match reality: breakage, spoilage, count corrections, write-offs.
Where: Inventory → Stock Adjustment
Pick the location and product, enter the adjustment (up or down) with its reason, post. The stock ledger and the books move together; the reason is what the auditor reads. For a full recount use Stock-taking; for moving stock between locations use Transfers.
Stock Receipt History
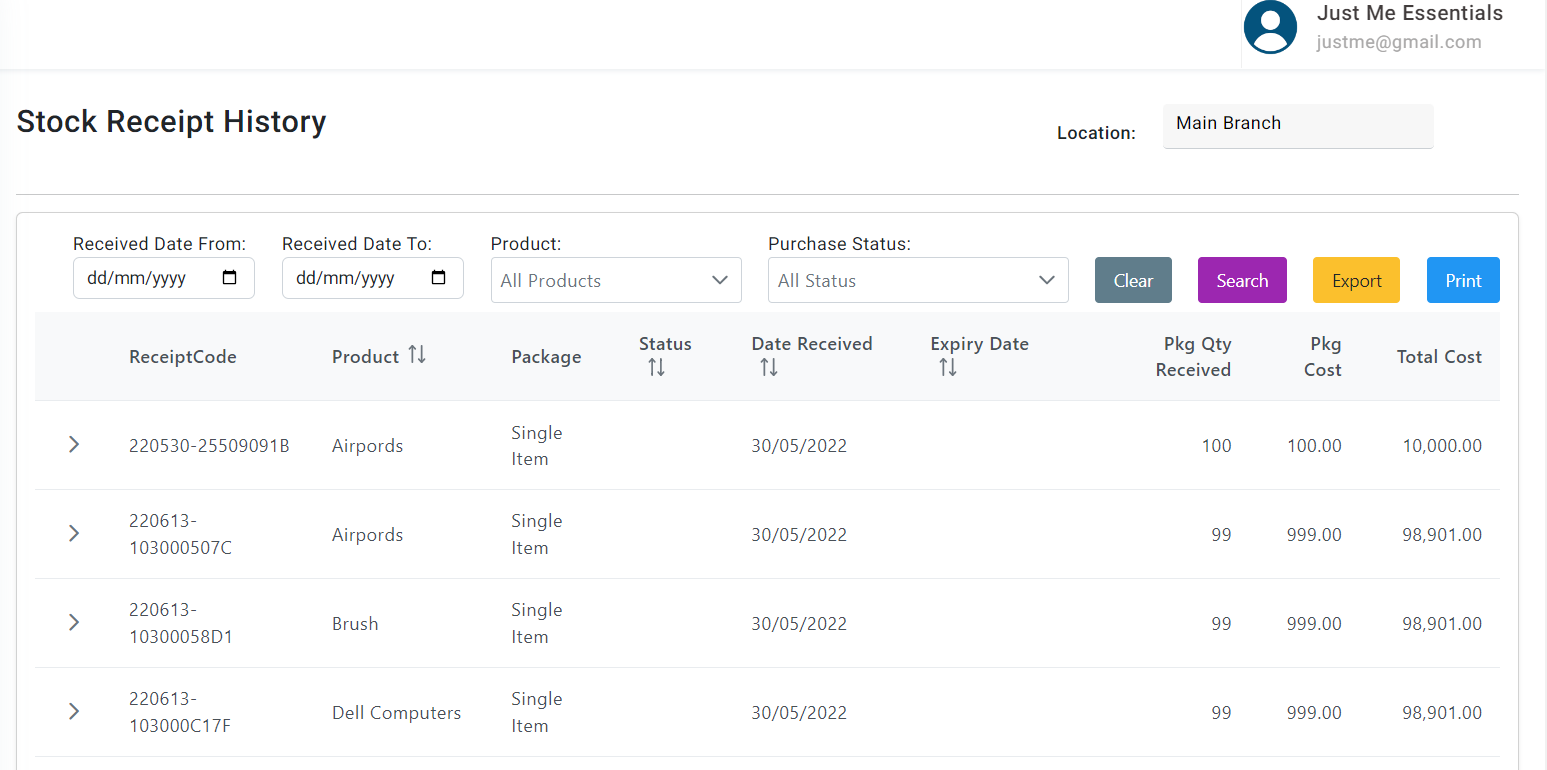
The stock receipt history is a record that track the historu of stock or inventory items as they are received into the business. It provides a chronologial account of when and how stock was received, including details such as quantities, dates and statuses of the purchase
Key Components of Stock Receipt History
- Date: The exact date of each stock receipt event
- Item Details:Information about the specific items received
- Quantity Received: The number of units or items received in each transaction
- Location: The physical location within the organisation where the stock was received, which is particularly important for businesses with mulitiple warehouses
- ReceiptCode: The Serials numbers for traceability
- Package Cost: The cost per unit of each item received. This is essential for calculating the total cost the received stock.
- Total Cost: The total cost of the received stock, which is calculated by multiplying the quantity received by the package cost
How to view every stock received from Suppliers
- Select Stock Receipt History
- Choose a warehouse (If you have multiple locations)
- Search by Date , Product, Purchase Status
Inventory Journal
Overview
Record of the movement of inventory items in and out of the company's possession as well as any adjustments made to the inventory account. Inventory journal entries include purchases of stock, sales, stock adjustments, stock returns and all other inventory-related transactions.
View Records
- Navigate to Inventory Journal
- All journal records are updated automatically.
Filter Records
Product
Date
Entry Type
- Sales
- Purchase
- Production item
- Production Material
- Purchase Order
- Stock Upload
- Stock Receipt
- Stock Adjustment
- Stock Taking
- Inventory Transfer
Inventory Journal Reposting
There may be rare situations where transactions may not be posted in the inventory journal, consequently affecting your inventory reports. If you encounter situations like that,
- Navigate to Inventory Journal
- Click Inventory Journal Reposting (under the inventory journal records)
- Select date range
- Click Repost
Inventory Transfer
Moving stock between locations without touching totals: out of one, into the other, one documented movement.
Where: Inventory → Transfers
Choose source and destination locations, the products and quantities, post. Both locations' on-hand update; the transfer document is the trail.
Transactions
Purchase Order
What you've asked a supplier to deliver — the document receiving checks against.
Where: Inventory → Purchase Orders
- New PO: supplier, expected date, then lines — product, quantity, cost.
- Send/print it; the PO sits open with its expected quantities.
- When goods arrive, receive against it — full or partial; the PO tracks received vs outstanding until closed.
Buying without a PO is possible (direct receipt), but POs are what make receiving checkable — three-way honesty between what was ordered, delivered and billed.
Sales Order
A sales order is the process of selling goods or services from a seller to a buyer. It serves as a formal request made by a customer to purchase products or services from a company. The sales order is typically created by the buyer, although in some cases, it may also be generated by the seller based on a verbal or written request from the customer.
To create sales order
On the Account page, select sales
- Select Sales Order
- Select New Sales Order
- Complete required fields
To Fulfill sales order,
- Select More
- Select Fulfil Order
- Select Fulfill All, if you want to fully fulfill the sales order or partially full sales order
- Select save
- Select Yes, if you want to generate invoice from the sales order
- Select No, if you dont want to generate invoice
Manufacturing
Manufacturing Order
Overview
The Manufacturing Order (MO) feature is designed to plan, coordinate, and control various aspects of the production process to ensure efficient and effective manufacturing operations. This feature allows you to outline the specific details and instructions required to produce a particular product in an organized manner.
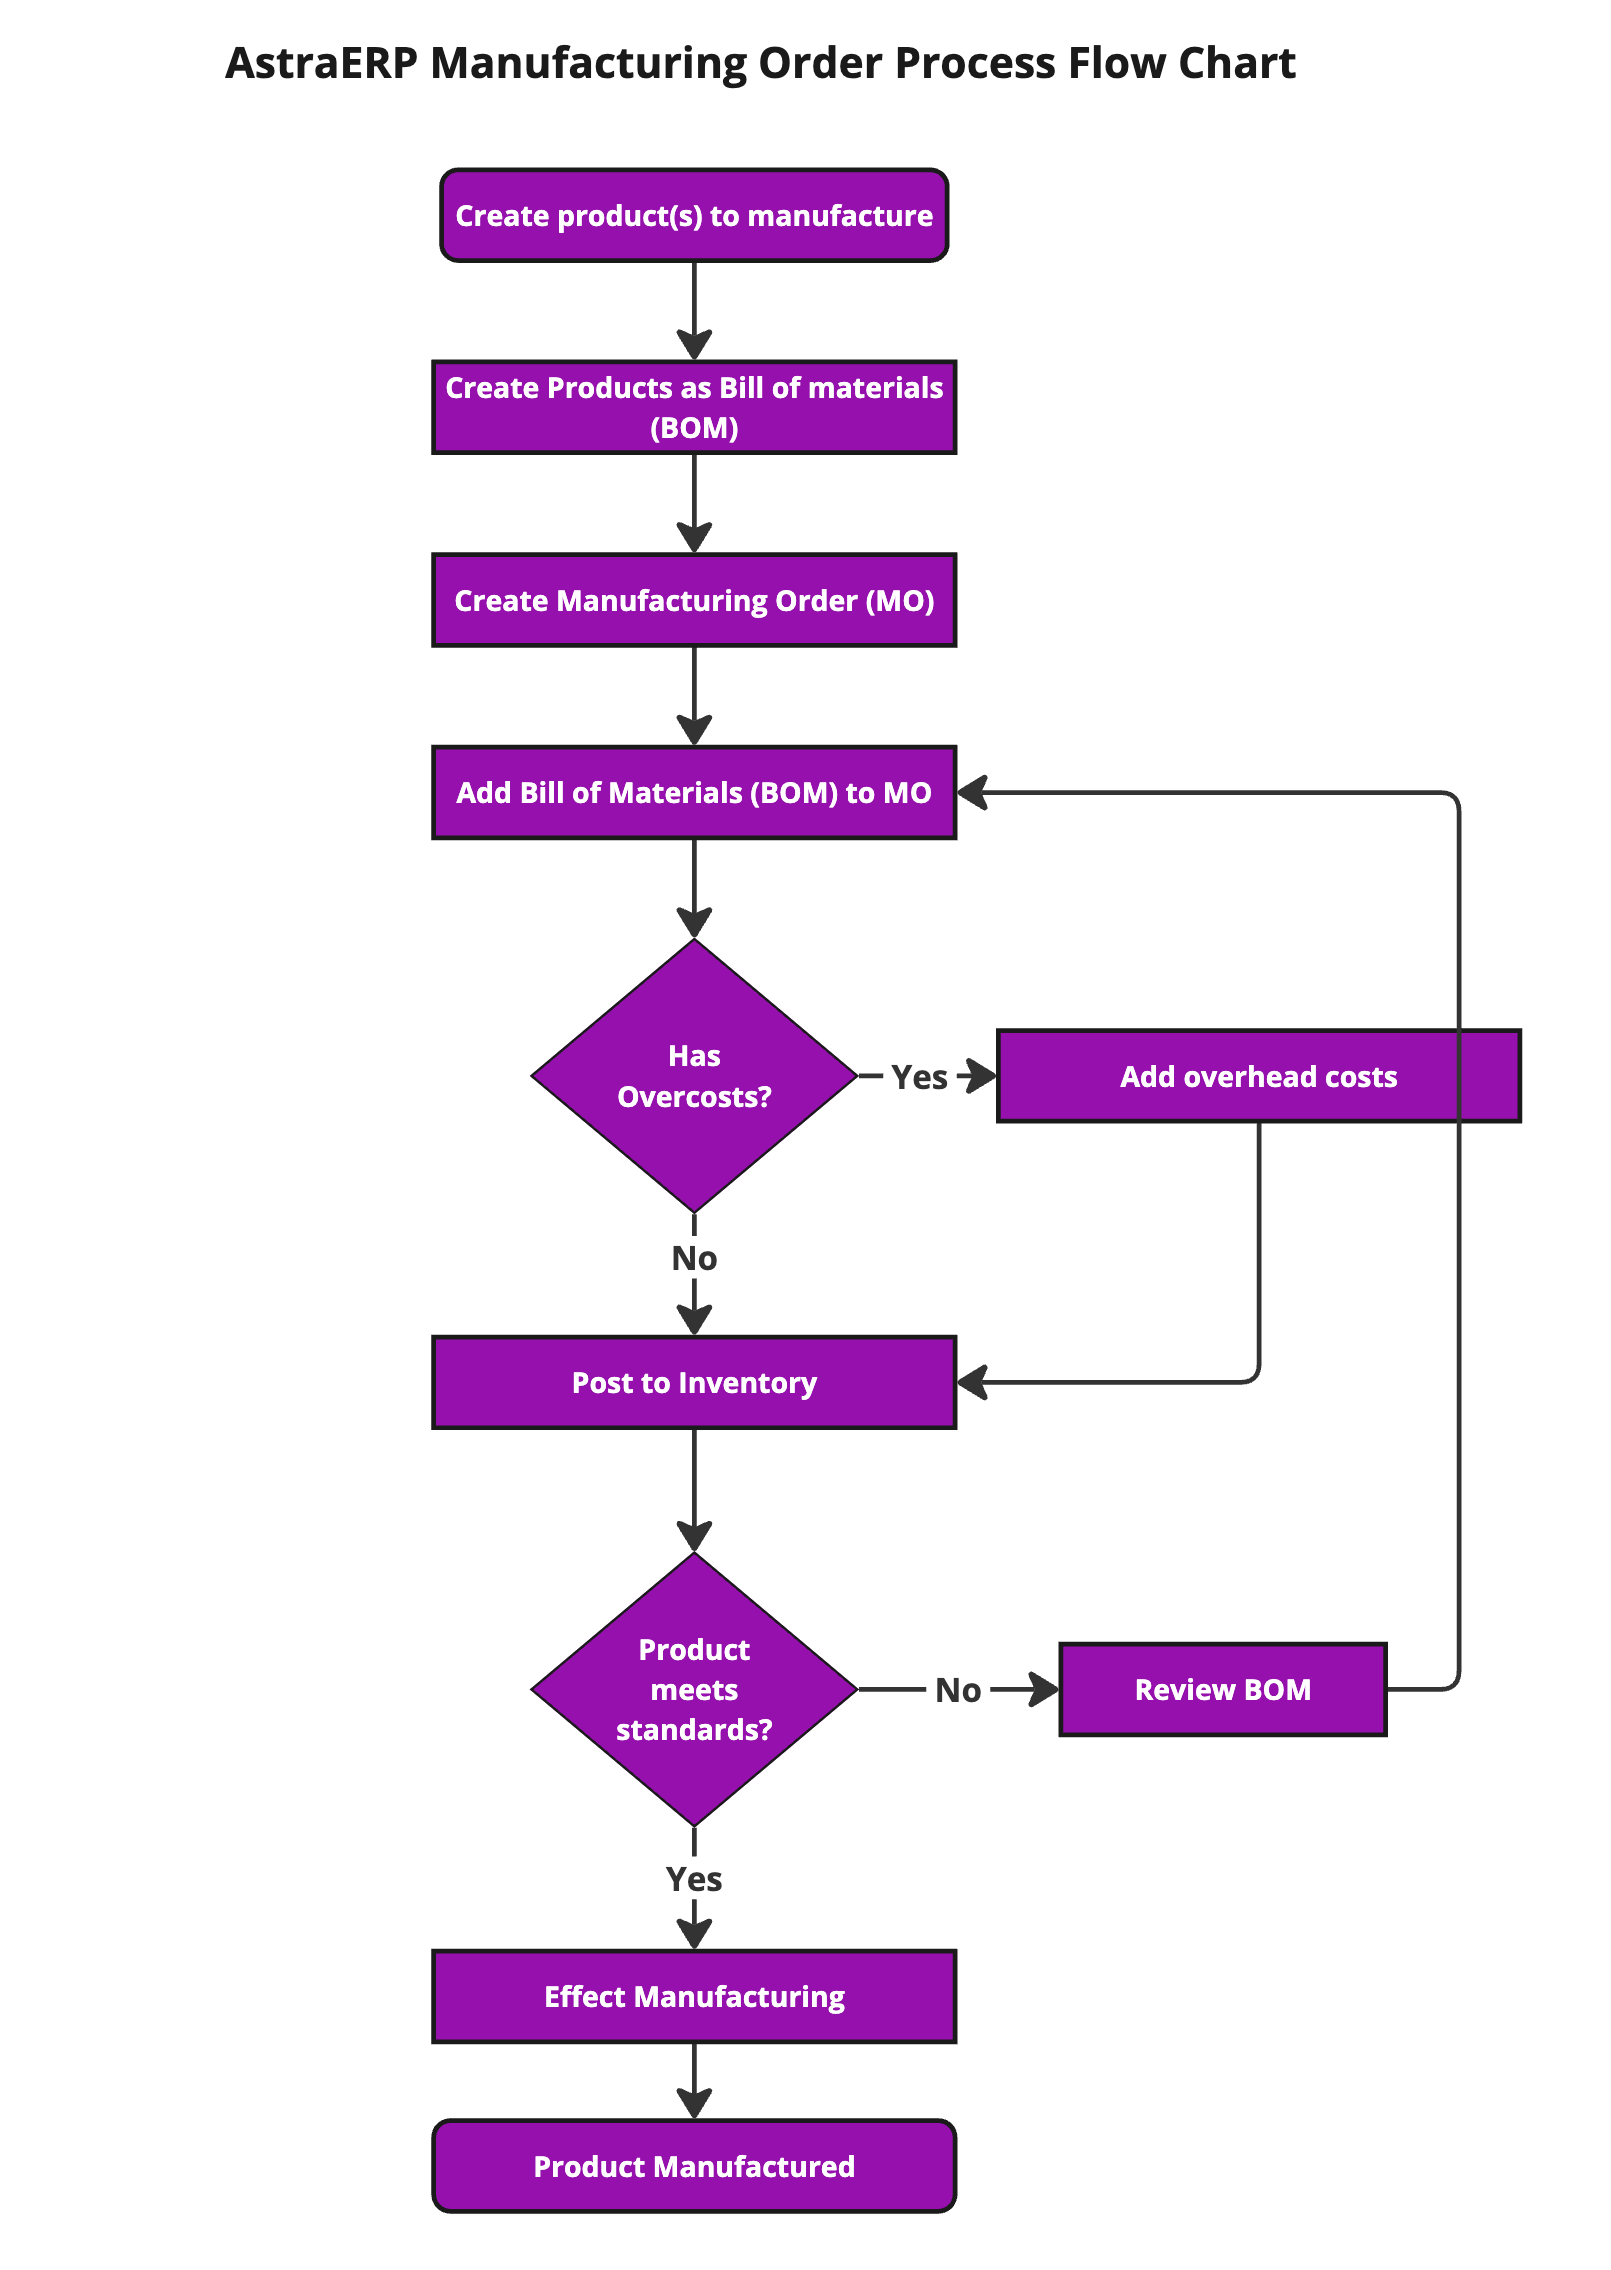
Key Components and Functions
- Location: The location where the product will be manufactured.
- Batch Number: A unique identifier assigned to the Manufacturing Order.
- Memo: A brief note or description about the product being manufactured.
- Transfer to Location after Manufacturing: This option is necessary if you have designated separate locations within the system for handling manufacturing and sales.
- Product: The product(s) to be manufactured. Only products that have been created with the label 'produce' can be selected.
- Quantity to Produce: The quantity of the product that is to be manufactured.
Creating a Manufacturing Order for Product(s)
To create a Manufacturing Order, follow these steps:
- In the Inventory Module, navigate to Manufacturing > Manufacturing Order.
- Enter the required data for the following fields:
- Location: Specify the manufacturing location.
- Order Date: Enter the date for the manufacturing order.
- Batch Number: Provide a unique batch number for the order.
- Memo: Add any relevant notes or descriptions.
- Product: Select the product(s) to be manufactured.
- To save the Manufacturing Order, click the Save and Continue button.
- After successfully saving the order, the Manufacturing Order listing page will open.
- New Manufacturing Orders have the Order Status of Planning.
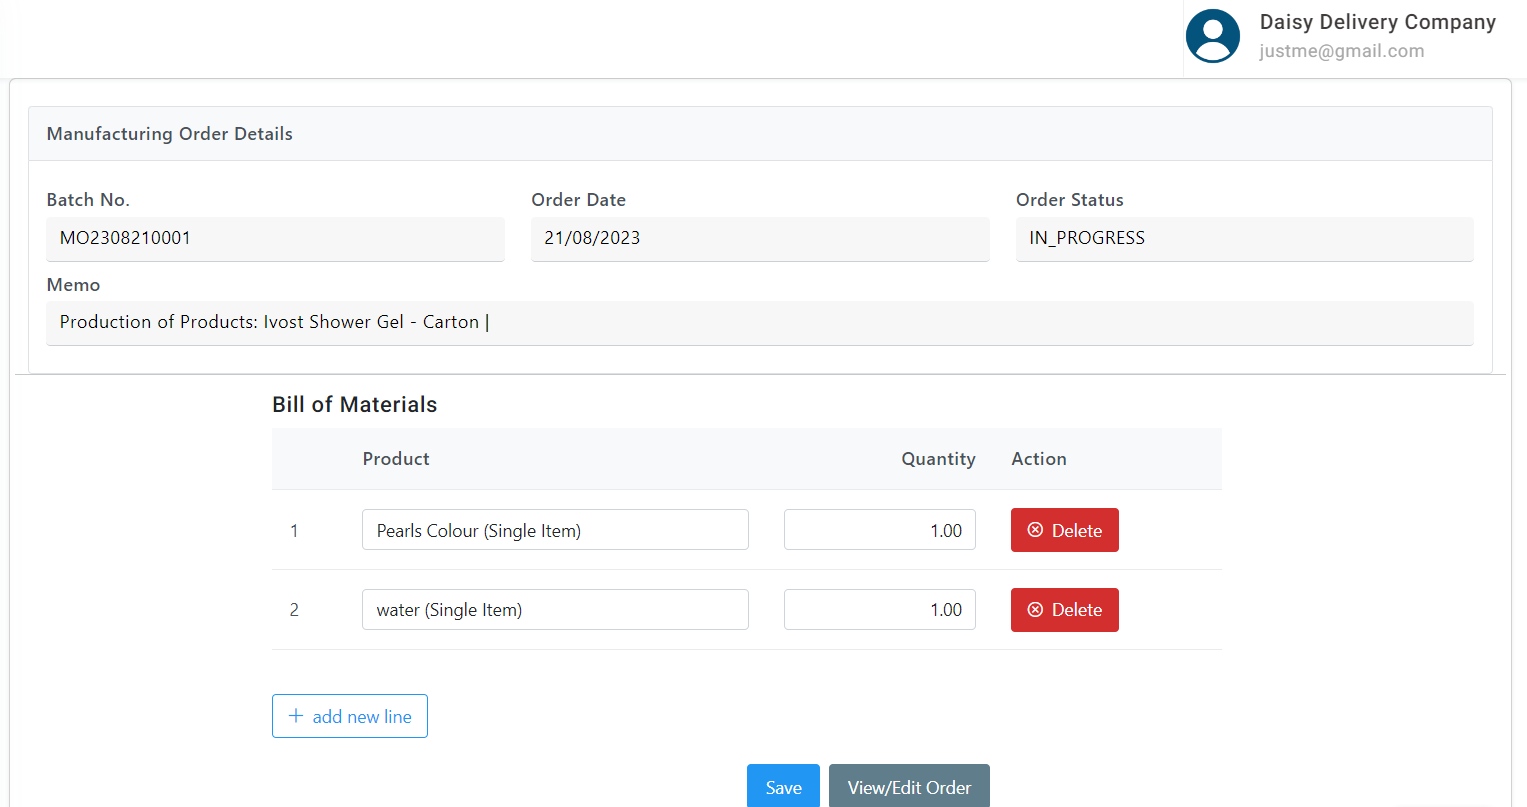
Editing a Manufacturing Order
To edit an existing Manufacturing Order:
- On the Manufacturing Order listing page, locate the order you want to edit.
- Click the Edit button next to the Manufacturing Order.
- Modify the fields as needed, such as Location, Order Date, Batch Number, Memo, or Product.
- After making the necessary changes, click the Save and Continue button to update the Manufacturing Order.
- The updated Manufacturing Order will be reflected in the listing page with the changes applied.
Bill of Materials (BOM)
Overview
The Bill of Materials (BOM) is a detailed list of all the raw materials required to manufacture the final product. It specifies the quantities of each item necessary to produce the order quantity specified in the Manufacturing Order.
Adding a Bill of Materials to the Manufacturing Order
To add a Bill of Materials to an existing Manufacturing Order, follow these steps:
- On the Manufacturing Order listing page, click on the MO (Manufacturing Order) for which the BOM needs to be added.
- You will be directed to the BOM page. Here, you can add the required raw materials and any associated costs:
- Select Product (Raw Material): Choose the raw material that will be used in the manufacturing process.
Only products labelled Buy/Sell can be selected. When the product(s) are tracked, there should be enough stocks for the product.
- Add Quantity Needed: Enter the quantity of the selected raw material required for the production.
- Select New Line to Add More Products (Raw Materials): Continue adding raw materials by selecting a new line for each additional product.
- Overhead Costs: If applicable, add any overhead costs associated with the manufacturing process, such as:
- Labour
- Water
- Electricity
- Others
- Once all the required information is entered, click Save to add the Bill of Materials to the Manufacturing Order.
Post to Inventory
Overview
Posting to Inventory is the final step in the manufacturing process. This action updates the stock levels to reflect the completion of the manufacturing process and the availability of the final product.
Steps to Post to Inventory
- On the Manufacturing Order listing page, locate the Manufacturing Order (MO) that has completed the manufacturing process.
- Click on Post to Inventory next to the relevant MO.
- You will be directed to a review page. Carefully inspect the details, including the MO products and the Bill of Materials (BOM).
- Once you are satisfied with the reviewed information, click on Effect Manufacturing to complete the process. This action will update the inventory levels to include the newly manufactured products.
Status Tracking
Overview
Throughout the manufacturing process, the status of the Manufacturing Order (MO) is updated to reflect its progress. This status tracking helps in monitoring and managing the different stages of production.
Status Information
Planning/Pending Order:
- This initial status indicates that the Manufacturing Order has been created and is awaiting the start of the manufacturing process.
In Progress:
- The "In Progress" status indicates that the manufacturing order has been initiated, and the production process is currently ongoing.
Completed:
- The "Completed" status signifies that the manufacturing order has been fully processed and finished. The final product has been manufactured, and the stock levels have been updated accordingly.
Manufacturing Order Color Indicators
The Manufacturing Order (MO) listing page uses color labels to indicate the status or condition of each order:
- Pending Order: Light Blue
- Profit Margin Less Than 0%: Light Red or Pinkish Red
- Profit Margin Greater Than 100%: Light Yellow
Manufacturing Analysis
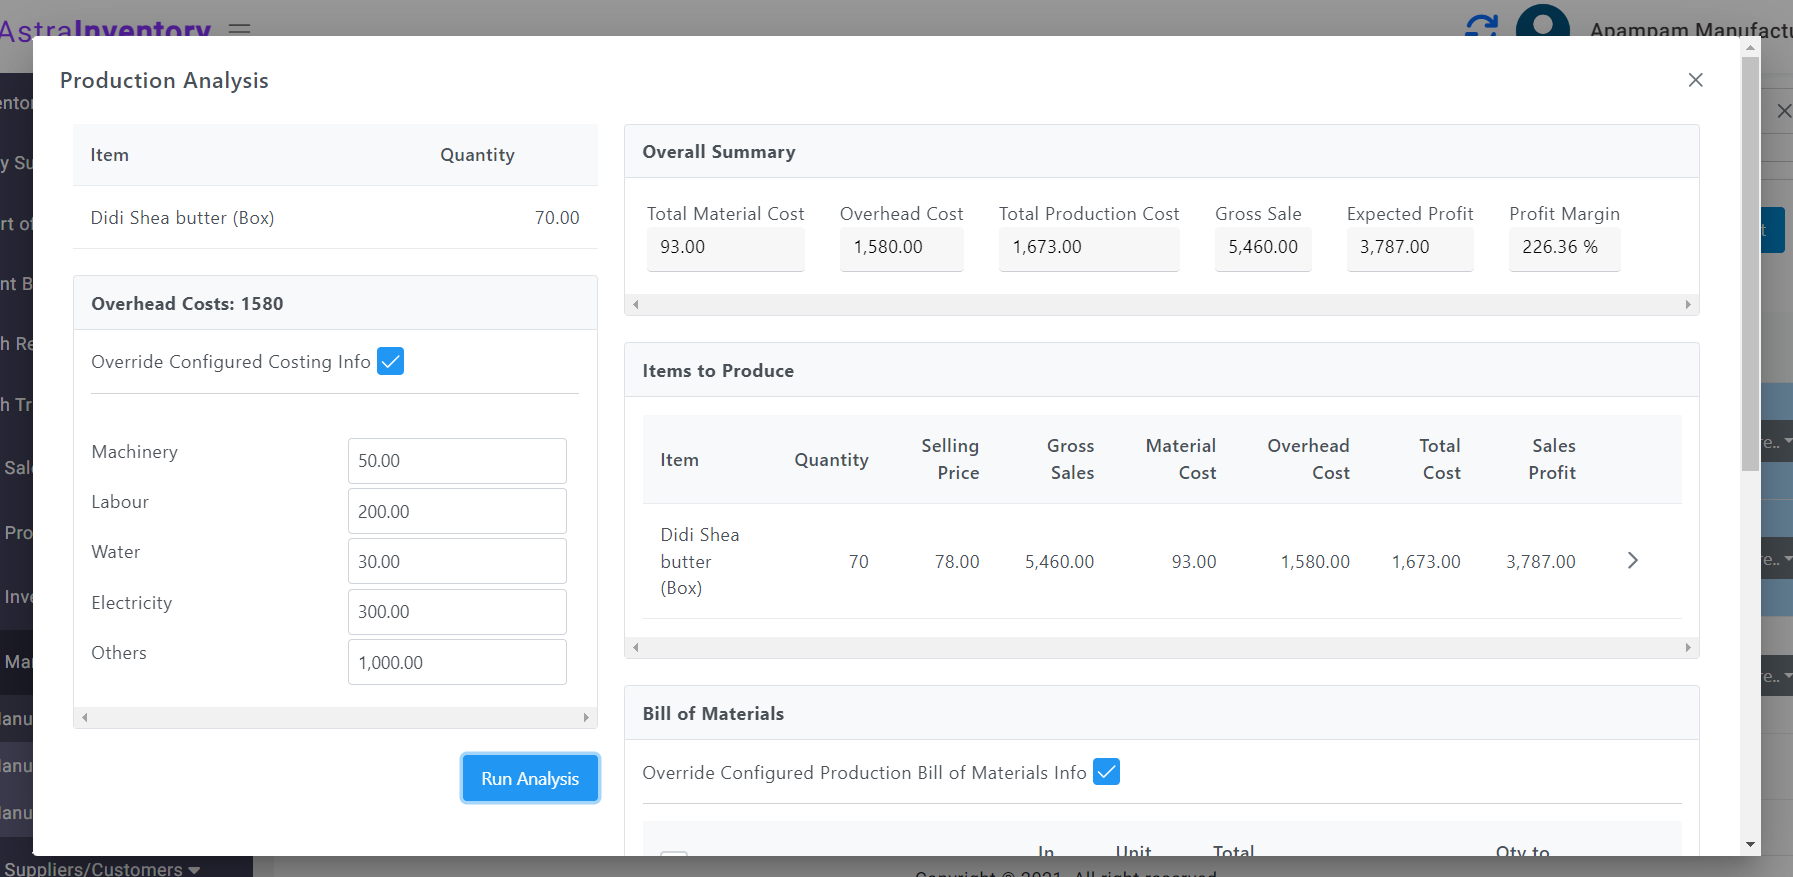
- The Manufacturing Estimations feature in AstraERP is designed to help businesses calculate and manage the costs associated with producing goods. This feature provides a detailed analysis of production costs, including materials, labor, overhead, and other expenses. It also allows businesses to estimate potential profits from the sale of manufactured products.
Key Components of Manufacturing Estimations
- Items to Produce
- Displays the selected item for production and all other relevant information about that particular product
- Quantity to Produce
- Displays the number of units you want to produce
- Bill of Materials
- Displays the items required for production and all other relevant information of the selected raw material
- Overhead Cost
- Displays all expenses that are not directly tied to the production of the finished product but are necessary for the overall operation of the manufacturing process.
Steps for Using Manufacturing Estimations
- Select the Product:
- Use the dropdown menu under "Item to Produce" to select the product you want to manufacture.
- Enter Quantity:
- In the "Qty to Produce" field, enter the quantity of the product you intend to manufacture.
- Add the Product:
- Click the Add button to add the selected product and quantity to the list of items to produce.
- Review Items to Produce:
- The added items will appear in the "Items to Produce" section. Review the details such as quantity, selling price, gross sales, material cost, overhead cost, total cost, and sales profit.
- Manage Overhead Costs:
- If you need to override the configured costing information, check the "Override Configured Costing Info" box.
- Enter the specific costs for machinery, labor, water, and electricity in the provided fields.
- Bill of Materials:
- If you need to override the configured production bill of materials information, check the "Override Configured Production Bill of Materials Info" box.
- Review the items required for production**.Ensure you have sufficient stock or determine the quantity that needs to be ordered.
- Finalize Estimation:
- Review all the details provided in the "Items to Produce" and "Bill of Materials" sections to ensure accuracy.
- Make necessary adjustments to quantities and costs as needed.
- Run Analysis
Suppliers/Customers
Suppliers/Customers
This page provides a detailed guide on how to manage clients, including customers and suppliers, within AstraERP. The provided interface allows users to add, edit, and organize client information efficiently.
General Buttons:
- Print: Print the list of clients.
- Export: Export the client list to a file (typically in Excel or CSV format).
- Add New: Add a new client to the system.
Actions
- Edit: Modify the client's details.
- Locations: Manage the client's locations.
- Add Sub Clients: Add sub-clients under the main client.
- Merge: Combine two or more clients into one.
- Delete: Remove the client from the system.
Detailed Steps for Common Actions
Adding a New Client:
- Click the Add New button.
- Fill in the required fields such as name, category, email, and mobile number.
- Select whether the client is a customer, supplier, or both.
- Save the new client information.
Editing Client Information:
- Find the client you want to edit in the client list table.
- Click the Edit button (pencil icon) next to the client's name.
- Update the necessary information in the provided form.
- Save the changes.
Adding Sub Clients:
- Click the More... button next to the client.
- Select Add Sub Clients from the dropdown menu.
- Enter the sub-client's details and associate them with the main client.
- Save the sub-client information.
Merging Clients:
- Click the More... button next to one of the clients you want to merge.
- Select Merge from the dropdown menu.
- Choose the other client(s) to merge.
- Confirm the merge action.
Additional Tips
- Filtering: Use the checkboxes to quickly filter the list to show only customers or suppliers, making it easier to manage large datasets.
- Client Upload - Import client data from an external file in Excel format
Client Upload
- The client upload feature in AstraERP allows users to efficiently add all clients (customers/suppliers) to the system at once. This is particularly useful for managing large clients, saving time, and reducing manual errors.
Steps to Client Data
**Complete an Excel template with your client information
Choose File
- Click on the "Choose file" button to open a file dialog.
- Select the file containing your sales data from your computer.
- Upload File
- After selecting the file, click the "Upload" button to start the upload process.
- Wait for the upload to complete. The interface will update to show the results.
- Review Results
- Check the Successful List tab to see the client records that were successfully uploaded.
- Check the Failed List tab to review any errors and understand why certain records failed to upload.
- Clear File (Optional)
- If you need to upload a different file, click the "Clear" button to reset the file selection and start over.
Other Components of Sales Upload
Upload Results
- Successful List: This tab displayss the list of succeessfully uploaaded client records
- Failed Lists: It shows the records that failed to upload, along woth error messages explaining the reason for the failure.
Bills/Expenses
Expenses
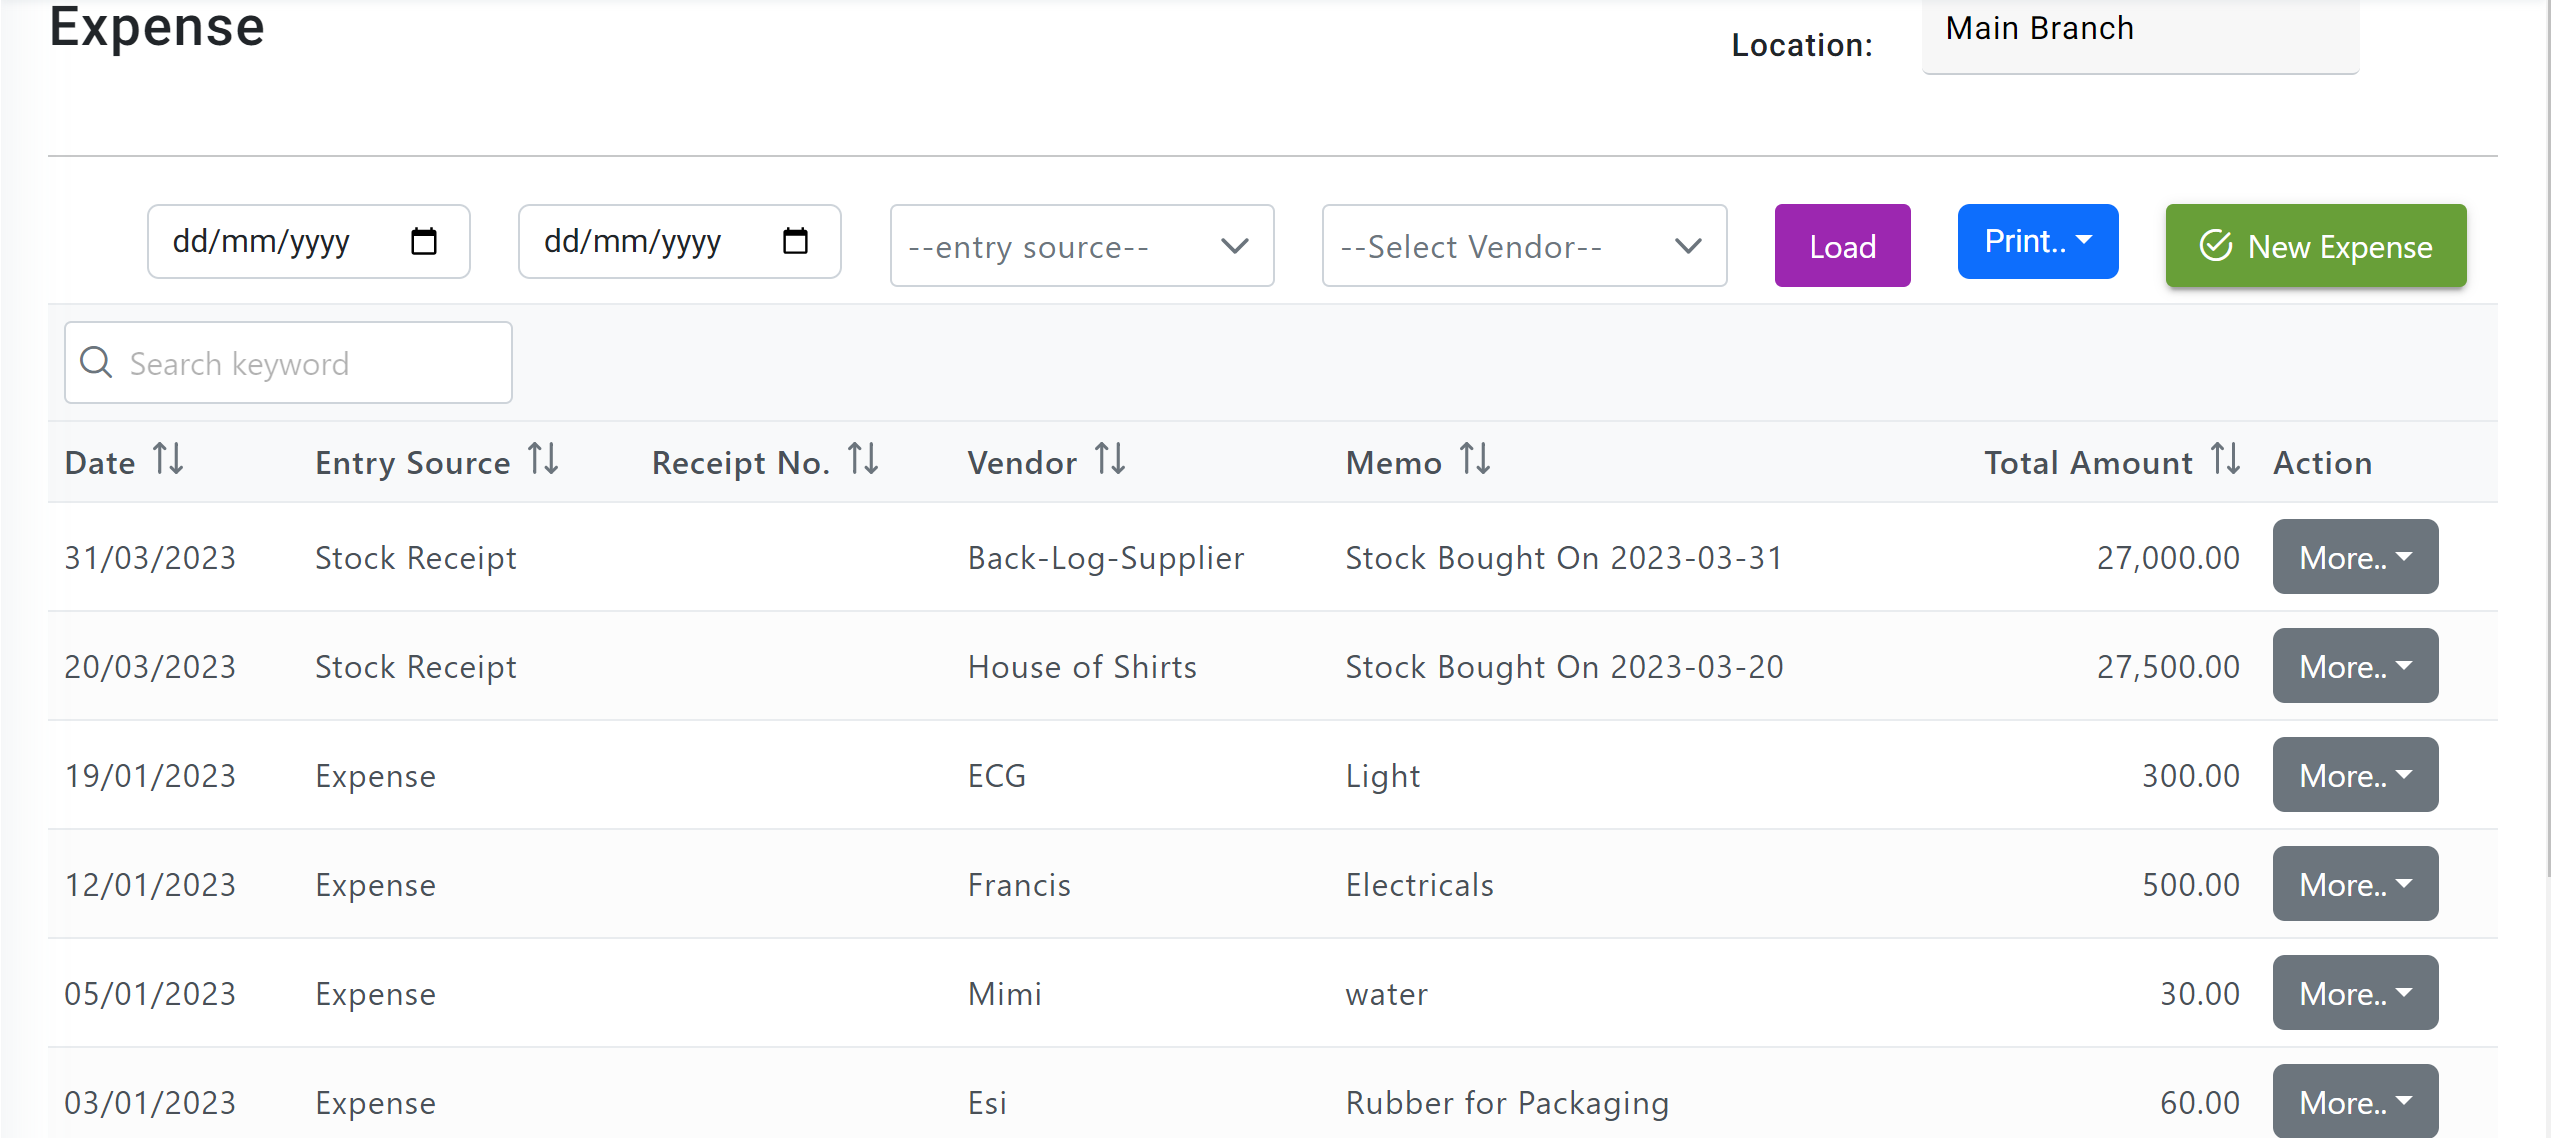
- Expense is a cost that bsinesses incur in runnning their operations. They can be incurred in various day-to-day business activities including wages, salaries, maintenance, rent, transportation etc.
In the expense feature, you will have the following sections:
Basic Functions in Expense
- Create New Expense
- View Expenses Created
- Attach Receipts to Expense
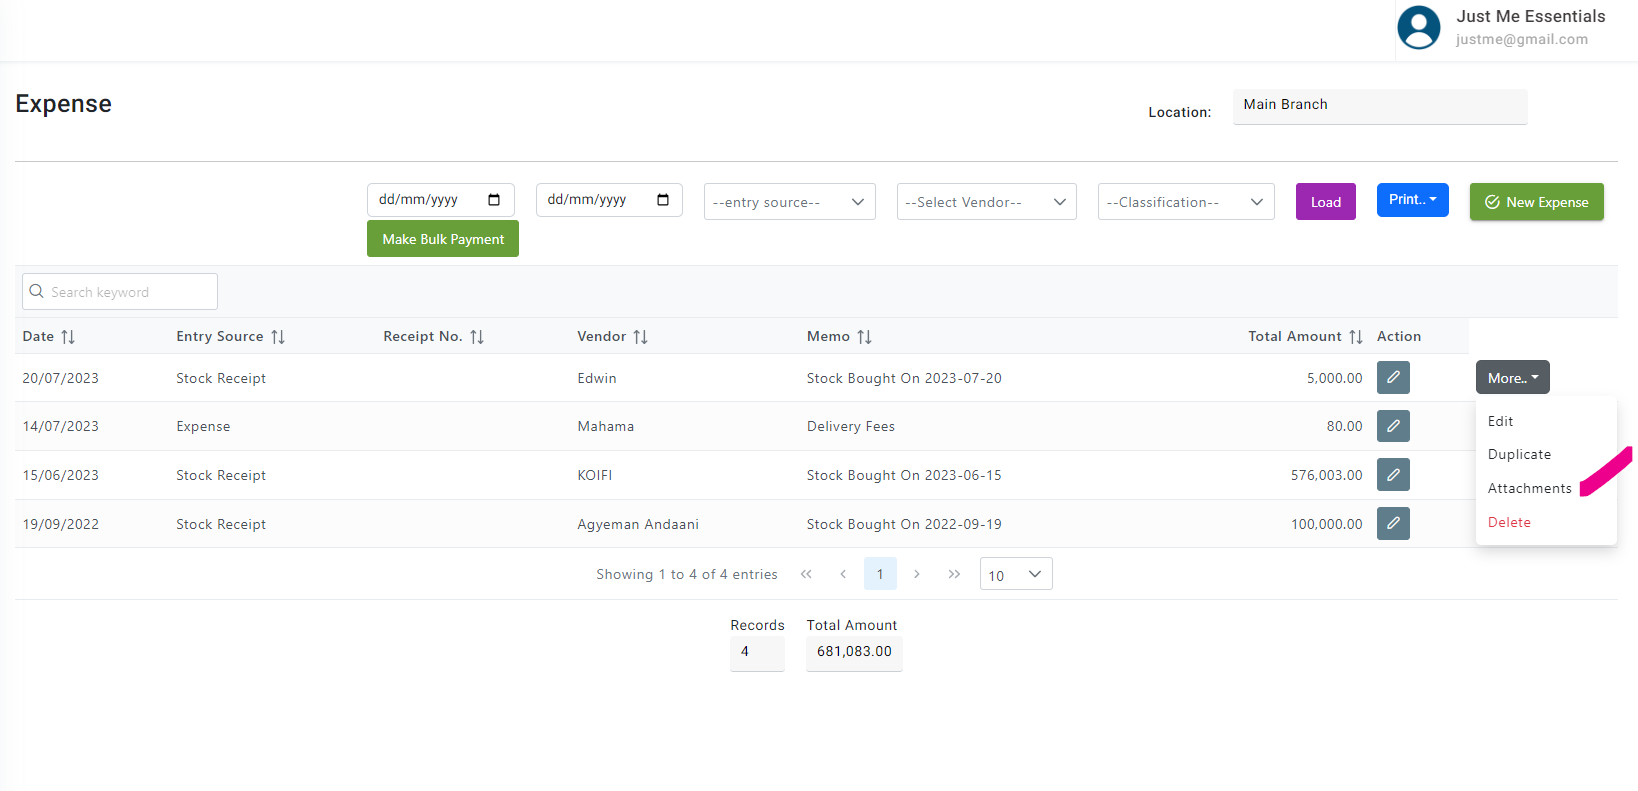
Manage Expenses
- Filter Expenses
- Edit Expense
- Attach Receipts
- Delete Expense
- Print Expense
- Duplicate Expense
How to create an Expense
To create an expense:
- Navigate to Bill/Expenses
- Click on New Expense on the top right corner of the page
- Enter the following details in the New Expense page.
Expense Information
| Field | Description |
|---|---|
| Date | Select the date on which the expense is created. |
| Payment Account | Select an account to track the expense you’re going to record. |
| Vendor | Select a vendor to whom you wish to associate the expense. |
| Add New line | Add multiple expense accounts under which you wish to track different expenses |
| Amount | Enter the expense amount |
| Charges | Add charges to the expense amount if any |
Attach Receipts
- Attach the receipt of your expense from your Desktop or Cloud. This will help you ensure that financial records align with actual spending. It will also help you to stay compliant with tax regulations, making audits processes smoother.
Bills
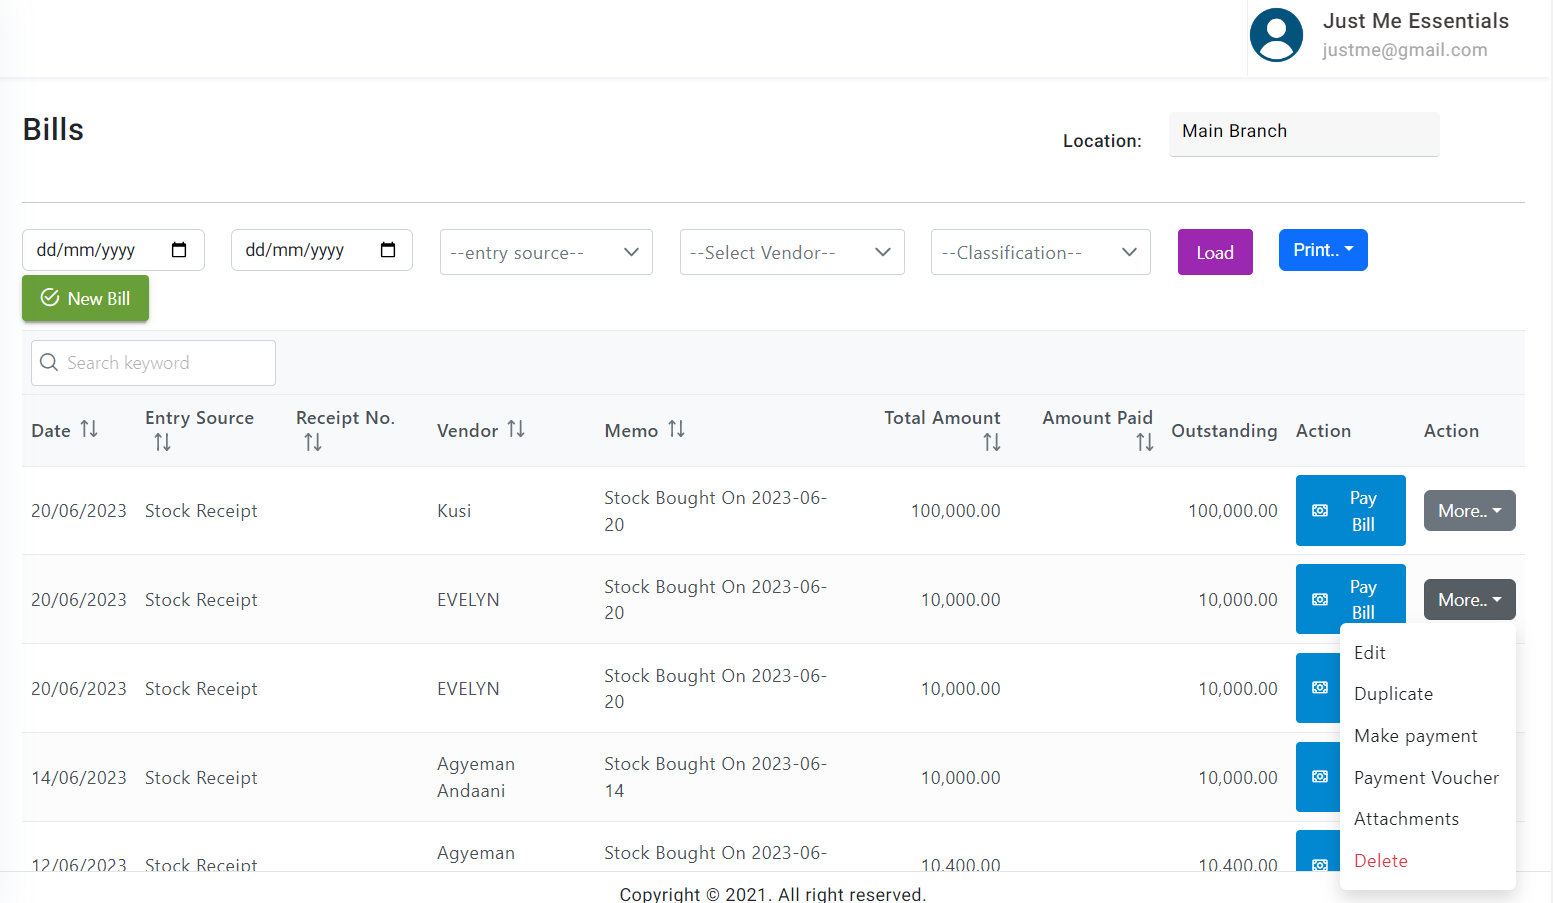
Bills are invoices issued by creditors, suppliers to request payment for goods or services. Eg.Utility, Medicals, Taxes, Insurance
To create a Bill, On the Account page,
- Select Purchases
- Select Bill
- Select New Bills
- Complete the required fields
- Save and close
- Select More to,
- Edit bill
- Duplicate bill
- Attach receipt
- Delete bill
On the same page, you can
- Search bill by date
- Search bill by entry source
- Search bill by vendor
- Print bill items
- Make Bulk payment for bill
To Make Bulk payment for bill,
- Select Make Bulk Payment
- Select Payment Date
- Select Counterparty
- Check if you want to specify date range for the payment to the bills. That is a bill payment date
- Enter Bill amount
- Select Payment Account
- Check Apply withholding Tax if applicable
- Select Make Payment
Bills Payment
This is a document that indicates the amount you owe your vendors for he goods and services provided to you.
Basic Functions in Bills
- Create New Bill
- Pay Existing Bills
- View Recorded Bills
Functions in Bill
- Link bills to products
- Attach cheque numbers used for Bil payment
- Set Cheque Due Date(when cheque is issued)
- Attach document to Bill
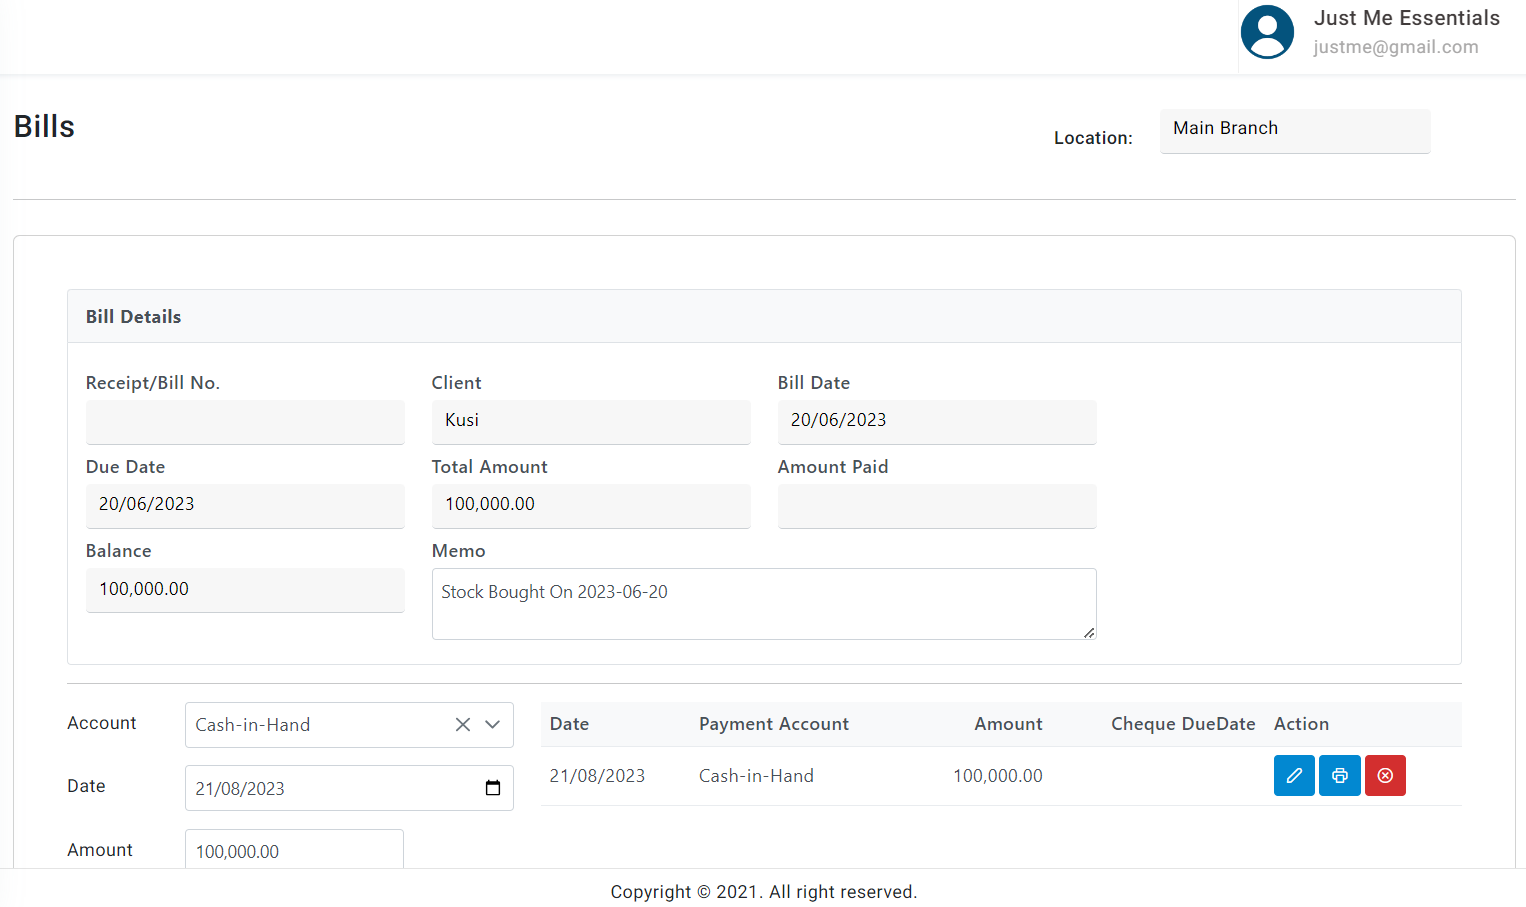
How to pay for stock bought at a latter date
- Navigate to Bills/ Expense
- Select Bills (This page shows all the stock received from the suppliers)
- Identify the stock you want to make payment for.
- Select More and choose Make payment from the drop-down list
- Record details of payments(Account type, Date, Amount and Reference number)
- Save
Upload Bills/Expense
When you want to load large volume of bills or expenese, you can use the excel template to do that.
To upload Bills/ Expenses
On the Account page, select purchases
- Select Upload bills/expense
- Select Payment Account. that is the mode of payment you use to ame the expense/bill
- Choose the excel file saved
- Select upload
- Select save Look out for Failed List.
Inventory Uploads
Products Upload
- The product upload feature in AstraERP allows users to efficiently add multiple products to the system at once. This is particularly useful for managing large inventories, saving time, and reducing manual errors.
Steps to Upload Product
- Select Income Account, Inventory Asset Account and Cost of Goods Account
- Choose the appropriate accounts for your products. This is required to proceed with the upload.
- Choose File
- Click on the "Choose file" button to open a file dialog.
- Select the file containing your product data from your computer.
- Upload File
- After selecting the file, click the "Upload" button to start the upload process.
- Wait for the upload to complete. The interface will update to show the results.
- Review Results
- Check the Successful List tab to see the product records that were successfully uploaded.
- Check the Failed List tab to review any errors and understand why certain records failed to upload.
- Clear File (Optional)
- If you need to upload a different file, click the "Clear" button to reset the file selection and start over.
Other Components of Sales Upload
Upload Results
- Successful List: This tab displayss the list of succeessfully uploaaded stock records
- Failed Lists: It shows the records that failed to upload, along woth error messages explaining the reason for the failure.
Stock Upload
- The stockt upload feature in AstraERP allows users to efficiently add all available stock to the system at once. This is particularly useful for managing large stock, saving time, and reducing manual errors.
Steps to Upload Stock
- Select Partner/supplier
- Choose the appropriate supplier/partner you are receiving the stock from. This is required to proceed with the upload.
- Choose File
- Click on the "Choose file" button to open a file dialog.
- Select the file containing your sales data from your computer.
- Upload File
- After selecting the file, click the "Upload" button to start the upload process.
- Wait for the upload to complete. The interface will update to show the results.
- Review Results
- Check the Successful List tab to see the stock records that were successfully uploaded.
- Check the Failed List tab to review any errors and understand why certain records failed to upload.
- Clear File (Optional)
- If you need to upload a different file, click the "Clear" button to reset the file selection and start over.
Other Components of Sales Upload
Upload Results
- Successful List: This tab displayss the list of succeessfully uploaaded stock records
- Failed Lists: It shows the records that failed to upload, along woth error messages explaining the reason for the failure.
Reports
View Reports
Overview of Reports
These reports are crucial for effective inventory management, financial planning and decision making. Your reports are based on your DAILY SUMMARY. Do Remember To Run Your DAILY SUMMARY to have accurate reports. To know how to run daily summary, please click here
The system provides you with the following reports:
| Field | Description |
|---|---|
| Profit and Loss Statements(P&L) | This report provides summary of company's revenues, costs and expenses over a specific period. it calculates the profit or loss by subtracting expenses from revenue |
| Cash Flow Statement | The cash flow statement tracks the movement of cash into and out of the business over a specific period. It categorizes cash flows into operating, investing, and financing activities, helping to assess the company's liquidity |
| Balance Sheet | This report presents a company's financial position at a specific point in time. It includes assets (such as inventory), liabilities, and shareholders' equity. The balance sheet helps to determine the company's financial health and net worth. |
| Sales Tax Report | This report summarizes the sales tax collected from customers. It's important for ensuring compliance with tax regulations and submitting accurate tax returns. |
| Account Receivable Report | This report lists outstanding invoices and the amounts owed by customers. It helps monitor and manage the collection of accounts receivable. |
| Account Payable Report | Similar to accounts receivable, this report lists outstanding bills and the amounts owed to suppliers and creditors. It aids in managing and tracking payment obligations. |
| Daily Sales Report | This report provides a breakdown of sales on a daily basis. It includes details such as the number of units sold, total sales revenue, and often categorizes sales by product or service. |
| Weekly Sales Report | A summary of sales activities and performance over a week, typically including comparisons to previous weeks. |
| Monthly Sales Report | This report offers an overview of sales performance for an entire month, often including sales trends, targets, and comparisons to previous months. |
| Account Receivable Aging Report | This report categorizes accounts receivable by the length of time outstanding. It helps identify overdue invoices and assess the effectiveness of the company's credit and collection policies |
How to View Reports
- Navigate to Reports
- Click View Reports
- Select the Report you want
- Complete details in the side component
- Click View Report (This will display the report you have selected)
Configuration
Reference (All Settings)
Everything under Config/Settings, in one map:
| Area | What it configures |
|---|---|
| Company | Business details, financial years, new-company creation |
| Branding | Logo, letterhead (letters, case packs and documents print on it), signature, stamp |
| Users & permissions | User accounts, per-page/per-action grants, user locations, company locations |
| Message templates | Email/SMS bodies per message type; the message generator for ad-hoc sends |
| Workflow | Approval workflows and their configuration; workflow requests & approvals queues |
| Custom fields | Extra fields on supported records |
| Module settings | HR, Payroll, CRM, Account, Inventory settings pages — each documented in its module's guide |
| API keys | Long-lived company-scoped keys for integrations — treat like passwords, revoke when in doubt |
| Extensions | Optional add-ons enabled per company |
| Lookups | The dropdown vocabularies used across modules (departments, job titles, banks, types…) — short, consistent lists keep reports clean |
The pages in this section cover the cross-cutting ones in detail: users, permissions, user locations, message templates, business details, new company.
Account
How Accounting Fits Together
Everything financial in AstraERP lands, eventually, in the general ledger — double-entry rows against the chart of accounts. You rarely write ledger rows yourself; the modules do:
 Sales/Invoices ──┐
 Bills/Expenses ──┤
 Payroll bills  ──┼──► JOURNAL ENTRIES ──► GENERAL LEDGER ──► Reports
 Bank & cash    ──┤        (auto-posted            │            (P&L, balances,
 POS & registers──┘         or manual)             │             business performance)
                                                   ▼
                                    Bank reconciliation proves the ledger
against the bank's own statement- Chart of accounts — your account tree (assets, liabilities, income, expenses, equity). Set it up first; every posting needs its account.
- Source documents (invoices, bills, expenses, payments, transfers, deposits) post their own journals — you record the business event, the books follow.
- Manual journals cover what has no source document (accruals, corrections, opening adjustments).
- Opening balances seed the ledger when you migrate onto AstraERP.
- Authorisation gates sensitive postings — a second pair of eyes before the ledger moves.
Start here, then use the section guides: Banking, Sales & Receivables, Purchases & Payables, Reports.
Account Dashboard
The financial pulse: cash and bank positions, receivables vs payables, income vs expense for the period, and the day's activity — with drill-through into every figure.
Where: Account → Dashboard 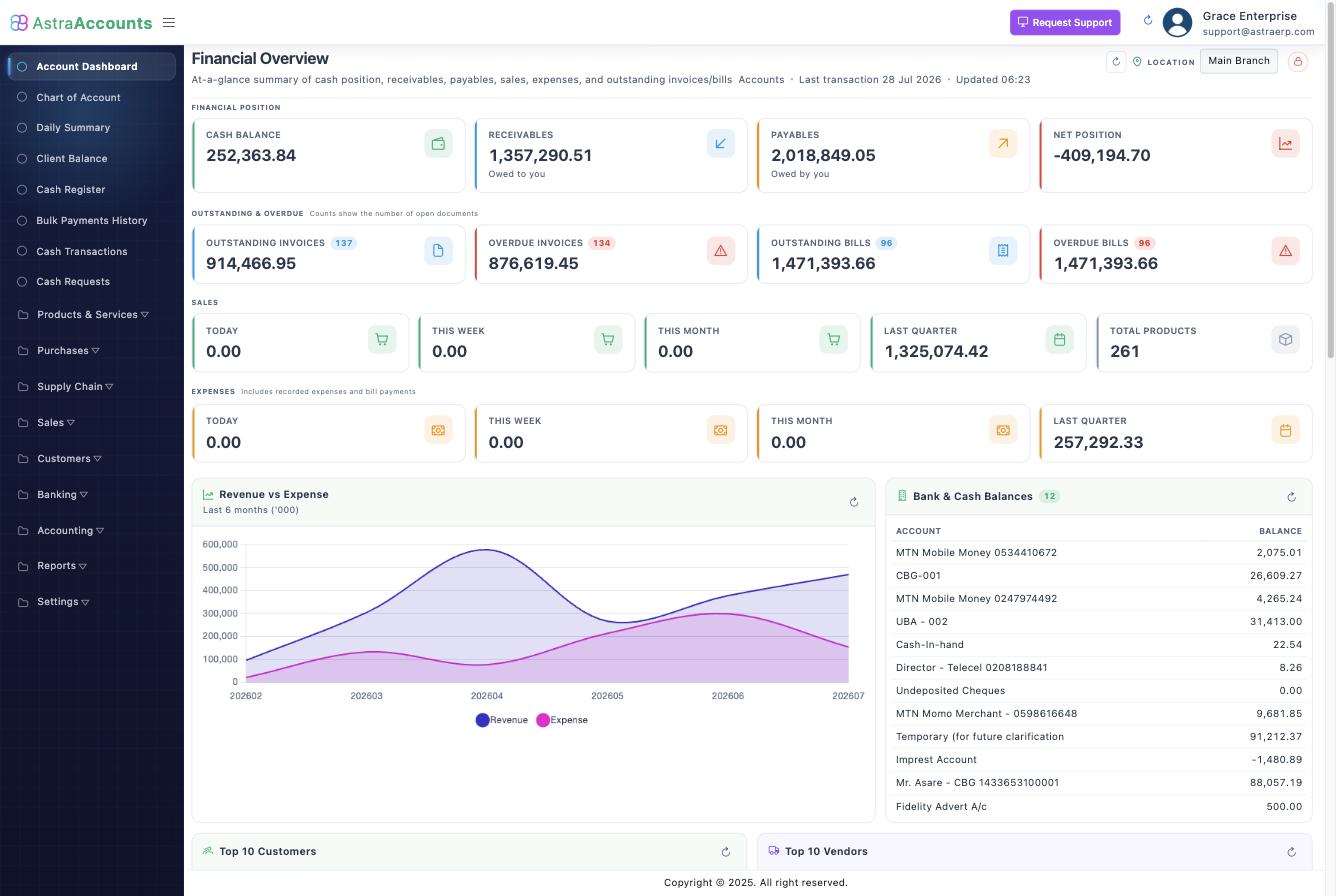
Pair it with Business Performance (trends over periods) and Daily Summary (the day's takings by till/register) for the three altitudes of oversight.
Chart of Account
To create Charts of Account, On the Account page,
- Select Charts of Account
- Select New Account
- Enter the Account Name. Eg. Transportation, Rent, Fuel loans
- Select the Account Type, Eg. Expense, Capital, Current Liability
- Checked the box if you want to specify an account code
Daily Summary
A concise report that provides a snapshot of fnancial transactions and activities that occured within a single day. It serves as a crucial tool for monitoring and managing the financial health of a business on a day-to-day basis
Components of Daily Summary
| Fields | Description |
|---|---|
| Date | The date of the summary which is usually the end of the business day |
| Stock @ Cost | This is the total value of inventory on hand at its purchase |
| Stock @ Selling | This represents the total value of on hand at its selling prices which include any markup or profit margin applied to the cost price. |
| Total Stock Received | This includes the total quantity and value of inventory received during the day. It is important for tracking inventory inflows. |
| Gross Sale Amount | This is the total revenue generated from sales before deductions. It includes the selling prices of all goods sold during the day. |
| Discount Amount | If any discounts were offered to customers during the day, this figure reflects the total amount of those discounts. |
| Net Sale Amount | This is the actual revenue earned by the busines after substracting discounts and retruns. It represents the money that the business actually received. |
| Amount Receivable | Any outstanding invoices or accounts receivables that were collected during the day |
| Tax amount | Details of any tax payments or tax-related transactions made during the day such as sales tax |
| Cost Price | The cost price of all goods sold during the day. It helps in calculating the cost of goods sold(COGS), which is essential for profit determination |
| Profit | It provides a measure of the day's profitability. It is calculated by substracting the cost price from the net sale amount |
How to RUN Daily Summary
- Navigate to the Daily Summary page
- Select the Date from - Date to if the daily summary has not been ran in a while
- Click Run
- Wait for daily summary to complete
- Refresh page
How to REVERSE Daily Summary
- Navigate to the Daily Summary page
- Select the Date from - Date to (period you want to reverse)
- Click Reverse
- Wait for reversal to complete
- Refresh page
Client Balance
Managing Client Balance This refers to a summary of the financial records that indicate the amount of money owed to or byclients in a business context. This helps businesses track the financial relationshipsthey have with their clients and ensures accurate accounting of transactions.
How to check Client Balances
- Navigate to client balance on the left side bar
- Select Client Balance
- Click Customers/Suppliers/Others/All(This provides information of balances based on user selection)
- Search customer(This feature provides you financial records for individual customers)
- Click on client's name
- View client balance
Uploading Client Balances
- Complete the Astra Partners Excel template
- Create a chart of account with the name Customer Deposits and Account type: Current liability
- Select Upload under Suppliers/customers
- Click on Account Options
- Complete all required fields
- Choose file (the completed Excel template)
- Upload and Save
Tracking Additional Customer Deposits
- Go to Deposits
- Select New Bank/Cash Deposits
- Under the Deposit Account, Select Cash in Hand
- Select the client who is making the deposit to the company
- Account – Select Customer deposits (the one you created in the charts of accounts)
- Description (if any)
- Amount (Enter the amount of money the customer gave)
- Save the changes
Confirming Customer Deposits
- Click on the Client Balances,
- Click on Customers
- Search customers name
- Click on Customer’s name
- Print statement (if necessary)
Other Actions of Client Balance
- View client balances
- Filter balances(customers, suppliers, others, all, and date)
- Searching for customers
- Exporting balances
- Printing balances
Cash Register
Cash register gives a summary view of all daily cash transaction. The cash register serves as the point where sales transactions, expenses, deposits etc viewed. To view all transaction in the cash regsiter, On the account page,
- Select Cash register
- You can select the cash/ Bank to view details of cash transaction
- You can select particular date to view transaction
- You can also print cash book
- Select view | Fields | Description | |--|--| |Cash Sales|The total cash sales on the day |Credit Payment|The total credit payment by a customer. That is when customer pays for goods bought on credit |Cash Movements|The inflow and outflow of cash eg. Deposit, withdrawal, transfers |Expenses|Total expense for the day |At the Begining of Date|Cash total at the begining of the transaction date |For Date|The total amount of cash as at the date |End of Date|The total amount pf cash at the end of the Date |Transaction summary|It shows all the daily cash transaction |Payment received|The total payment received |Bill payment|Total bill payment. That is when payment is made to a supplier
Bulk Payments History
Bulk paymemt History show all the record of bulk payment either by a supplier or a customer. It shows the following details,
- Date of the Bulk payment
- The payment type eith invoice paymemt or Bill Payment
- Counterparty
- Payment Account
- Debt to pay
- Total amount
- The number of times payment was made
To make, view, print or reverse Bulk payment,
On the account page,
- Select Bulk Payment History
- Select make Bulk payment to record Bulk payment
- Complete required fields
- You can view, print and reverse Bulk payment
Cash Transactions
A cash transaction refers to a transaction which involves an immediate outflow and inflow in the organisation.Cash transaction can be consumer-oriented or business-oriented.
On the Account page, select Banking
- Select Cash transactions to record transfers, withdrawals and deposit
- Select Add New
- Select transaction type, that is either cash transfer, cash withdrawal and cash deposit
- Complete the required fields
- Select save and close
Products & Services
Advanced View
Product is a broad term that refers to any tangible or intangible item (goods or services) that is created, or offered to meet a particular need in the market
How to create a product
To create a product
- Select product on the left sidebar of the inventory module.
- Select New Product
- Complete the required fields and select Save Changes
General Information
| Fields | Description |
|---|---|
| Product type | Whether product is a goods or a service. Your choice will influence the package information. |
| Description | Add any information related to the product you are creating. |
| Product Category | Add categories that will help you to group products that are related. |
| Track Inventory | Indicate where you want to monitor and manage the quantities and value of your products. |
Package/Variant Information
| Fields | Description |
|---|---|
| Reorder level | Add the minimum quantity of a product that your business should have in stock before placing a new order. |
| Product Package | Add how the product is packaged. How they are bought or sold, whether in boxes, cartons, single items etc. |
| Item Label | Add how you want the product to be displayed. This will be included to the product name. |
Uploading Products
If you already have a list of your products in XLSX format, you can upload them into AstraERP
- Complete the Inventory Product Excel template
- Navigate to inventory uploads in the left sidebar
- Complete all the relavant fields:
- Income Account
- Cost of goods Account
- Inventory Asset Account
- Create Non Existing Packages
- Overide Existing Packages
- Under the inventory uploads, select Product Upload
- Click the Choose file to select the Excel file containing the data you want to upload
- Click upload
- You can choose to Skip or Override the packages
Note: After product upload, the "Successful list" will give provide you with the number of products that were uploaded. The :"Failed list" will furnish you with the products that were not successful. You will know the reason(s) for unsuccessful upload.
Purchases
Expense
Overview - Expense
- Expense is a cost that bsinesses incur in runnning their operations. They can be incurred in various day-to-day business activities including wages, salaries, maintenance, rent, transportation etc.
In the expense feature, you will have the following sections:
Basic Functions in Expense
- Create New Expense
- View Expenses Created
- Attach Receipts to Expense
Manage Expenses
- Filter Expenses
- Edit Expense
- Attach Receipts
- Delete Expense
- Print Expense
- Duplicate Expense
How to create an Expense
To create an expense:
- Navigate to Bill/Expenses
- Click on New Expense on the top right corner of the page
- Enter the following details in the New Expense page.
Expense Information
| Field | Description |
|---|---|
| Date | Select the date on which the expense is created. |
| Payment Account | Select an account to track the expense you’re going to record. |
| Vendor | Select a vendor to whom you wish to associate the expense. |
| Add New line | Add multiple expense accounts under which you wish to track different expenses |
| Amount | Enter the expense amount |
| Charges | Add charges to the expense amount if any |
Attach Receipts
- Attach the receipt of your expense from your Desktop or Cloud. This will help you ensure that financial records align with actual spending. It will also help you to stay compliant with tax regulations, making audits processes smoother.
Bills
Bills are invoices issued by creditors, suppliers to request payment for goods or services. Eg.Utility, Medicals, Taxes, Insurance
To create a Bill, On the Account page,
- Select Purchases
- Select Bill
- Select New Bills
- Complete the required fields
- Save and close
- Select More to,
- Edit bill
- Duplicate bill
- Attach receipt
- Delete bill
On the same page, you can
- Search bill by date
- Search bill by entry source
- Search bill by vendor
- Print bill items
- Make Bulk payment for bill
To Make Bulk payment for bill,
- Select Make Bulk Payment
- Select Payment Date
- Select Counterparty
- Check if you want to specify date range for the payment to the bills. That is a bill payment date
- Enter Bill amount
- Select Payment Account
- Check Apply withholding Tax if applicable
- Select Make Payment
Bill Payment
Overview - Bills This is a document that indicates the amount you owe your vendors for he goods and services provided to you.
Basic Functions in Bills
- Create New Bill
- Pay Existing Bills
- View Recorded Bills
Functions in Bill
- Link bills to products
- Attach cheque numbers used for Bil payment
- Set Cheque Due Date(when cheque is issued)
- Attach document to Bill
How to pay for stock bought at a latter date
- Navigate to Bills/ Expense
- Select Bills (This page shows all the stock received from the suppliers)
- Identify the stock you want to make payment for.
- Select More and choose Make payment from the drop-down list
- Record details of payments(Account type, Date, Amount and Reference number)
- Save
Payroll Bills
The accounting side of payroll: when a pay run is authorised (and payroll settings post to accounting), the run's cost arrives here as bills — net pay, statutory remittances (SSNIT, Tier 2, PAYE) and institutional items — ready to be paid and posted like any other liability.
Where: Account → Purchases → Payroll Bills
Pay them through Bill Payments; each payment posts its ledger entries and clears the liability.
Payment Voucher
A payment voucher is a document used by businesses to record and authorize payments made to vendors, suppliers, employees, or for various expenses incurred by the company. It serves as supporting evidence for the transaction and is an important part of the company's internal control and accounting processes. Remember to activate bill payment settigs at the company settings if you want to track that processes.
To generate payment voucher, On the account page
- Select Bills
- Select generate payment voucher on the bills that has already been created
- Complete required fields
- Select save and close
To Approve payment vouchers
- Select payment vouchers
- Checked on Approve to approve payment vouchers
- Complete required fields
- Select Approve Payment
Petty Cash
Petty cash is a small amount of cash that a company or organization keeps on hand to cover minor, day-to-day expenses. It is typically maintained in a secure box or drawer, and a designated person, often called the petty cash custodian, is responsible for managing and disbursing the funds.
On the Account page, select Purchase
- Select Petty Cash
- Select Add New
- Complete the required fields
- Save Fund
To Manage Petty Cash
- Select Manage
- Select New Expense Item
- Complete the required fields
- Save and close
Fixed Asset
Fixed assets, also known as property, plant, and equipment (PP&E), are tangible assets that a company owns and uses in its business operations to generate income. These assets are long-term in nature and are not intended for sale in the normal course of business. Fixed assets typically include: Land, Vehicles, Machinery, Bulildings
| Fields | Description |
|---|---|
| Date | |
| Specify Tracking No | |
| Assest Name | |
| Asset Description | |
| Assest Serial Number | |
| Asset Account | |
| Payment Account | |
| Vendor | |
| Paid Purchase | |
| Purchased Cost | |
| Warrantly Expiration Date | |
| Purchase State | |
| Expense Account | |
| Schedule | |
| Start Date | |
| Depreciation Amount | |
| Under Warranty |
Purchase Order
How to Order Goods from your Suppliers
- On the menu, select Purchase Order
- Select Add New Purchase Order
- Complete the required fields and Save
- Select Close to go back
How to Receive the Stock into your warehouse/shop
- select Purchase Order
- On the Purchase Order page, filter and search for the order you want to receive either by Date or by Location.
- Select More
- Select Receive Stock
- On the Receive stock page
- For Full PO receipt: select Receive All, this will automatically display details of the items (Product, Package, Expiry Date, Quantity, Cost Price, Total Cost) on the Stock Receipts section of the page.
- Complete the required fields and save.
For Partial Purchase Order Receipt:
- select Add New Entry
- choose the items you want to receive payment for by selecting receive below the Receive All section of the page
- Complete the required fields and save
Please note: Creating a Purchase Order and receiving stock automatically creates a bill
Accrued Liabilities
Obligations you owe but haven't been billed for yet — recorded so the books show the truth before the invoice arrives (utilities consumed, services received, year-end accruals).
Where: Account → Purchases → Accrued Liabilities
Record the liability with its account, amount and period; reverse or settle it when the actual bill lands (raise the bill and clear the accrual). Accruals are classic month-end journal territory — keep descriptions explicit for the auditor.
Sales
Recurring Sales
Recurring sales refer to regular, predictable sales transactions that occur on a periodic basis, typically involving the sale of products or services on a recurring or subscription-based model to a client. These sales generate revenue at regular intervals, often weekly, monthly, quarterly, or annually.
To Set Recurring Sales
On the Account page, select sales
- Select New Recurring sales
- Complete required fields
| Fields | Description |
|---|---|
| Repeat Every | How often do you want the recurring invoice to repeat |
| Frequency | It is the rate of occurrence or the number of times of the invoice, eg. Days, Weekly, Monthly |
| Start Date | Invoice start date |
| End Date | Invoice end date |
| Send Automatically | That is the invoice will be send to the customer automatically via email |
| Customer | The customers name |
| Payment Terms | Whnen payment should be made |
| Memo | Any additional information or instructions |
| Payment Instruction | Any paymemt instruction for the clustomer |
- Select add new line to add details of product
- Complete required fields
- Select save and close
Sales Upload
Bulk-import sales/invoices from a spreadsheet — for migrations and channels that sell outside AstraERP.
Where: Account → Sales → Sales Upload · Template: Upload Templates.
Fill the template (customer, date, items/amounts, references), upload, review the preview's per-row results, process. Imported sales post like natively-raised ones: AR, ledger and reports all see them.
Customers
Suppliers/Customers
Overview
The Customers/Suppliers/Clients section is where you add new Customers/Suppliers/Clients with their details and manage them.
Add Clients
- Navigate to Clients
- Select the Location to add the client to
- Click "New Customer/Supplier"
- On the "New Customer/Supplier" page, enter details for the following fields:
- Code
- Name
- Mobile Number
- Other Contact No.
- Email-Address
- Nature of Business
- Type
- Partner Category
- WHT Exempt
- Billing-Address
- Geolocation
- Has Parent Client? [Leave unchecked if a parent client]
- Click "Save Changes"
Delete Clients
- Navigate to Clients
- Select the Location to delete the clients from
- Select the client and Click More -> Delete
Add Sub clients
A sub client is a client that is been served or is linked to a parent client.
- Navigate to Clients
- Select the Location to add the client to
- Click "New Customer/Supplier"
- On the "New Customer/Supplier" page, enter details for the following fields:
- Code
- Name
- Mobile Number
- Other Contact No.
- Email-Address
- Nature of Business
- Type
- Partner Category
- WHT Exempt
- Billing-Address
- Geolocation
- Has Parent Client? check field
- Select parent client this client would be linked to
- Click "Save Changes"
Print Clients
- Navigate to Clients
- Select the Location for which the export would be made
- Click on Print
Export Clients
Exports are made in the xlsx format.
- Navigate to Clients
- Select the Location for which the export would be made
- Click on Export
Merge Clients
- Navigate to Clients
- Select the Location to merge clients
- Select the client to merge
- Click More -> Merge
- Select client to merge client with
- Click "Merge Contacts"
Banking
Bank Statement Upload
Bring the bank's own record into AstraERP so reconciliation can compare it against your ledger.
Where: Account → Banking → Bank Statement · Template: Upload Templates.
- Fill the statement template (date, description, reference, debit/credit) from your bank export.
- Choose the bank account, choose the file, Upload.
- Review the result list — uploaded rows vs failures (bad dates/amounts). Fix failures in the sheet and re-upload just those.
Uploaded statement lines become the "bank side" in Bank Reconciliation and in Transaction Mapping.
Bank Transaction Mapping
Teach AstraERP what recurring statement lines mean, so imports classify themselves: map a match pattern (e.g. "MTN MOMO FEE", "SSNIT") to the ledger account it should post to.
Where: Account → Banking → Transaction Mapping
Once mapped, matching statement lines are proposed against the right account automatically — reconciliation becomes confirmation instead of data entry. Maintain mappings as your bank's descriptors change.
Bank Reconciliation
Overview of Bank Reconciliation
This function allows you to compare your company's bank statement to the records (ledgers) in AstraERP, ensuring that all transactions are accounted for. Bank reconciliation is a tool used by businesses and accountants to identify fraud, omissions, and mistakes in financial accounts. Reconciliation statements, when regularly completed, assist businesses in finding cash flow problems, giving investors accurate information, and accurately planning and paying taxes. Companies and individuals should reconcile their bank statements on a monthly basis. Additionally, they can be completed on a daily or weekly basis, depending on how often statements are created.
To successfully complete your bank reconciliation in AstraERP, you'll need to format and upload your bank statements in AstraERP. Find the template for the Bank statement upload here.
How to upload your Bank Statement
- Complete the Bank Statement Upload Template
- Navigate to Banking
- Select Bank Statement Upload
- Select Bank Account
- Click on Choose file to select the bank statement upload template you just completed.
- Click on upload to complete the process.
- You can view the list of the transactions that were successfully uploaded and those that failed.
How to do Bank Reconciliation
- Navigate to Banking
- Select Bank Reconciliation
- Click on Select Account to select the bank account you are about to reconcile.
- Click on New Recon
- Select Start and End Date
- Enter the Bank Recon Start balance & End Balance as showed in the bank reconciliation statement you just uploaded
- Click on Start Recon
- On your left is Unreconciled Transactions Records & On your right is Unreconciled Ledger Records
- Pick a transaction in the Unreconciled Transactions Records and find its corresponding transaction in the Unreconciled Ledger Records
- If both transactions match, Click on Match Records
- Go through all the transactions in order to find the those that match.
- View Reconciliation Details.
- Click the End Recon to end the process for the month or the selected period.
- Repeat the steps if you want to start a new bank recon for a new month
Accounting
Journal
Manual double-entry: debit one account, credit another, dated and described — for accruals, corrections and anything without a source document.
Where: Account → Journal · Bulk: Journal Upload / Ledger Upload with the templates.
A journal must balance (debits = credits) before it posts. Write descriptions for the reader you'll be in twelve months: "March electricity accrual — bill outstanding" beats "adjustment".
General Ledgers (GL)
The book itself: every posted entry, filterable by account and date range, with running debit/credit/balance per account.
Where: Account → General Ledger
Use it to trace any figure on a report to its postings: filter the account, set the period, follow each row to its source document. If a number surprises you, this is where the answer is — nothing reaches a report without a row here.
Opening Balance Upload
Seed the ledger when you move onto AstraERP: per-account opening balances as at your cut-over date — plus per-partner openings (what customers owed you / you owed suppliers).
Where: Account → Opening Balance / Upload Opening Balance (template-based)
Enter or upload the trial balance as at cut-over; the system posts the opening entries. Get this signed off before live entry starts — everything after builds on it.
Reports
Settings
Payroll
Getting Started
AstraERP Payroll turns employee pay setup + the month's variable items into an authorised pay run: gross to net with SSNIT (Tier 1), Tier 2, income tax (Ghana PAYE bands), allowances, deductions, overtime and wages — with payslips, bank pay-in lists and institution schedules out the other end.
The pay cycle
 Setup (once)                     Each month                        Month end
 ─────────────                    ──────────────                    ─────────────
 Payroll items        →   Variable items: overtime,      →   Pay run: compute →
 (earnings/deductions)    wages, bonuses, deductions,        review → AUTHORISE →
 Employee pay setup       refunds, attendance hours          payslips · bank list ·
Settings & pay period statutory schedules- Configure — payroll items, settings, the current pay period.
- Set each employee's pay — pay details: basic pay or wage type, statutory flags, recurring earnings/reliefs.
- During the month — capture overtime, wages, bonuses & compensations, deductions, refunds; monthly work-hours flow in from HR attendance.
- Run — create the pay run, review, authorise, dispatch payslips and export the bank/institution schedules.
Who does what
Pay setup and runs are permission-gated pages like everything else; the pay run itself takes a second authorisation step before anything can be dispatched — computed numbers are reviewable and reversible until then.
Dashboard
The month at a glance: headcount on payroll, gross/net totals, statutory obligations and the state of the current run — with shortcuts into setup gaps (employees not ready, no pay type).
Where: Payroll → Dashboard
Employees
Payroll's view of the workforce: who is on payroll, their pay type, statutory flags and whether their setup is complete.
Where: Payroll → Employee Pay Setup 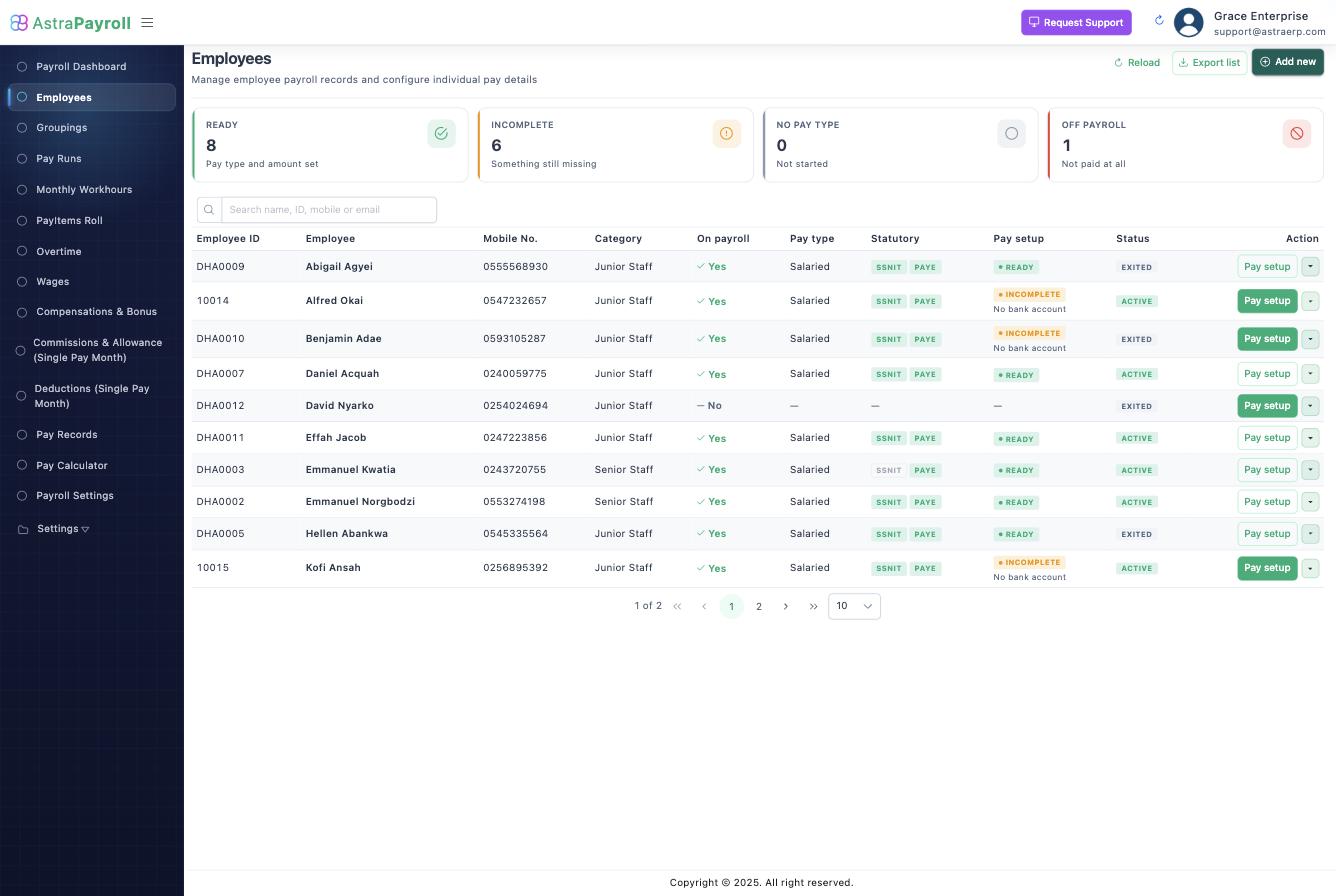
Filters worth knowing: Ready, Incomplete, No pay type, Off payroll — your gap list before every run. Pay setup opens the employee's pay details; Export list for the spreadsheet view.
Employees are created in HR; payroll adds the pay dimension. A minimal employee (bio + bank) can also be captured from here when payroll runs ahead of HR data entry.
Groupings
Named groups of employees for payroll purposes — run subsets (e.g. management vs field staff), special-group handling and reporting cuts.
Where: Payroll → Employee Groups
A pay run can target a group; employees outside it are untouched by that run.
Pay Runs
Where the month becomes money.
Where: Payroll → Pay Runs 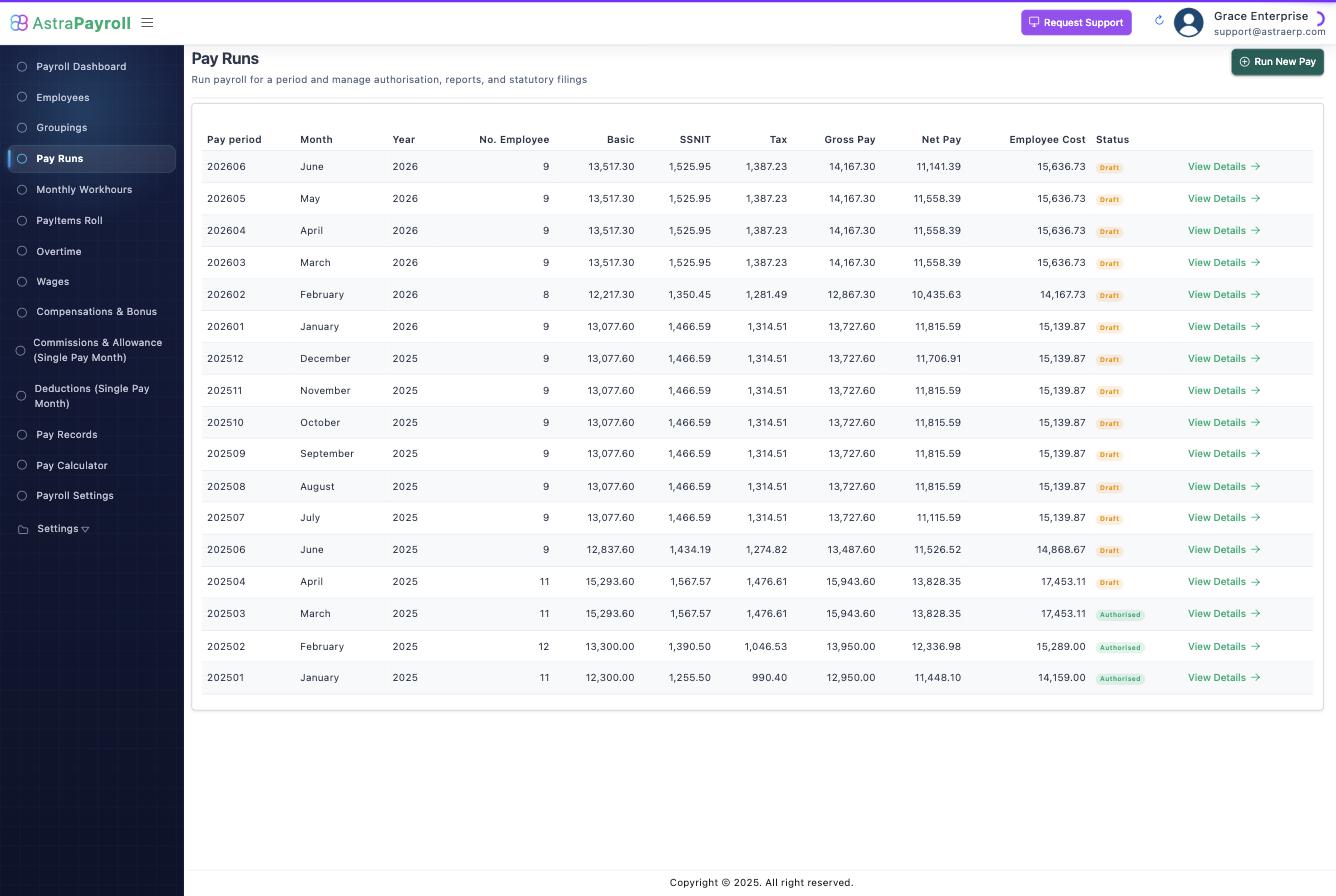
Pay periods
Payroll works in periods (month + year). Set the current period under Pay Period (Set As Current Pay Period); variable items and runs belong to it. Locked/authorised periods refuse edits — corrections go into the next period or via deauthorisation.
Running
- Create the run for the period (optionally for one employee group).
- The run computes every on-payroll employee: basic, allowances, overtime/wages, bonuses, deductions, SSNIT, Tier 2, PAYE → gross, net, employer cost.
- Review — the run lists totals and each employee's row; drill into any payslip. Wrong numbers? Fix the source (pay details or variable items) and recompute.
- Authorise — the sign-off. After authorisation:
- Payslips dispatch to employees (portal/email),
- Bank Pay-In Slip exports the net-pay list per bank,
- Email to Institution sends each institution its schedule (pensions, unions, loans),
- Excel exports for gross pay, employer SSF and full run data.
- Deauthorise reopens a run that must be corrected — deliberately loud, and only until payment has gone out.
Common questions
An employee is missing from the run. Check the setup list filters: off payroll, no pay type, or incomplete setup.
Attendance hours didn't arrive. The month must be confirmed, locked and posted in HR → Attendance → Summaries first.
Pay items Roll
Pay Item Roll (Payroll → Pay Item Roll): the period's totals by item — every payroll item with its total and the employees behind it. The reconciliation view for remittances and cost analysis.
Pay Item Definitions (Payroll → Definitions): coded variants under one item — label, code, amount — for items that need sub-products (loan schemes, allowance grades).
Overtime
Per-employee overtime for the month: entries against the employee's overtime pay item, at the amount or rate configured in their pay details.
Where: Payroll → Overtime
Where HR attendance is in use, prefer posting the confirmed monthly work-hours from HR (Attendance → Summaries) — overtime hours then arrive computed from clock data instead of typed.
Compensations & Bonus
One-off bonus payments for a period — bonus type, employees, amounts — computed with the run and shown on payslips per your payslip settings.
Where: Payroll → Compensations · Bonus types are configured in payroll lookups.
Pay Records
The pay history: per period per employee — basic, SSNIT, Tier 2, allowances, taxable pay, income tax, gross, net and employer cost — with the payslip a click away.
Where: Payroll → Pay Records
Filter by employee; Details opens the full breakdown, Payslip the printable slip. Employees see the same payslips on the portal.
Pay Calculator
A what-if calculator, independent of any employee record: basic pay, allowances, bonus, overtime, other deductions/reliefs, provident fund %, senior-staff flag → gross, income tax (with the PAYE band-by-band breakdown), net and cost to employer.
Where: Payroll → Pay Calculator
Use it for offers and negotiations — nothing is saved.
Settings
Payroll Items
The building blocks of pay. Every earning, relief and deduction is a payroll item: name, type, application mode (fixed amount or percentage), amount, taxable flag, status — and, for remitted items, the institution it is paid to.
Where: Payroll → Payroll Items
| Field | Meaning |
|---|---|
| Item name / description | How it appears on payslips and reports |
| Pay item type | What it is (allowance, deduction, pension tiers, loans…) — drives where it lands in the computation |
| Application mode | Fixed amount or percentage (of basic) |
| Amount | The default; per-employee overrides happen at assignment |
| Taxable | Whether it enters taxable income |
| Institutional item + institution | For remittances (pensions, unions, loans) — enables per-institution schedules and email dispatch from the pay run |
Definitions (Pay Item Definitions) let one item carry coded variants (e.g. loan products) with their own labels and amounts.
System-managed items (e.g. Tier 2 pension) are created automatically and shouldn't be repurposed.
Configuration
The setup surfaces in one list:
| Screen | Configures |
|---|---|
| Payroll Items | Earnings, reliefs, deductions; institutional items |
| Definitions | Coded variants under items |
| Institutions | The bodies you remit to: code, name, contact, bank details, email list (per-run schedules go here) |
| Settings | Statutory flags, ERN, payslip options, accounting posting |
| Pay Period | The current month/year everything belongs to |
| Employee Groups | Run subsets |
Payroll Settings
Company-level payroll behaviour.
Where: Payroll → Settings
| Setting | Effect |
|---|---|
| Pays income tax / pays SSNIT | Whether statutory deductions are computed at all (some categories of employer differ) |
| SSNIT ERN | Your employer registration number, printed on schedules |
| Payment day | The nominal pay date in the month |
| Payslip options | Show/hide SSNIT, Tier 2 and the "other" section on payslips; payslip footer text |
| Post accounting bills | Post the run's cost into Accounting as bills automatically |
Set Pay Period
Everything recurring about one employee's pay.
Where: Payroll → Employee Pay Setup → Pay setup on the employee
The pay details
| Field | Meaning |
|---|---|
| Pay type | Salaried (monthly basic) vs wage-based |
| Basic pay | The monthly basic for salaried staff |
| On payroll | Master switch — off = skipped by runs |
| Deduct income tax / SSNIT | Statutory participation for this employee |
| Expected / override net pay | Target-net arrangements: the system back-computes, or you pin the net |
| Overtime / Saturday / Sunday / holiday pay items | Which item each premium pays through, and the amount or rate mode |
| Regular-time pay item | For wage staff — the item hours pay through |
Recurring earnings, reliefs and deductions
- Add Earnings & Reliefs — recurring allowances and reliefs: item, mode, amount, status.
- Deductions — recurring or term deductions: item, amount per period, total to pay with start/end dates (the system stops when the total is recovered — loans), status.
Everything here repeats each period until changed; one-off amounts belong in the monthly variable screens instead.
Upload Employee Payroll Items
Bulk-assign payroll items from a spreadsheet: Employee ID, payroll item, amount — with an application date, and switches for override existing payroll item and create non-existing employee.
Where: Payroll → Upload Employee Payroll Items
The preview shows every row with a comment when it can't apply (unknown employee/item); process, fix the rejects, re-upload just those.
Human Resource
Initial Set-up
The order that makes the HR module work end to end for a new company:
- Departments, job titles, ranks — Settings → HR lookups. Ranks carry a weight (seniority) used across HR.
- Working period — working hours per weekday and overtime rate; attendance maths depends on it.
- Leave types & allocations — see Leave Setup and Rank Allocation; type individual figures on Entitlements.
- Employees — add or bulk-upload your people, with department, rank, manager and status set.
- Management roles — assign who approves leave and who holds discipline authority.
- Discipline catalogue — seeded automatically; review it under Discipline → Setup.
- Portal invitations — send from the Employee List so staff can activate self-service.
- Attendance device / notifications — if you clock with a device, register it under Attendance Device.
HR Dashboard
The landing view of the HR module: headcount and status at a glance, upcoming events (birthdays, retirements, probation ends), pending leave, and shortcuts into the busiest screens.
Where: HR → HR Dashboard · Who: anyone granted the HR module 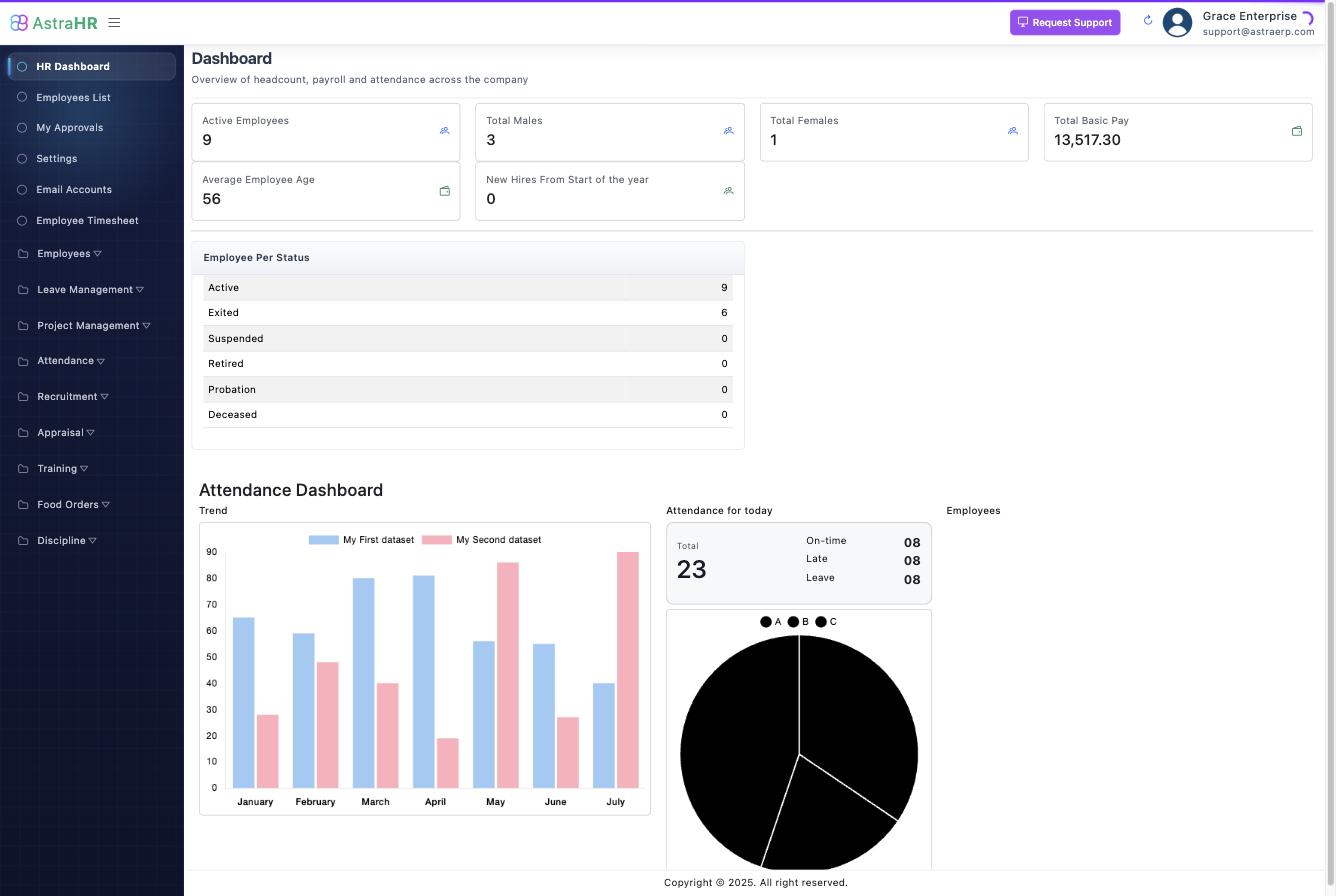
Use it as the daily starting point: the tiles answer "who is in, who is out, what needs my action today", and each tile links through to the underlying list.
Common questions
The numbers look stale. Tiles compute on load — refresh the page after big changes (uploads, status changes).
A tile shows a page I can't open. Tiles reflect company data; opening the detail still requires the page grant.
Employees
View Records
One employee's whole HR file on a single screen: profile, promotions and rank history, bank accounts, qualifications, job history, identifications, relations, documents, training — each section read-only here with links to the screen that manages it.
Where: HR → Employees → View Records · search for the employee by name or staff ID.
Use this before meetings and audits: it's the fastest answer to "show me everything we hold on this person". For payroll ledger entries shown per employee, credits/debits/balance come from the employee's pay record.
Employee List
The employee master list — every person in the company, with everything else in HR (leave, attendance, payroll, discipline) hanging off these records.
Where: HR → Employees → Employee List · Who: HR users with the Employees page
The list
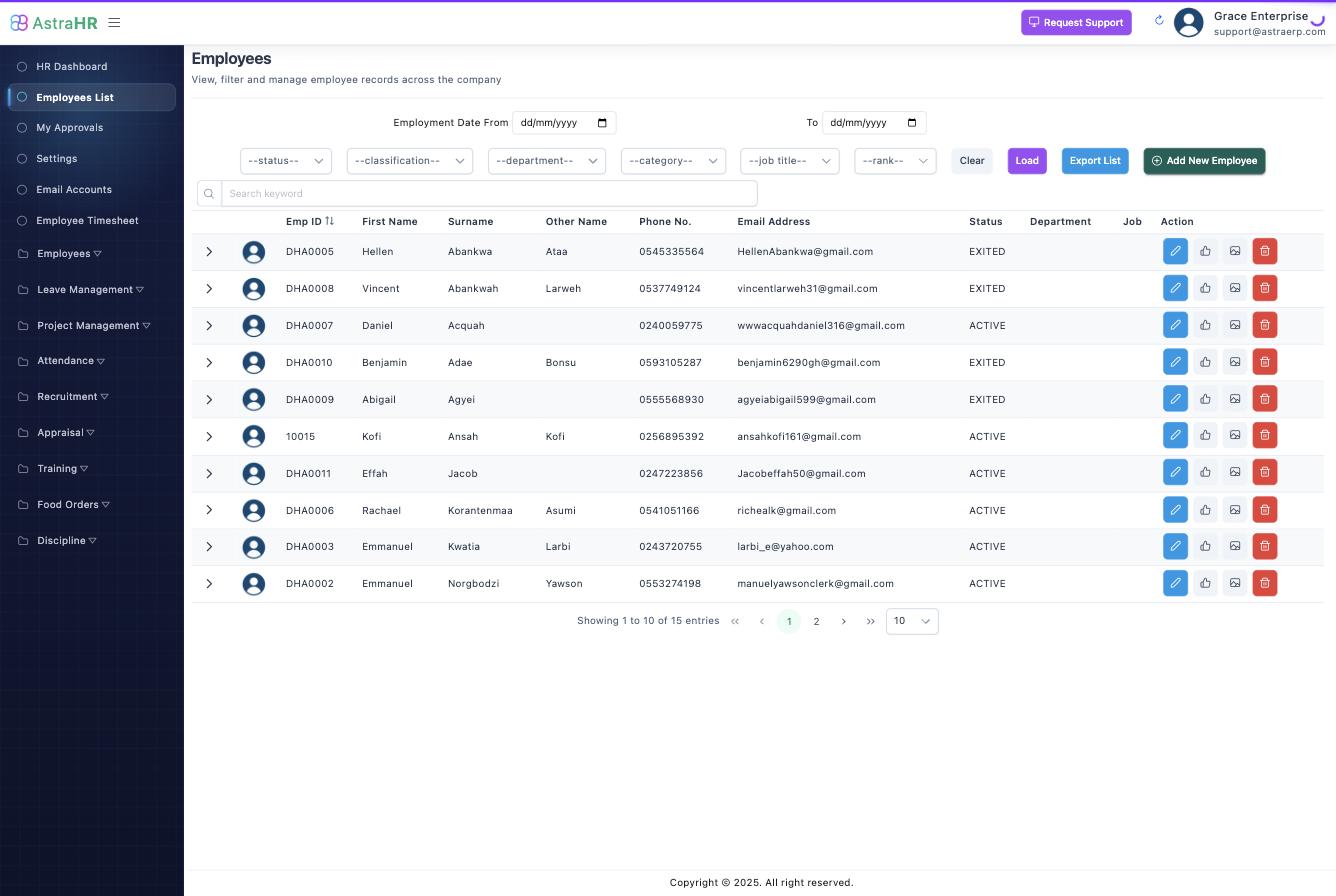
Columns: first name, surname, other names, phone, email, status, department, job. Filter, then Load; Export List produces Excel; Send Employees Portal Invitation emails portal activation to selected employees.
Adding an employee
Click Add New Employee and work through the form:
| Field group | Fields |
|---|---|
| Identity | Title, first name, surname, other names, initials, gender, date of birth, marital status, languages spoken |
| Contact | Phone, other phone, email, residential / postal / digital address |
| Origin | Nationality, country/city/place of birth, hometown, national ID |
| Employment | Employee ID (staff number), employment date, retirement date, status (Active, Probation, Suspended, Exited, Retired, Deceased), category (Management / Senior / Junior staff), classification (Full time, Part time, Contract, Intern), contract staff?, expatriate? |
| Position | Department, job title, rank/grade, manager (the supervisor — approvals and discipline routing follow this) |
| Statutory | SSNIT number, TIN |
| Banking | Bank, branch, account name & number (also manageable under Bank Account) |
Save Changes creates the record. The employee appears immediately in every other HR screen's pickers.
What happens next
- Portal access: send the portal invitation so the employee can activate self-service (leave, payslips, attendance, discipline).
- Payroll: a payroll profile is created for the employee; set pay items under Payroll.
- Status drives everything: Probation routes discipline to the probation procedure; Suspended blocks leave approval; Exited/Retired drop the employee from active lists but never delete history.
Common questions
Can I delete an employee? No — set status to Exited. History (pay, leave, discipline) must stay resolvable.
Employee ID vs record: the staff number is yours to assign; the system keys everything internally, so IDs can be corrected without breaking links.
Employee Relation
Family contacts and dependants per employee: who to call, who benefits, and the declared-relations register that other modules read (e.g. Discipline's conflict-of-interest screen).
Where: HR → Employees → Employee Relation
Steps
- Search and select the employee.
- Add a relation: relationship type (spouse, child, parent…), name, gender, date/place of birth, contact number & email, addresses, national ID, and percentage allocation where the relation is a beneficiary.
- Save — the relation lists under the employee.
Common questions
Percentage allocation? Used where benefits (e.g. family allotments) are split across beneficiaries; the percentages are yours to keep at 100 in total.
Employee Document
Scanned letters, contracts, certificates and any other file that belongs on an employee's file — typed by document type so they can be found again.
Where: HR → Employees → Employee Document · Document types are maintained in Settings → Lookups.
Steps
- Search and select the employee.
- Choose the document type, the submitted date and a description.
- Attach the file and save.
Documents are listed per employee, newest first, and open in the browser viewer.
Job History
The employee's employment record before joining you — companies, roles, dates and referees. Internal promotions live under Promotions, not here.
Where: HR → Employees → Job History
Fields
Company name & location, nature of business, job title, specific duties, joined/exit dates, exit reason, supervisor name & contact, additional comments.
Identification Info
Identity documents per employee — national ID, passport, driver's licence, voter ID — with numbers, issue and expiry dates.
Where: HR → Employees → Identification Info
Add the ID type, card number, issue date and expiry date, and attach the card image where available. Expiring IDs are the reason expiry dates matter — sort the list by expiry when doing compliance sweeps.
Upload Employee
Bring a whole workforce in from a spreadsheet instead of typing each person.
Where: HR → Employees → Upload Employee · Template: download from Upload Templates.
Steps
- Fill the template — one row per employee: Emp ID, first name, surname, other name, phone, email, SSNIT no., TIN, status, category and the profile columns.
- Upload the file. The preview lists every row with a Reason column.
- Choose the collision behaviour: Create new record and/or Override existing record (existing = matched by Employee ID).
- Process. Rows that fail stay in the preview with the reason (missing required value, unknown department…) — fix and re-upload just those.
Common questions
Will re-uploading duplicate people? Not with Override existing — rows matching an existing Employee ID update in place.
Upload Bank Accounts
Bulk-load employee bank accounts from a spreadsheet: Employee ID, bank name, branch, account name, account number.
Where: HR → Employees → Upload Bank Accounts
Upload, review the preview (each row shows a comment when it can't be matched or parsed), and process. Accounts land on each employee's Bank Account list; set the active one there.
Qualification
Academic and professional qualifications per employee: certificate, qualification type, institution and year admitted.
Where: HR → Employees → Qualification
Add one row per certificate. Qualification types (e.g. Degree, Diploma, Professional) come from the HR lookups so reporting stays consistent.
Bank Account
Each employee can hold several bank accounts; exactly one is current — the one payroll pays.
Where: HR → Employees → Bank Account
Steps
- Search and select the employee.
- Add account: bank, branch, account name, account number.
- Set as current on the account payroll should use. Changing the current account takes effect from the next pay run.
Promotions
The employee's internal progression: each row is a dated change of job title and/or rank, and the latest row is the employee's current position.
Where: HR → Employees → Promotions
Steps
- Search and select the employee.
- Add: effective date, new job title, new rank/grade, and consolidated pay where the change carries one.
- Set as current to make it the active position.
What happens next
Rank drives leave allocations (rank-based) and seniority comparisons; job title shows across HR and payroll. Pay changes flow to payroll per your payroll setup (a rank change can carry a pay change unless overridden on the employee).
Employee Accident
Workplace accident register: what happened, to whom, the injury type, and the record you'll need for insurance and safety reporting.
Where: HR → Employees → Employee Accident · Injury types are maintained in HR lookups.
Record the employee, date, injury type and description. Where an accident points at a wilful safety breach by someone, that is a separate disciplinary matter — see Discipline.
Discipline
Overview
AstraHR's Discipline module manages employee misconduct and grievances end to end — from the first quiet word, through formal cases with queries, hearings and sanctions, to appeals, closure and record expiry.
It is not a logbook. It is a procedure-enforcing system: a sanction physically cannot be recorded until the steps that make it defensible are complete, and everything that happens lands on an append-only audit trail.
Why it works this way
Under Ghana's Labour Act 2003 (Act 651), when a dismissal is challenged at the National Labour Commission (NLC), the employer must prove two things:
- the ground was fair (what the employee did), and
- the procedure was fair (how the employer handled it).
Most SMEs lose on the second one — not because the employee was innocent, but because nobody can prove a query was served, a hearing was offered, or the employee was allowed to bring a colleague. The module exists to make that proof automatic: if the case reached a sanction, the procedure happened, and the Case Pack proves it in one click.
The module also respects the Data Protection Act 2012 (Act 843): discipline data defaults to the least visibility, restricted cases suppress notifications, and retention is policy-driven.
The seven ground rules
These are built into the system — no configuration can switch them off:
- The product is a defensible record. Every action is written down with actor and timestamp.
- Procedure-enforcing, not outcome-logging. Gates are enforced by the server, not just the screens.
- The right to be heard is never bypassable. Every path to a sanction passes through a query and the chance to respond.
- Conduct is not capability. Poor performance belongs in Appraisals, not here.
- Nothing is ever deleted. There is no delete button on a case, allegation, evidence item, finding, sanction, appeal or audit entry — anywhere.
- Automation recommends; humans decide. No job opens a live case or applies a sanction on its own.
- Confidentiality by default. New cases default to Restricted visibility.
The module at a glance
Where things live
| What | Where |
|---|---|
| HR / manager screens | HR → Discipline in the sidebar: Dashboard, Cases (with the Report Incident button), Counselling Notes, Setup |
| Employee's side | Employee portal → Discipline: their cases, responses, acknowledgements, appeals, counselling comments, grievances |
| Configuration | HR → Discipline → Setup (one tabbed workspace) |
Reading order
New to the module? Read in this order:
- Key Concepts — the vocabulary and the case lifecycle (and the Glossary whenever a term is unfamiliar)
- Setup & Configuration — what to review before the first case
- Tutorial: Running a Minor Case — the everyday flow
- Tutorial: Gross Misconduct — investigation, suspension, hearing
- Appeals · Counselling Notes · Grievances
- The Employee's Side — what your staff see and do
- Automation & Jobs — auto-triggers, deadlines, notifications
- Dashboard & Case Pack — oversight and the NLC bundle
- FAQ & Data Rules — everything else, including what the system refuses to do
Key Concepts
Learn these eight ideas and every screen in the module makes sense.
1. Case vs Sanction
The Case is the process — the file that moves through reporting, triage, query, decision. The Sanction is the outcome imposed at the end (written warning, suspension without pay, dismissal). The word "disciplinary action" is deliberately not used for either, because it blurs the two.
2. The three-tier response model
Forcing every timesheet lapse through a full case is how discipline modules die. AstraHR has three tiers:
| Tier | Instrument | Opens a case? | Counts toward escalation? | Appealable? |
|---|---|---|---|---|
| 0 | System reminder / nudge | No | No | No |
| 1 | Counselling note | No — a lightweight record | Yes, as proof of prior notice | No — nothing was imposed |
| 2 | Formal case | Yes | Yes | Yes |
A tier-1 counselling note is what other systems miscall a "verbal warning". A verbal warning is a contradiction — to be useful later it must be written down, and once written it is a record. AstraHR names it honestly.
3. The case lifecycle
Every case is always in exactly one state — the coloured chip at the top of the case workspace shows which. Moves between states are called transitions, and each transition has a gate: a condition the server checks before letting the case move. If a gate fails you are told exactly why, and nothing changes.
How to read the diagram below: follow the top row left to right — that is the normal path of an everyday case (report → review → query → response → decision). Boxes off the main row are the exits and detours: Dismissed (no case to answer), Hearing (mandatory for serious cases), Sanction Issued and the Appeal loop in blue. Every case ends in the green CLOSED box. Don't try to memorise the arrows — the workspace only ever offers you the legal moves; section 4 tells you what to actually do at each stop.
The most important gates, in plain words — these are the rules that make the record defensible, so the system will not let you skip them:
| To reach… | The system demands… |
|---|---|
| Under Review | A named respondent; anonymous reports need a named HR validator |
| Query Issued | Offence classified, at least one allegation, evidence where the offence requires it |
| Response Received | A response on file, or the lapsed deadline minuted with a timestamp (a lapse is never an admission); a verbal response must be verified by the employee |
| Decision | For hearing-mandatory classes: a concluded hearing with quorum, attendance, representation status and minutes |
| Sanction Issued | Every allegation carries a finding; at least one upheld; ladder floors/ceilings respected; overrides justified in writing |
| Closed | No active suspension (auto-lifts), no undetermined appeal, appeal window elapsed or waived |
4. Who does what at each stage
The workspace never shows you an illegal move: the buttons across the top of a case are exactly the transitions the case allows right now, and hovering any of them shows a plain-words explanation of what it does. Use this section as the companion — for each state the case can be in: what just happened, what you do next, and what the employee sees and does on their portal at the same moment.
| The case says… | What you do next | The employee, on their portal |
|---|---|---|
| Draft (auto-raised from attendance) | Open it, read the attached attendance evidence. Real issue → Advance to Reported. Noise → Dismiss Draft — nothing counts against anyone | Sees nothing — a draft is invisible to the employee |
| Reported | Take Under Review. The case needs a named respondent; an anonymous report needs a named HR validator first | Nothing yet |
| Under Review | Triage — pick the offence (the system shows the recommended sanction for this occurrence). Then add at least one allegation (the specific charge), attach evidence, and Disclose each item. Serious matter? Use the Process tab first: apply a precautionary suspension and/or appoint an investigator. When the file is ready → Issue Query | Notified only when the query is served — nothing leaks while you prepare (restricted cases suppress notifications entirely) |
| Query Issued | Wait for the deadline to run. The employee answered in person instead? Record Response (they must verify your transcription). Deadline passed in silence? Minute Lapsed Deadline — never treat silence as guilt | Reads the query and every disclosed evidence item, and responds in their own words by the working-day deadline. Verifies any response HR transcribed for them |
| Response Received | Read the response honestly — it may end the matter. Minor case → Record Decision. Hearing-mandatory class (or you judge one is needed) → Process tab → Schedule the hearing (the conflict check names who cannot sit; the date respects the notice window) | Waits; receives the hearing invitation if one is convened |
| Hearing | Hold the sitting: record attendance, representation (a requested-and-refused companion is flagged red — don't be that case), minutes and votes → Record Sitting and conclude. Then Record Decision | Attends, with a companion or union rep if they wish. May respond to the evidence in person |
| Decision | Give every allegation a finding. Anything upheld → Issue Sanction — the ladder recommendation is pre-selected; changing it needs a written justification. Nothing upheld → Close (No Sanction) | Waits for the outcome |
| Sanction Issued | The letter is served on the portal automatically. Watch for the acknowledgement; a refusal is recorded too. Payroll-affecting sanctions raise the deduction instruction on their own | Acknowledges the sanction letter (or refuses — that is recorded, not forced). The appeal window opens |
| Appeal Window | Nothing — unless an appeal arrives, in which case the appeal authority (never the issuer) opens the Appeal tab → Determine Appeal. Once the window elapses, the appeal is decided, or the employee waives in writing → Close Case | May lodge an appeal, with grounds and a written submission, any time inside the window |
| Closed / Dismissed | Nothing — the case is read-only forever. Case Pack produces the full NLC bundle any time | Sees the outcome in their history. A spent sanction drops out of occurrence counts automatically — no one has to remember |
What does "Disclose" mean? (the button on the Evidence tab)
Adding evidence puts it on your file; disclosing it releases that item to the employee on their portal, and stamps the date and time it happened. The principle behind it: the employee must see what the decision-maker saw, before the decision is made — otherwise they are answering a charge blind, and the decision is unfair no matter how right it is. That timestamp is your proof at the NLC that they saw it. Practical rule: disclose everything you intend to rely on before issuing the query; an undisclosed item on a decided case is counted as a defect on the dashboard.
The three moments people get wrong
- Skipping disclosure — evidence added but never disclosed, then relied on. The dashboard counts these as defects.
- Treating silence as admission — the deadline lapsing is minuted as a lapse; the case then proceeds on the evidence, not on the silence.
- Refusing a companion — the single most common procedural defect at the NLC. If the employee asks to bring someone, the answer is yes.
5. Effective-dated configuration
A case is judged by the configuration in force on its incident date, not today's. If you tighten a policy in March, a January case still runs under January's rules — otherwise every closed case becomes arguable. That is why offences, sanction types and authority rules carry Effective from / Effective to dates, and why the case snapshots its offence class, procedure and recommendation at triage.
6. Occurrences and the sanction ladder
Each offence carries a ladder: the recommended sanction for the 1st, 2nd, 3rd… upheld occurrence. At triage the system counts the respondent's prior upheld, unspent occurrences of the same offence and pre-selects the right rung. Departing from the recommendation requires a written justification, and configured floors/ceilings are enforced. Severity never decreases down a ladder.
Spent records don't count. When a sanction's validity elapses (e.g. a written warning after 12 months), a nightly job marks it spent: still on the trail forever, but excluded from occurrence counting. Closure starts the clock; it does not end the record.
7. Suspension is not a sanction
Precautionary suspension is a neutral measure while a case runs — it may span review, query and hearing, it blocks leave approval, and it auto-lifts the moment the case closes. An SME forgetting to reinstate someone is a real liability; the system makes it impossible.
8. Roles and the authority matrix
Business roles (Line Manager, HR Officer, HR Manager, Managing Director, CEO) carry a seniority order. The authority matrix says, per sanction: who may issue, who must approve, and who hears the appeal — and the appeal authority must sit strictly above the issuer. Two absolutes hold regardless of configuration: the issuer never determines the appeal against their own decision, and dismissal is never reachable without a concluded hearing.
9. The audit trail is the case
Every transition, query, disclosure, finding, sanction, acknowledgement (or refusal), lapse and note is appended to the case's event log with actor, timestamp and reason. There is no code path that edits or deletes an entry. The Case Pack's chronology is this log — which is why it stands up at the NLC.
Glossary
| Term | Meaning |
|---|---|
| Allegation | One specific factual assertion on a case; each carries its own finding |
| Appeal window | Working days after a sanction during which the employee may appeal |
| Case reference | The immutable number (e.g. DC/2026/0007) minted when a case is created |
| Disclosure | Releasing an evidence item to the respondent; timestamped to prove they saw what the decision-maker saw |
| Finding | The adjudication of one allegation: Upheld, Not Upheld, Partially Upheld, Withdrawn, or No Finding |
| Grievance | An employee's complaint to the organisation; rides the same case machinery with no sanction path |
| Lapse | A response deadline passing with no response — minuted with a timestamp, never treated as an admission |
| Occurrence | Which upheld repetition of an offence this case is, for the respondent |
| Quorum | Minimum voting panel members who must be eligible (after conflict exclusions) and present |
| Restricted | Case visibility that excludes even the respondent's line manager |
| Spent | A sanction whose validity has elapsed — on the record, out of the counts |
| Working days | Calendar days minus weekends and the public-holiday calendar; all deadlines use them |
Glossary
Every word the Discipline module uses, in plain language. Terms are grouped by theme; use the search box (or the outline on the right) to jump straight to one. Where a term comes from Ghana's Labour Act, 2003 (Act 651) the section is cited; where the Act is silent, we say so — those practices come from natural justice (the fair-hearing principles the NLC applies) or from your own handbook.
How to read a law reference: Act 651 s.62 means section 62 of the Labour Act, 2003. The Act is the floor, not the ceiling — your handbook or collective agreement can be more generous to the employee, never less.
The people on a case
Respondent
The employee who has to answer the allegation — the person the case is about. On a grievance the respondent is optional (a grievance may be about a situation, not a person).
Complainant / Reported by
Whoever raised the matter. On a disciplinary case it's usually the line manager; on a grievance it's the aggrieved employee.
Anonymous report
A report where the reporter's name is withheld from the record. The system still requires a named HR validator before the case can pass triage — someone accountable must vouch that the report is worth pursuing. Not from the Act — good practice so anonymous reports can't be weaponised.
Validator
The named HR person who reviews an anonymous report and confirms there's a case to answer. Their name goes on the record; the reporter's does not.
Initiator
The supervisor or manager who starts cases. The dashboard tracks cases by initiating supervisor because one person raising most of the cases is a warning sign about the supervisor, not the staff.
Panel
The group of people who sit in a disciplinary hearing and recommend a decision. Configured in Setup with members, a quorum and a decision rule (e.g. majority).
Quorum
The minimum number of panel members who must actually sit for the hearing to count. If exclusions (see conflict of interest) drop attendance below quorum, the hearing cannot proceed.
Conflict of interest
A reason a person cannot judge a case. The system enforces two absolutes: the complainant and the investigator can never sit on the panel, and a rehearing excludes everyone who sat the first time. Optional per-panel rules also exclude the respondent's supervisor or department. Not spelled out in the Act — it is the "no one judges their own cause" rule of natural justice, and the NLC applies it.
Investigator
The person appointed to establish the facts before a decision — interviews, documents, witness statements. Investigating disqualifies them from judging: they present findings, they don't decide.
Witness
Anyone who gives an account during an investigation or hearing. Their statement is recorded on the case file.
Representative / Companion
The person the employee brings to a hearing — a colleague or a union representative. The right to organise and be represented by a union flows from Act 651 s.79 (freedom of association). Refusing a requested companion is the most common procedural defect — the module flags it in red wherever it happens.
Appeal authority
The role that decides an appeal. The rule the system enforces: whoever issued the sanction can never determine the appeal, and the appeal authority must outrank the issuer.
The case itself
Case
The file everything hangs off — allegations, evidence, queries, responses, hearings, findings, sanctions, appeals and the audit trail. One case = one matter about one respondent.
Case type
Disciplinary (the employer alleges misconduct) or Grievance (the employee raises a complaint). Both run on the same machinery; a grievance has no offence and no sanction path.
Case reference
The permanent number on the file, e.g. DC/2026/0007 — generated when the case is created, never changed, never reused.
Three tiers
The module's response model: a counselling note (tier 1, the quiet word), a disciplinary case (tier 2, the formal process), and the grievance track (employee-initiated). Most issues should die at tier 1.
Counselling note
The written record of an informal correction: employee, what was discussed, validity period (default 6 months). It is not a sanction — it isn't appealable and doesn't appear in appraisals. It exists to prove the employee was told, and it counts at the tier boundary: a repeat inside the validity window justifies escalating to a case.
Grievance
A complaint by an employee — about workload, treatment, pay, a colleague. Raised from the employee portal (or by HR on the employee's behalf), triaged, investigated, decided and closed on the same audited machinery. Under Act 651 s.64 an unresolved workplace grievance can end up before the NLC, so the record matters just as much.
Visibility
Who can see the case. Restricted — named participants only (harassment, financial matters; even the line manager is excluded); HR only; Department. New cases default to the company's configured default, normally Restricted. Confidentiality is also a Data Protection Act, 2012 (Act 843) obligation — discipline data is personal data.
Audit trail / Case event
The append-only log under every case: who did what, when, from which status to which. Nothing on it can be edited or deleted — it is the chronology the case pack prints and the evidence the NLC reads.
Case pack
The one-click bundle of the entire case — report, allegations, disclosed evidence, query and response, hearing minutes, decision, sanction letter, appeal — as one ordered, printable document on the company letterhead. Built for the day a dismissal is challenged.
Working days
Deadlines in the module (response periods, appeal windows, hearing notice) count working days: weekends and the company's holiday calendar are skipped. The Act states notice in ordinary days/weeks/months (s.17); the module uses working days for internal process deadlines because that is fairer to the employee.
SLA
Service-level agreement — the internal clock on each step (e.g. "respond to a query within 5 working days"). Breached means the deadline passed. SLAs discipline the process, not the employee.
Offences and sanctions
Offence
A defined act of misconduct in your catalogue — e.g. Lateness, Insubordination, Theft. Its definition is printed verbatim on the query letter, so it's written in plain words, not legal shorthand. Misconduct as a ground for termination comes from Act 651 s.15 and s.62(b) — but only proven misconduct, which is what the whole process exists to prove.
Offence catalogue
The company's list of offences, grouped by class and category, with effective dates. Cases always use the catalogue as it stood on the incident date — you cannot change the rules after the fact.
Offence class
How serious the offence type is: Minor, Major or Gross. The class picks the procedure — a minor offence runs the short procedure; gross misconduct forces the full one (investigation, possible suspension, mandatory hearing).
Offence category
What the offence is about — Attendance, Conduct, Safety, Financial, Harassment, Confidentiality, Insubordination, Substance, Property. Categories power the dashboard's pattern heatmap. (Safety duties: Act 651 s.118; sexual harassment is defined in Act 651 s.175, and harassment-linked termination is unfair under s.63.)
Occurrence
Which time this is, for this employee and this offence: 1st, 2nd, 3rd… Counted at triage from prior upheld, unspent records only — dismissed cases and expired records don't count against anyone.
Sanction
The formal penalty at the end of a proven case — the outcome. (The process is the case; the outcome is the sanction.)
Sanction type
A kind of penalty in your catalogue: verbal warning (recorded), written warning, final written warning, suspension without pay, demotion, dismissal. Each has a severity rank and a validity period.
Sanction ladder
Per offence, the recommended sanction per occurrence — e.g. lateness: 1st = counselling, 3rd = written warning, 5th = final warning. Severity can never decrease down the ladder. The ladder is why two employees who did the same thing the same number of times get the same penalty — consistency is half of fairness at the NLC.
Recommended sanction
What the ladder (or an escalation rule) proposes at triage. It is pre-selected when the sanction is issued — a recommendation, not an order.
Override
Issuing a different sanction than recommended. Allowed, but it demands a written justification on the record, stays within the offence's floor and ceiling, and is counted on the dashboard (override rate) — a high rate means the ladder and reality disagree.
Terminal sanction
A sanction that ends employment — dismissal. The system physically requires a concluded hearing first; there is no configuration where dismissal skips the hearing. Termination grounds and notice: Act 651 ss.15, 17, 62; wrongly done, it becomes unfair termination under s.63, remediable by the NLC under s.64 (reinstatement, re-employment or compensation).
Spent sanction / validity
Every sanction expires after its validity period (e.g. a written warning valid 6 months). Once spent, it no longer counts toward occurrence numbers. The dashboard's compliance clock shows sanctions going spent in the next 30 days.
Payroll effect
What a sanction does to pay, automatically: a suspension without pay or a fine raises the deduction instruction in Payroll — no side-channel emails.
Escalation rule
An automatic recommendation trigger: "3rd lateness in 12 months → final written warning". First matching rule wins, and it only ever recommends — a human decides.
The process, stage by stage
Triage
The sorting step right after a report: HR (or the manager) examines it and decides what it actually is — pick the offence from the catalogue in force on the incident date, snapshot its class and procedure onto the case, count the occurrence, and see the ladder's recommendation. Think of a hospital triage nurse: nothing is treated yet; the case is classified so the right procedure applies. A report with no substance is dismissed at triage and the respondent's record stays clean.
Allegation
The specific charge, in writing: what the employee is said to have done, when and where (the particulars). A query cannot be issued until at least one allegation is on file — the employee must know exactly what they are answering. This is the "reason for the charge" half of the fair-hearing rule the NLC applies.
Evidence
Anything that supports (or undermines) an allegation — documents, photos, attendance records, statements. Evidence is registered on the case with who collected it and when.
Disclosure
Releasing evidence to the employee, with a timestamp. The principle: the employee must see what the decision-maker saw, before the decision. An undisclosed item on a decided case is a defect — the dashboard counts them.
Query
The formal written "please explain yourself" letter, served on the employee (on their portal) with the allegations, the disclosed evidence and a working-day response deadline. The right to be heard before punishment is the heart of procedural fairness — no path in the module reaches a sanction without a query.
Response
The employee's answer, in their own words, from their portal. If HR types up a verbal answer instead (transcribed response), it is held until the employee verifies the transcription — nobody's words are put in their mouth.
Lapse / Minuting a lapse
If the deadline passes in silence, HR clicks Minute Lapsed Deadline. The lapse is recorded, never assumed — and silence is not an admission of guilt. The case proceeds on the evidence.
Precautionary suspension
Sending the employee home (normally on full pay) while a serious matter is investigated. It is not a sanction and implies no guilt — it protects evidence, people or money. It has a planned end date, must be reviewed if it runs past it, blocks leave approvals while active, and auto-lifts when the case closes. The Act doesn't regulate suspension directly; unpaid or indefinite suspension is where employers get into unfair-treatment territory, so the module defaults to paid and time-boxed.
Investigation
The fact-finding stage for serious cases: an appointed investigator, witness statements, a findings report. The offence definition can require it; a gross-misconduct procedure always includes it.
Hearing
The formal sitting where the employee answers the charge before a panel: notice served in advance (minimum notice days are configured), attendance recorded, representation offered, minutes taken, votes recorded, conclusion reached. Mandatory before any terminal sanction.
Finding
The decision on each allegation: Upheld (proven), Not upheld, Partially upheld, Withdrawn, or No finding — insufficient evidence. Every allegation gets one — there are no half-decided cases. Only upheld findings can carry a sanction; "proven misconduct" is the exact language of Act 651 s.62(b).
Appeal
The employee's challenge to the decision or the sanction, lodged from their portal within the appeal window. Heard by someone senior to (and other than) the issuer.
Appeal window
The working-day period after a sanction during which the employee may appeal. A case cannot close while the window is open unless the employee has waived the appeal in writing.
Appeal outcomes
Dismissed — sanction confirmed · Sanction reduced · Sanction increased · Finding overturned · Rehearing ordered (before a fresh panel — nobody who sat the first time). A substituted sanction supersedes the original: the old one stops counting but stays visible on the trail — history is never rewritten.
Overturn rate
The dashboard's headline quality number: the share of determined appeals that changed the outcome. A high rate means first-instance decisions are getting it wrong — retrain the deciders or fix the process.
Closure
The end of the case, with a closure reason: sanction served, dismissed at triage, allegation withdrawn, employee resigned or dismissed, referred to the NLC or police, time-barred, duplicate. Closing auto-lifts any active suspension; a closed case is read-only forever.
Institutions and instruments
Labour Act, 2003 (Act 651)
Ghana's principal employment statute. The sections this module leans on: s.15 (grounds of termination) · s.17 (notice) · s.62 (fair termination — including proven misconduct) · s.63 (unfair termination) · s.64 (remedies before the NLC) · s.79 (freedom of association / union representation) · s.118 (occupational safety) · s.175 (definitions, including sexual harassment).
NLC — National Labour Commission
The statutory body (established under Part XVIII of Act 651) that hears unfair-termination and labour complaints. When an employee challenges a dismissal there, the employer must prove the ground and the procedure were fair. The case pack is your file for that day.
Natural justice
The two fair-hearing rules courts and the NLC apply even where the Act is silent: hear the other side (no sanction without notice of the charge and a chance to answer) and no one judges their own cause (conflict screening, independent appeal). Most of the module's hard gates are these two rules in software.
Data Protection Act, 2012 (Act 843)
Why discipline records default to restricted visibility, notifications are suppressed on sensitive cases, and retention is policy-driven — discipline data is personal data.
Employee handbook / Collective agreement (CBA)
Your own rules — offence definitions, ladders, procedures. The module's catalogue is where they become executable. They may improve on the Act's minimums, never undercut them.
See also: Key Concepts for how these pieces fit together, and the FAQ for the data rules.
Disclaimer: this glossary is practical guidance for using AstraHR, not legal advice. Section references are to the Labour Act, 2003 (Act 651) as enacted; have your lawyer confirm interpretations that matter to a live dispute.
Setup & Configuration
Everything the module judges cases by lives in one place: HR → Discipline → Discipline Setup — a tabbed workspace. This page walks every tab, in the order you should review them.
You start from a working catalogue
A complete Ghana SME default catalogue is seeded automatically for every company (and can be re-run any time from the Seed Catalogue tab). Your job on day one is to review and adjust, not to build from scratch.
The two configuration laws
- Deactivate, never delete. Configuration referenced by a case must stay resolvable forever, so every list offers Deactivate (the ban icon), never delete. Deactivated rows show greyed and stop appearing on new cases; historical cases still resolve them.
- Effective dating. Offences, sanction types and authority rules carry Effective from / to. A case runs under the configuration in force on its incident date. When you change policy, set the new row's effective date rather than rewriting history.
Tab 1 — Parameters
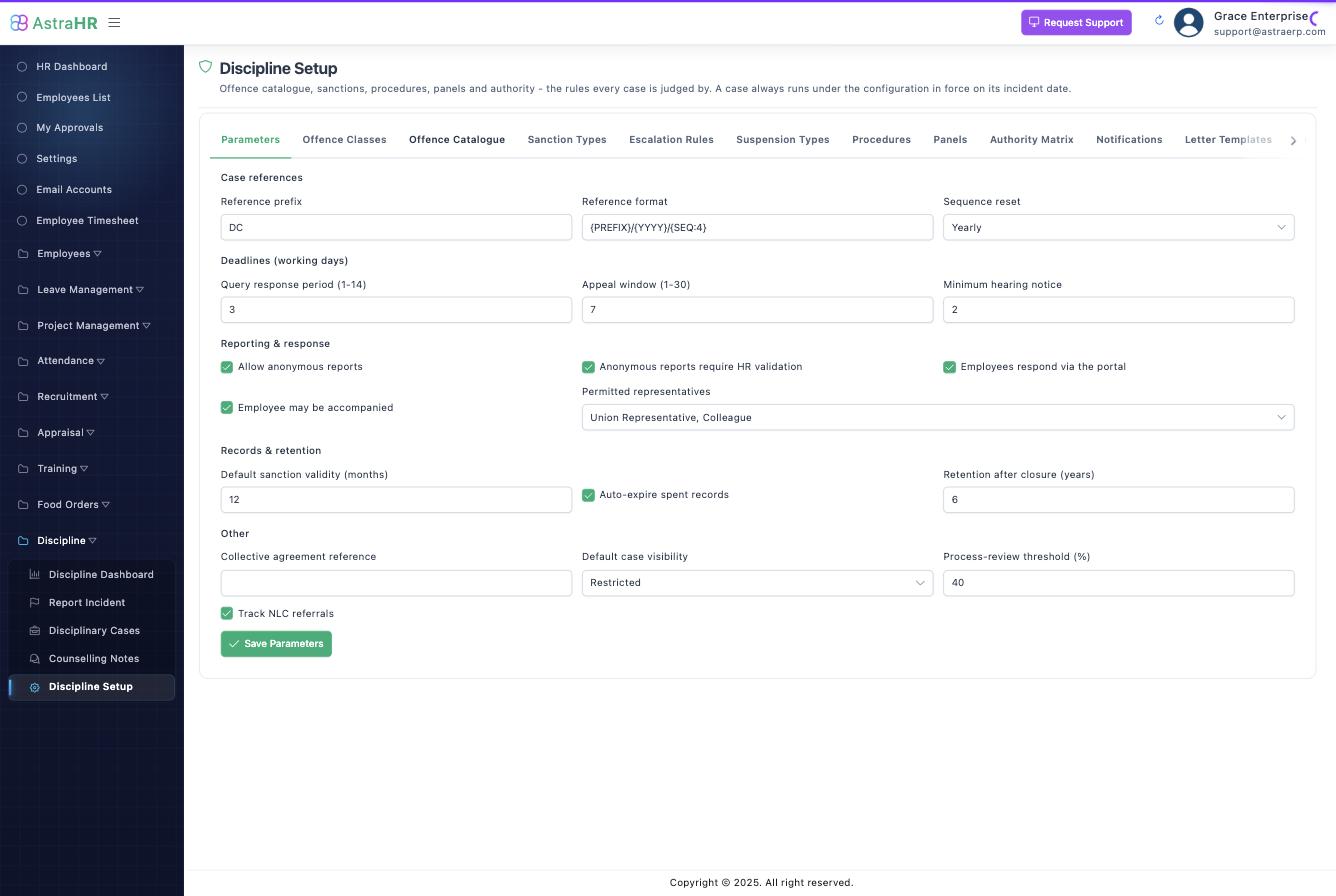
One record per company; the module-wide defaults.
| Setting | Meaning | Default |
|---|---|---|
| Reference prefix / format / reset | How case numbers are minted, e.g. {PREFIX}/{YYYY}/{SEQ:4} → DC/2026/0007; sequence resets never/yearly/monthly | DC, yearly |
| Query response period | Working days the employee has to answer a query (1–14) | 3 |
| Appeal window | Working days to appeal a sanction (1–30) | 7 |
| Minimum hearing notice | A hearing cannot be scheduled inside this many days | 2 |
| Anonymous reports / HR validation | Allow anonymous intake; require a named HR validator before an anonymous report passes triage | on / on |
| Employees respond via the portal | The query/response step runs through ESS | on |
| Representation | Whether and by whom the employee may be accompanied (union rep, colleague, lawyer, family) | on; union rep + colleague |
| Default sanction validity | Months before a sanction becomes spent when its type doesn't specify | 12 |
| Auto-expire spent records | Drives the nightly expiry job | on |
| Retention after closure | Years, for Act 843 alignment | 6 |
| Default case visibility | Restricted / Department / HR only | Restricted |
| Process-review threshold | Above this % of staff breaching, auto-triggers stand down and flag HR instead | 40% |
Working days everywhere: all deadlines skip weekends and the public-holiday calendar maintained in HR.
Tab 2 — Offence Classes
The severity bands: Minor, Major, Gross Misconduct (seeded; you may add). Each class sets: severity rank, whether an investigation and a hearing are mandatory, whether it permits summary dismissal, and its default procedure.
The one rule you cannot configure away
Permits summary dismissal requires Hearing mandatory. There is no configuration in which an employee can be dismissed without a hearing — the save is refused.
Tab 3 — Offence Catalogue
What an employee can be charged with. Each offence has three tabs in its editor:
Details — code (ATT-01), name, class, category, and the definition. The definition is printed verbatim on the query letter — write it as it should read to the employee, not as legal shorthand. Optional: handbook clause, statutory reference (e.g. Act 651 s.62), CBA clause, "requires investigation" (may only raise the class default), "prompt precautionary suspension", "externally reportable", restricted visibility (harassment/financial — excludes the line manager from the case), record validity override, grade/department applicability, effective dates.
Sanction Ladder — one row per occurrence: the recommended sanction for the 1st, 2nd, 3rd… upheld occurrence, optional floor/ceiling for overrides, and whether overriding needs a justification (default yes). Occurrences must run 1, 2, 3… and severity may never decrease down the ladder — the save tells you if it does.
Evidence — the expected evidence types (rendered as a checklist on the case), whether evidence is mandatory before the query can be issued, and guidance for the investigator.
Tab 4 — Sanction Types
The penalties a case can impose. Seeded set: Verbal Warning (Recorded), Written Warning, Final Written Warning, Suspension Without Pay, Dismissal With Notice, Summary Dismissal.
Key fields: severity rank (unique — drives ladders and appeal routing), kind (warning / financial / status change / separation / non-punitive), terminal (ends employment), validity months (empty = permanent), appealable + window override, letter template, and the payroll block — effect (none / unpaid period / fixed / percentage deduction / increment withheld / grade change), the payroll item it applies through, deduction cap, duration limits. Terminal sanctions must state their notice treatment (served / pay in lieu / summary) and separation reason.
Hard validations: terminal ⇒ hearing required, no validity, notice treatment set; a payroll effect needs its payroll item.
Tab 5 — Escalation Rules
Progressive discipline across offences: "3 attendance offences in 12 months → Final Written Warning". Rules run in priority order; the first match wins, and the result is a recommendation shown at triage — never auto-applied. Scope: same offence / same category / same class / any offence; rolling lookback window; counting flags (upheld only — default on; include expired — default off; count counselling notes — the tier-1→2 bridge).
Tab 6 — Suspension Types
Precautionary suspension is configured here — it is not a sanction type. Pay treatment (full/half/no pay), maximum days (review prompt at expiry), extensions and approver, whether it revokes portal access, recalls assets, or pauses attendance capture (so no absence penalties accrue while suspended). Auto-lift on case closure is always on and cannot be disabled.
Tab 7 — Procedures
The ordered steps a case follows: Triage → Investigation → Query → Response → Hearing → Decision → Sanction → Appeal → Closure — each step with mandatory flag, responsible role, SLA (working days) and optional document. Templates apply per class, per grade, per employment type — and probationers must have their own template; the system never silently applies the permanent-staff ladder to them.
Validation: a template for a hearing-mandatory class must contain a mandatory Hearing step preceded by a Query step.
Tab 8 — Panels
Hearing panels: members with roles (exactly one Chair), voting flags, alternates; quorum; decision rule (unanimous / simple majority / chair decides). The conflict-of-interest switches live here — but two are locked and always on: the complainant and the investigator can never sit. Optional: exclude the respondent's direct supervisor (default on), same department, declared relations; manual recusal (reason minuted).
A one-member panel is legitimate — the "minimum viable hearing" for a small company is a single hearing officer with the conflict rules still enforced.
Tab 9 — Authority Matrix
Per sanction (and optionally per grade/department scope): who may issue, who must approve (second signature), who hears the appeal (role and/or panel), and any final authority. The appeal authority must sit strictly above the issuing role in the seniority order — the matrix refuses a configuration where the issuer would hear the appeal against their own decision.
Roles are assigned to employees under HR's management-role assignment; the order is: Line Manager < Department Head < HR Officer < HR Manager < Managing Director < CEO.
Tab 10 — Notifications
One rule per event × recipient: which events (query issued, hearing scheduled, sanction issued, response overdue, appeal lodged/decided, case closed…) notify whom (respondent, complainant, line manager, HR, a custom role) on which channels. Suppress on restricted cases (default on) keeps harassment matters from leaking through a cc line. Email is the delivery channel today; in-app and SMS ride the same matrix when wired.
Tab 11 — Letter Templates
The letters the module serves: query, hearing invitation, warning, sanction, dismissal, suspension, appeal letters. Bodies are plain text with merge tokens — {employee.full_name}, {case.reference}, {offence.name}, {offence.description}, {query.response_deadline}, {sanction.name}, {appeal.deadline} and more. Letters and the case pack render on the company letterhead uploaded under Config → Letterhead.
Locked wording
The hearing invitation's right-to-be-accompanied sentence is appended by the system at render time and is not editable template text — no tenant can forget it.
Tab 12 — Seed Catalogue
Shows how many records each catalogue currently holds, and Run Seeding loads whatever is missing from the Ghana SME default set. Safe at any time: every record is checked by its code first, so seeding only fills gaps — it never duplicates and never overwrites your edits. The result panel shows exactly what each run added.
Tutorial: Running a Minor Case
The everyday scenario, end to end: an employee has been persistently late, a counselling note six weeks ago didn't change anything, and their manager wants a written warning. Target time on task: under five minutes, spread across the response window.
What you'll touch: HR → Discipline → Cases.
Step 1 — Report the incident
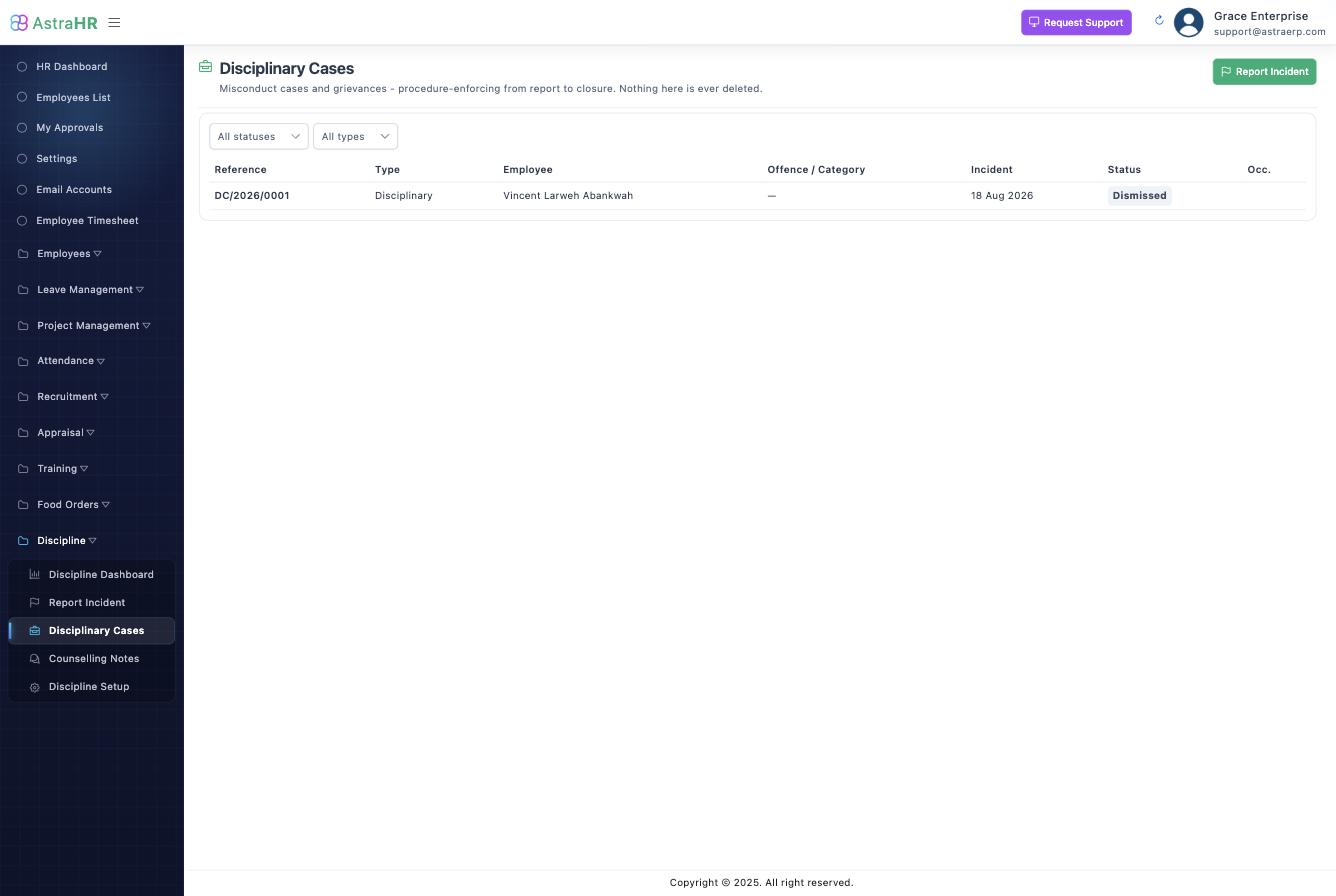
- Open Cases and click Report Incident.
- Type: Disciplinary. Pick the respondent (the employee concerned) and optionally reported by.
- Incident date, time, location, and a plain-language summary of what happened.
- Create Case. The case is minted with its immutable reference (e.g.
DC/2026/0012) and opens in the workspace at Reported.
Anonymous reports
Tick Anonymous report to omit the reporter. The case then cannot pass triage until a named HR validator is recorded — an anonymous accusation alone never advances.
Auto-raised Drafts (from the attendance triggers) start one step earlier: review the attached system evidence, then Advance to Reported or Dismiss Draft.
Step 2 — Take under review and triage
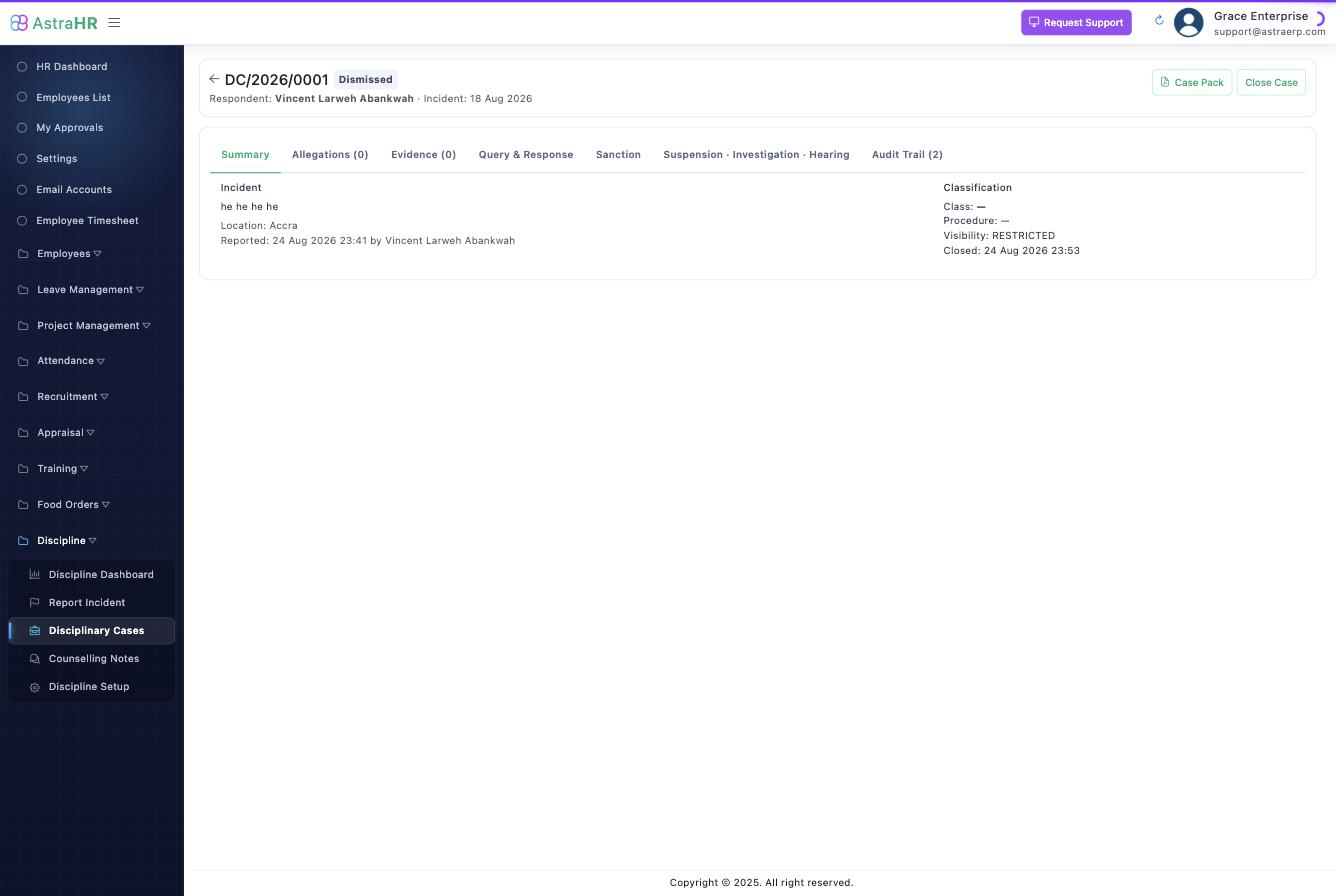
- Click Take Under Review. (Gate: respondent identified; anonymous reports validated.)
- Click Triage and pick the offence — e.g. ATT-01 Persistent lateness. Only offences in force on the incident date are accepted.
Triage does four things automatically, all visible on the case header:
- snapshots the class (Minor) and the procedure the case will follow;
- counts the respondent's prior upheld, unspent occurrences of this offence — say this is occurrence 2;
- reads the offence's sanction ladder → recommendation: Written Warning;
- runs the escalation rules — a matching rule can raise the recommendation (it's still only a recommendation).
Step 3 — Allegations and evidence
- Allegations tab → Add Allegation: the specific factual assertion — "Reported at 09:40 on 18 Aug, 09:55 on 19 Aug and 10:05 on 21 Aug against an 08:00 start." One case can carry several; each will get its own finding.
- Evidence tab → Add Evidence: attendance records, statements, CCTV… When you want the employee to see an item, click Disclose — the timestamp is your proof they saw what the decision-maker saw.
The query is blocked until at least one allegation exists (and evidence, where the offence demands it).
Step 4 — Issue the query
Click Issue Query. The text is pre-drafted from the offence definition — edit it, then Issue. The system:
- stamps the response deadline (parameters default: 3 working days — weekends and holidays skipped);
- serves the query to the employee's portal and (per the notification matrix) emails them;
- moves the case to Query Issued.
When the employee opens it on the portal, the opened timestamp lands on the case — service is proven.
Step 5 — The response
Three ways this resolves:
| What happens | What you do | Case moves on? |
|---|---|---|
| Employee responds on the portal | Nothing — it lands on the case | Yes → Response Received |
| Employee hands you paper / responds verbally | Record Response, choosing the mode. A verbal transcription is held until the employee verifies it on the portal — otherwise it's HR's account of their defence | After verification |
| Deadline passes silently | Minute Lapsed Deadline — recorded with a timestamp and explicitly not treated as an admission | Yes |
Step 6 — Decide
Click Record Decision (a minor offence may skip the hearing; a hearing-mandatory class cannot — the button will tell you). For every allegation, record a finding — Upheld / Not upheld / Partially upheld / Withdrawn / No finding — plus a one-line rationale. No partially adjudicated cases: the sanction stays locked until all findings are in.
Nothing upheld? Close (No Sanction) — the case and its trail remain forever, but no record counts against the employee.
Step 7 — Sanction
Click Issue Sanction. The dialog shows the recommendation for occurrence 2 (Written Warning), pre-selected.
- Take the recommendation → click Issue Sanction.
- Depart from it → the system demands a written justification, and refuses anything outside the ladder's floor/ceiling for this occurrence.
On issue: the letter renders from the sanction type's template (snapshotted on the case exactly as served), validity is stamped (12 months → the spent date), the case moves through Sanction Issued into Appeal Window, the employee is notified, and any payroll effect raises its deduction instruction automatically.
The employee acknowledges on the portal — or refuses, and the refusal itself is recorded. Either way the record stands.
Step 8 — Appeal window, then close
The employee has the appeal window (default 7 working days, shown on the case) to appeal from the portal — see Appeals. When the window elapses (or an appeal is determined, or the employee waives in writing), click Close Case. Closing:
- auto-lifts any suspension,
- starts the validity clock — after 12 months the nightly job marks the warning spent: still on the trail, no longer counted.
What just got built, without you thinking about it
Open the Audit Trail tab: creation, review, triage with occurrence and recommendation, every allegation and disclosure, the query with its deadline, the response (or minuted lapse), each finding, the sanction with any override justification, the acknowledgement, closure — each with actor and timestamp. Click Case Pack and that record is one printable document. That is the point of the module.
Tutorial: Gross Misconduct
The high-stakes scenario: suspected theft (FIN-01 — Theft, fraud or misappropriation). Gross misconduct differs from the minor flow in four ways: an investigation is mandatory, a precautionary suspension is usually prudent, the hearing is mandatory, and the sanction may be summary dismissal — which is exactly why the procedure must be airtight. Most dismissals lost at the NLC are lost on procedure.
1. Report and triage
As in the minor tutorial: report the incident, take under review, triage to FIN-01. The class snapshot is Gross Misconduct, the full procedure applies, and the offence is flagged restricted visibility — the case is invisible to the respondent's line manager and notifications are suppressed per the matrix.
2. Precautionary suspension (Process tab)
If the employee's presence risks evidence, colleagues or funds:
- Process tab → Suspension → Apply, pick Precautionary Suspension (Full Pay).
- The system records the dated instance, marks the employee suspended (visible to Leave — leave approval is blocked while active), optionally pauses attendance capture (no absence penalties accrue) and revokes portal access if the type says so.
Remember what suspension is: a neutral measure, not a punishment, not a verdict. It has a maximum duration with a review prompt, and it will auto-lift the instant the case closes — nobody stays suspended by oversight.
3. Investigation (Process tab)
- Appoint an investigator with terms of reference. The investigator cannot be a party to the case — and is automatically barred from the later hearing panel.
- The investigator gathers evidence onto the case (each item typed and described) and witness statements (witnesses need not be employees).
- Record Findings — findings and a recommendation, timestamped.
Disclose to the respondent every evidence item the panel will rely on — undisclosed evidence is flagged in red on the case pack.
4. Query and response
Issue the query as usual. For gross misconduct the stakes make the wording matter: the offence definition (printed verbatim) plus allegations that are specific — dates, amounts, documents. The employee responds on the portal within the working-day deadline; a lapse is minuted, never assumed.
5. The hearing (Process tab)
This is where cases are won or lost. The system holds your hand:
Scheduling.
- Hearing → Schedule; pick the panel. The conflict screen runs immediately and tells you, by name and reason, who cannot sit: "K. Mensah cannot sit — is the complainant", "A. Osei — conducted the investigation", "B. Addo — is the respondent's direct supervisor". Quorum is then checked after exclusions; if it fails, you're told to substitute or use another panel — the sitting cannot be confirmed.
- Date/time must respect the minimum notice window (parameters, default 2 days) — earlier dates are refused.
- On scheduling: the invitation is served to the portal with the sitting details and the locked right-to-be-accompanied wording, and the case moves to Hearing.
Recording the sitting (Record Sitting):
- Attendance register — present / absent / apology per person.
- Representation status — accompanied, declined, waived, or requested-but-refused. That last one lights up red everywhere: a refused request for accompaniment is the single most common procedural defect in dismissal cases.
- Minutes — what was put, what was answered.
- Votes — each voting member: uphold / not uphold / abstain, with dissent notes minuted.
- Panel recommendation, then tick Conclude — the case moves to Decision only if quorum was present, representation is recorded and minutes are attached. Otherwise the gate tells you what's missing.
6. Decision and summary dismissal
Record a finding on every allegation. With theft upheld and the hearing concluded, Issue Sanction → Summary Dismissal is now — and only now — reachable:
A terminal (or hearing-required) sanction is refused unless a concluded hearing is on the case. There is no configuration, no role and no shortcut around this.
On issue: the dismissal letter renders (notice treatment summary — no notice; separation reason Summary Dismissal), the appeal window opens, and if the offence was marked externally reportable you record the regulator/insurer reference on the case.
7. Appeal, closure, aftermath
The employee may appeal — for dismissal cases assume they will, and be glad of it: an internally-decided appeal is far cheaper than the NLC. On closure the suspension auto-lifts (moot after dismissal, automatic regardless), and the Case Pack gives you the complete bundle: chronology, allegations and findings, evidence index with disclosure proof, query and response as served, investigation, hearing with attendance/representation/minutes/votes, the letter, the appeal.
Gross-misconduct checklist
- [ ] Offence triaged on the incident date's catalogue; restricted visibility respected
- [ ] Suspension (if any) applied through the module — never verbally
- [ ] Investigator appointed with ToR; findings submitted; witnesses recorded
- [ ] All relied-on evidence disclosed to the respondent
- [ ] Query served and answered (or lapse minuted)
- [ ] Panel passed the conflict screen; notice window respected
- [ ] Representation status recorded — refusal shows red for a reason
- [ ] Minutes and votes on file; hearing concluded
- [ ] Finding on every allegation before the sanction
- [ ] Letter served; acknowledgement (or refusal) captured
- [ ] Appeal window respected before closure
Appeals
An appeal is the employee's challenge to a sanction. Handled well, it is your cheapest quality control — an internal correction beats an NLC determination every time. The module treats the overturn rate as a signal about decision-making quality, not as an embarrassment to hide (it headlines the dashboard).
How an appeal is lodged
Only the employee lodges, from their portal, while the case sits in Appeal Window:
- The sanction card on the portal shows the deadline — issue date + the appeal window in working days (sanction-type override, else the company default of 7).
- The employee picks a ground — procedural irregularity, new evidence, sanction disproportionate, finding against the evidence, bias/conflict of interest, other — and writes their submission.
- On lodgement the system computes in time / out of time. A late appeal is recorded and flagged, never silently refused — refusing to even record a late appeal looks terrible at the NLC; deciding what to do with it is a human call.
The appeal is automatically routed per the authority matrix in force on the incident date: the configured appeal authority role (which the matrix guarantees outranks the issuer) and/or appeal panel.
Determining an appeal
On the case workspace, Sanction tab → Determine Appeal:
| Outcome | What the system does |
|---|---|
| Dismissed — sanction confirmed | Sanction stands; case closes |
| Sanction reduced / increased | You pick the substituted sanction; a new sanction instance is issued and the original is marked superseded on appeal — both remain on the trail, nothing is edited |
| Finding overturned | The sanction is rescinded; the case returns through Appeal Upheld to Decision for findings to be re-recorded |
| Rehearing ordered | The case returns to Hearing — and the conflict screen now also excludes everyone who sat on the original sitting: a rehearing needs fresh ears |
A written rationale is mandatory — it is what makes the determination defensible.
The two hard rules
- The issuer never determines the appeal against their own decision. The system refuses the determination outright.
- A case cannot close over an appeal. While an appeal awaits determination, Close is refused. Closing early — inside the window, no appeal — requires the employee's written waiver on file, recorded as the closure reason.
Timeline of a varied sanction
Counselling Notes
Tier 1 of the response model: a written record that the employee was told — before anything becomes a case.
Why this exists (and why "verbal warning" doesn't)
Managers reach for a "verbal warning" for first lapses. But a verbal warning is a contradiction: if it is to matter later ("we told you in March"), it must be written down — and once written, it is a record. AstraHR names it honestly: a counselling note. It is:
- not a sanction — nothing is imposed;
- not appealable — there is nothing to appeal;
- not in appraisals;
- evidence of prior notice — it counts at the tier-1→2 boundary while valid, where an escalation rule says so.
Raising one (manager / HR)
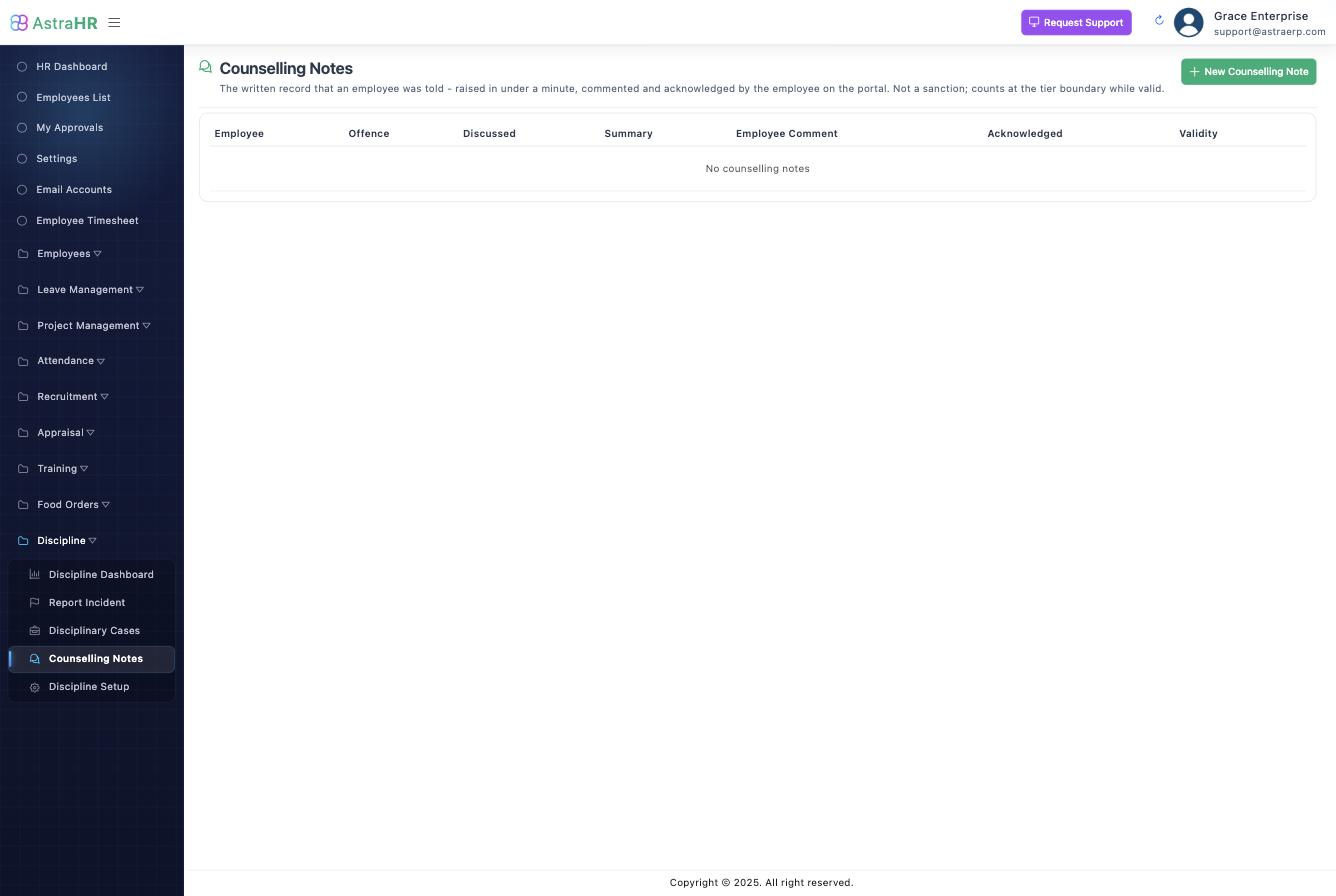
HR → Discipline → Counselling Notes → New. Under a minute:
- Employee, optional offence from the catalogue, incident date, discussed-on date (defaults today; discussed by defaults to the employee's manager).
- What was discussed — the summary, in plain words.
- Validity in months (default 6) — after this the note is spent and stops counting.
The employee's half
On their portal the employee sees the note and:
- adds their own comment — typed by them, never by the manager. That distinction is the note's integrity: it captures both sides in each side's own words;
- acknowledges that the conversation happened — or declines, and the refusal itself is recorded.
Once the employee has commented or acknowledged, the note is locked — the manager can no longer edit it.
Life of a note
When to use which tier
| Situation | Right tool |
|---|---|
| First missed timesheet, first lateness | Nothing, or a nudge |
| Repeat minor lapse; a real conversation happened | Counselling note |
| Lapse persists after a note; or any major/gross matter | Formal case |
Grievances
A grievance points the other way: the employee's complaint to the organisation — working conditions, pay, workload, treatment by management, harassment, discrimination, safety, interpersonal conflict.
Grievances ride the same case machinery as discipline (same file, same audit trail, same confidentiality), with the punitive half removed: no offence, no occurrence counting, no sanction path.
Raising a grievance
Employee (normal path): portal → Discipline → Raise a Grievance — category, what happened, submit. The complainant is always the logged-in employee; there is nothing to fill in on someone's behalf and no way to impersonate.
HR (on behalf): Cases → Report Incident → type: Grievance — for grievances received on paper or in person. Pick the complainant, optionally a named concerning employee, category, summary.
Either way a case is minted with a reference and lands in HR's case list marked Grievance.
Handling it
- Take Under Review. The grievance skips triage — there is no offence to classify.
- Investigate if warranted (Process tab): appoint an investigator, gather statements — same machinery as discipline.
- Move to Decision and record the resolution.
- Close with the closure note. The complainant follows progress and sees the outcome on their portal.
What carries over from discipline, and what doesn't
| Carries over | Does not apply |
|---|---|
| Case reference, workspace, evidence, audit trail | Offence catalogue, triage, occurrence counting |
| Confidentiality defaults and restricted visibility | Queries and response deadlines |
| Investigation and witness statements | Sanctions, ladders, payroll effects |
| Closure discipline (reasons, record kept forever) | Appeals (nothing was imposed) |
A harassment complaint is a grievance first
When an employee reports harassment, it enters as their grievance. If investigation substantiates it, HR opens a disciplinary case against the harasser (offence HAR-01, restricted visibility) — two files, each with its own procedure and its own record.
The Employee's Side
Everything the employee does lives in the portal under Discipline (sidebar → Workplace). Every call is scoped server-side to the logged-in session — there is no employee ID anywhere to tamper with, and no employee can ever see another's records.
What an employee sees on a case
Deliberately a subset of the case file:
| Visible to the employee | Never visible |
|---|---|
| The charge: offence name + the definition as written for them | Internal HR notes and triage detail |
| The query as served, with the response deadline | The reporter's identity on restricted matters |
| Evidence that has been disclosed (with the disclosure timestamp) | Undisclosed evidence |
| Hearing invitation: sitting, venue, panel, the right-to-be-accompanied wording | Panel deliberations and votes |
| Their own response, verbatim | Other employees' cases — ever |
| The outcome: sanction letter, validity, appeal deadline |
What an employee does
Respond to a query. The case card shows Respond by in red. They write their response — their words, straight onto the record — optionally ticking I admit the conduct described, and submit. HR cannot edit it.
Verify a transcription. If HR captured a verbal response, the portal asks the employee to confirm the transcription says what they said. Until they do, the case does not move — otherwise it would be HR's account of their defence.
Acknowledge a sanction — or refuse. Acknowledging confirms receipt, not agreement. Refusing is allowed and is itself recorded; the sanction stands either way, and the record shows exactly what happened.
Appeal. Within the window shown on the sanction: pick a ground, write the submission, lodge. Late appeals are recorded and flagged, not blocked. The outcome and rationale appear on the same card when determined.
Comment on and acknowledge counselling notes. Their side of the conversation, in their own words — the manager cannot type it for them, and the note locks once they respond.
Raise a grievance. Category + what happened → a real case with a reference, handled confidentially by HR, progress visible on the portal.
Why this matters beyond convenience
Every portal interaction is service and participation proof: the query's opened timestamp, the response's submission time, the acknowledgement (or its refusal), the appeal's lodgement time. When a dismissal is challenged, "the employee never saw it" stops being an argument — the record answers.
Automation & Jobs
One principle governs everything here: automation recommends; humans decide. No job opens a live case, applies a sanction, or advances a file on its own.
Attendance auto-triggers (weekly, Monday morning)
The trigger scans the last 7 days of attendance per company:
| Pattern | Draft raised |
|---|---|
| 3+ Reported Late days | ATT-01 Persistent lateness |
| Any Absent Without Notice day | ATT-02 Absence without permission |
Each hit creates a case in Draft — not Reported — with the attendance rows pre-attached as system evidence (source: Attendance, record reference kept). Drafts sit in the case list under the Draft (auto-raised) filter until a manager reviews the evidence and either Advances or Dismisses them. Duplicate protection: an employee with an open draft/report for the same offence doesn't get a second one.
Process-review suppression
If more than the configured threshold (default 40%) of tracked staff breach in the same week, the triggers stand down for that company and the situation is flagged for process review instead. Sixty warnings for one broken clock-in form makes the ERP the villain — when most people "breach", the process is the problem, not the people. Manual case creation stays available throughout.
Nightly jobs (2:30 am)
Record expiry. Sanctions whose validity has elapsed are marked Spent — kept on the trail forever, excluded from occurrence and escalation counts. Closure starts the clock; this job runs it. (Controlled by the Auto-expire spent records parameter.)
SLA watch. Open queries are checked against their response deadline: Due soon the day before, Breached after — surfaced on the case list, the dashboard, and (per the matrix) notified to the line manager.
Deadline arithmetic
Every deadline in the module — query response, appeal window, hearing notice — is computed in working days: weekends and the public-holiday calendar are skipped. A 3-day query issued Thursday before a Monday holiday is due Wednesday, and the case shows that date; nobody does calendar maths.
Notifications
Driven entirely by the notification matrix (Setup → Notifications): event × recipient × channels. Wired events: query issued, hearing scheduled, sanction issued, response overdue, suspension applied, appeal lodged/decided, case closed. Recipients resolve to real people — respondent, complainant, line manager (the respondent's supervisor), or holders of a management role. Rules marked suppress on restricted stay silent for restricted/HR-only cases. Delivery is asynchronous and never blocks or fails the business action; email is the wired channel today, with in-app/SMS riding the same matrix when enabled.
Escalation engine
Runs at triage, after the offence ladder: rules in priority order, first match wins, producing a recommendation (a stronger sanction, or a reclassification). Counting is conservative by design — upheld findings only, spent records excluded, counselling notes counted only where the rule says so. The full rule reference is in Setup — Tab 5.
What is deliberately NOT automated
- Opening a live case (drafts only, and only from attendance)
- Applying or suggesting suspension (a human applies; offences can prompt)
- Applying any sanction
- Determining appeals
- Closing cases
Dashboard & Case Pack
The dashboard
HR → Discipline → Discipline Dashboard. Its layout is an opinion: what needs a human first, quality second, counts last — because "how well are we running the process" matters more than "how many cases do we have".
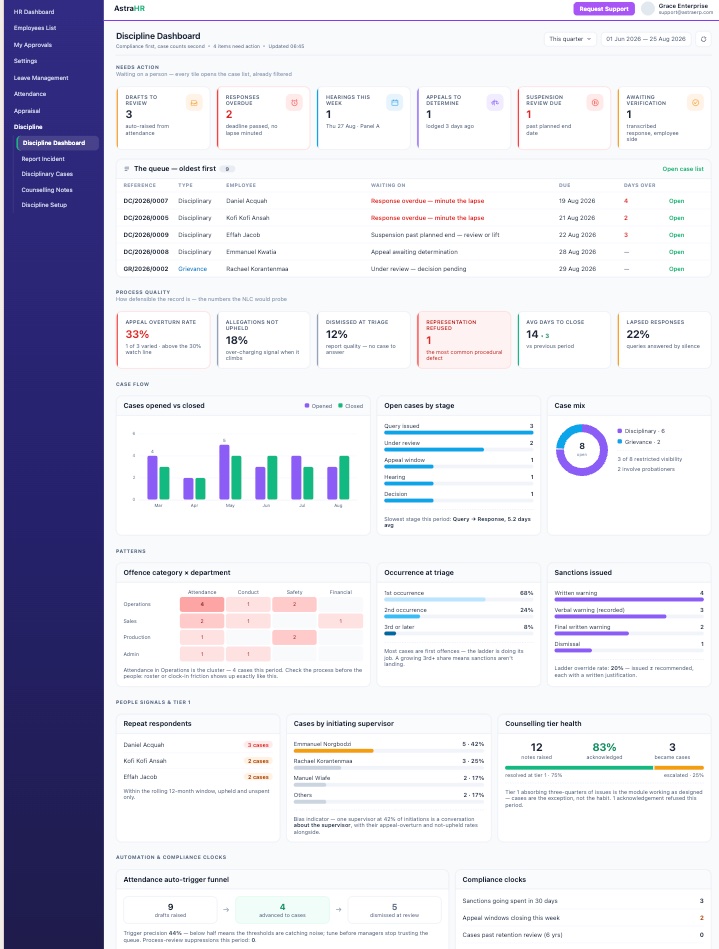
Two kinds of number live on the page, and the header of each section says which is which:
- Current state — Needs Action, the work queue, open-by-stage, the case mix and the compliance clocks describe the caseload as it stands and ignore the period filter.
- Period bound — everything else follows the From/To range in the header (default: this quarter; quick periods reload immediately).
| Section | What it tells you |
|---|---|
| Needs Action | Six tiles for what is waiting on a person: drafts to review, responses overdue (no lapse minuted), hearings in the next 7 days, appeals awaiting determination, suspensions past their planned end, transcribed responses awaiting employee verification. Every tile opens the case list already filtered, and the queue below lists the same items oldest-first with days overdue |
| Process Quality | The numbers the NLC would probe: appeal overturn rate (flagged above 30% — retrain the issuers, don't blame the appellants), allegations not upheld (over-charging signal), dismissed at triage (report quality), representation refused (the most common procedural defect — red the moment it is non-zero), average days to close with the trend against the previous period, and lapsed responses |
| Case Flow | Cases opened vs closed per month (are you keeping up?), open cases by stage with the slowest stage computed from the audit trail, and the disciplinary/grievance mix with the restricted-visibility count |
| Patterns | The offence category × department heatmap — a cluster is usually a process problem (roster friction, unclear rules) before it is a people problem; occurrence at triage (is the ladder deterring repeats?); sanctions issued with the ladder override rate |
| People Signals & Tier 1 | Repeat respondents over a rolling 12 months (dismissed cases excluded); cases by initiating supervisor — the bias indicator: one supervisor generating a disproportionate share is worth a conversation about the supervisor, read with their overturn and not-upheld rates; and counselling-tier health — notes raised, acknowledgement rate, and how many became cases |
| Automation & Clocks | The attendance auto-trigger funnel (raised → advanced → dismissed) with a trigger precision figure — below half means the thresholds are catching noise; and the compliance clocks: sanctions going spent within 30 days, appeal windows closing this week, undisclosed evidence on decided cases |
The case pack
The Case Pack button on any case produces the complete NLC-ready bundle as one ordered, printable document on your company letterhead (uploaded under Config → Letterhead). Use the browser's Print → Save as PDF for the file.
Contents, in order:
- Cover — reference, parties, offence, class, dates, status, occurrence
- Allegations & findings — each assertion with its adjudication and rationale
- Evidence index — every item with collector, timestamp and disclosure proof (undisclosed items flagged red)
- The query as served — the exact text, deadline, the employee's opened timestamp, any minuted lapse
- The employee's response — verbatim, with mode and verification status
- Investigation — investigator, terms of reference, findings, witnesses
- Hearing — panel, notice, attendance register, representation status (requested-but-refused in red), minutes, votes with dissents
- Sanction — what, when, by whom, any override justification, the letter as served, acknowledgement or recorded refusal
- Appeal — lodgement, grounds, submission, determination and rationale
- Chronology — the full append-only audit trail, actor and timestamp on every line
Nothing in the pack is composed for the occasion — every line is the record as it was written at the time. That is exactly what makes it persuasive.
FAQ & Data Rules
Process questions
Can I skip the query for an open-and-shut case? No. The right to be heard is not bypassable — every path to a sanction passes through a query and the chance to respond. "Open-and-shut" cases that skipped the query are how employers lose winnable NLC cases.
The employee refuses to sign anything. Now what? Nothing stops. Acknowledgement confirms receipt, not agreement — and a refusal is itself recorded, which is just as good on the record. The same goes for refusing to acknowledge a counselling note.
The employee resigned mid-case. Do we drop it? Close the case with closure reason Employee resigned. The record — allegations, findings so far, the trail — stays intact, which matters if the matter resurfaces (references, re-employment, NLC).
Can I edit a query/letter after serving it? No. The served text is snapshotted on the case. Template edits affect future letters only.
We made a mistake on a sanction. Can we fix it? Not by editing — records are never edited. The appeal path exists precisely for this: determine an appeal (or invite one) with outcome sanction reduced/increased or finding overturned; the original is superseded or rescinded, and both remain on the trail.
Who can see a restricted case? Not the respondent's line manager, and notifications marked suppress on restricted stay silent. Harassment and financial offences are seeded restricted by default. The respondent always sees their own employee-facing view.
What's the difference between Dismissed and Closed?Dismissed = the case died at review (no case to answer) — it never counts against the employee. Closed = the case ran its course, whatever the outcome.
Does a "Not upheld" case count against the employee later? Never. Occurrence counting and escalation rules count upheld findings only — a dismissed allegation can never escalate anything.
How do occurrences interact with old warnings? Only active (unspent, unrescinded, unsuperseded) sanctions with upheld findings count. A warning that expired last year is spent — on the record, out of the maths.
Probationers? They follow their own procedure template. The system will not silently run the permanent-staff ladder on a probationer.
What if we're too small for panels? A one-member panel — a single hearing officer — is fully supported. The conflict rules still apply to that one person.
Data rules — what the system refuses to do
| You cannot… | Because… |
|---|---|
| Delete a case, allegation, evidence, finding, sanction, appeal or audit entry | The record is the product; a trail with a delete button proves nothing |
| Edit the audit trail | Append-only, no update path exists in the code |
| Reach a sanction with an unadjudicated allegation | No partially adjudicated cases |
| Dismiss without a concluded hearing | Enforced against the sanction, not just the class config |
| Sit the complainant or investigator on a panel | Locked conflict rules |
| Determine an appeal you issued the sanction on | Hard rule, regardless of roles |
| Close over an active suspension | It auto-lifts — nobody stays suspended by oversight |
| Close over an undetermined appeal | The employee's challenge is answered first |
| Charge an offence not in force on the incident date | Effective dating protects closed cases |
Configuration is deactivated, never deleted, once anything references it — historical cases must resolve their config forever.
Retention & privacy
- Discipline data is the most sensitive HR data; visibility defaults to Restricted and every read of an employee's own data on the portal is session-scoped.
- Spent ≠ gone: expired sanctions stay on the trail but stop counting.
- The retention parameter (default 6 years after closure, Act 843-aligned) is the policy input for eventual archival/anonymisation — deletion is never the mechanism.
Migration from the old screens
The pre-2026 "Disciplinary Action" screen and its tables (misconduct, discipline_action, employee_discplinary_action) are retired and removed from the application. Historical rows are handled manually from backup per the migration script docs/migrations/2026-08-24-drop-legacy-disciplinary-tables.sql — back up first if any of it matters. Old records are deliberately not imported as cases: a migrated "case" would imply a procedure (query, hearing) that never happened, which would undermine the very defensibility the module exists to provide.
Glossary shortcut
See the Key Concepts glossary.
Leave Management
Overview
Leave Management is the part of AstraHR that answers four questions every company asks, and usually cannot:
- How many days does this person actually have left? — not a guess from a spreadsheet, but a figure that accrues month by month, pro-rates for joiners, carries over at year end and forfeits above a cap.
- Who is waiting on whom? — every request is routed through the approvers the leave type demands, and the system can say which stage a request is stuck at and for how long.
- Can the unit survive next week? — approved leave is plotted against a staffing floor per department, so an approver sees the roster consequence before saying yes.
- What does untaken leave cost us? — accrued-but-untaken days are valued at each employee's own pay rate and frozen every month end, so the liability is history rather than arithmetic.
The module is used by three kinds of people:
| Who | What they do | Where |
|---|---|---|
| Employees | Check balances, request leave, follow the approval, withdraw a request | Employee portal → Leave |
| Approvers (supervisors, department heads, the HR leave approval manager) | Approve, reject, revert, cancel; see cover and coverage before deciding | HR → Leave Management → Leave Dashboard, Leave Records, Leave Calendar; HR → My Approvals |
| HR administrators | Configure the leave year, leave types, days per year, staffing floors and statutory rules; run the year-end close | HR → Leave Management → Leave Setup, Rank Allocation, Entitlements |
The process at a glance
Leave runs on four clocks. Setup happens once a year. A request is decided in hours or days. The leave itself runs for weeks. The accounting only really bites at year end. The diagram follows the same order, top to bottom.
How to read it.
- Band 1 is configuration and happens before anyone asks for a day off. The nightly accrual turns the configuration into one balance row per employee per leave year, and that balance is shown to every approver when they decide.
- Band 2 is a single request. It is submitted, it goes to the approvers the leave type requires, and it ends Approved or Rejected. The employee may withdraw it before a decision, and a request whose start date passes undecided expires on its own.
- Band 3 is the leave being served. Nobody presses anything here: the nightly job moves an approved request from Scheduled to In progress on the start date and to Ended after the end date, and checks attendance to see when the person actually came back. An approver can cancel approved leave that will no longer be taken.
- Band 4 is the money. Approved leave is booked until it is served and taken afterwards, so the remaining balance falls as leave is approved, not as it is taken. Accrued-but-untaken days are a liability on the balance sheet. At year end HR closes the leave year: days above the carry-over cap are forfeited, the rest are carried into the next year, and band 1 starts again.
The diagram lives in content/web/hr/leave/diagrams/leave-process.svg and is included into this page, so it can be edited in any text or vector editor without touching the prose.
Six rules that hold everywhere
- A request has two statuses, not one. Was it approved? and where is it now? are different questions. The Decision chip answers the first; the stage or "When" column answers the second. See Key Concepts.
- Only approved leave counts. Pending and rejected requests never reduce a balance and never count against cover. Approved leave reduces the balance immediately, as booked, even if it starts next month.
- Only one leave type accrues. Normally annual leave. It is the only type that accrues monthly, carries over, forfeits and forms a liability. Every other type is a flat allowance for the year.
- Nothing is invented. A company that has not run the accrual sees empty balance and liability bands, not made-up numbers. A department with no staffing floor shows counts but never a "breach".
- Authority comes from holding the approval. Only the person a request is waiting on can decide it, wherever they press the button. Seeing the queue is not the same as owning it.
- The year end is a deliberate act. Nobody's days are forfeited by a timer. HR previews who loses what, then confirms.
Where things live
| Menu item | What it is for | Page |
|---|---|---|
| Leave Dashboard | The approval queue, who is out, balances, liability, patterns, the year ahead | Leave Dashboard |
| Leave Requests | HR raising or correcting a request on an employee's behalf | Leave Requests |
| Leave Records | The company-wide register of every request, with approve / reject / revert | Leave Records |
| Leave Calendar | Who is away when, and where cover runs thin | Leave Calendar |
| Entitlements | Days per year, adjustments, and every computed balance per employee | Entitlements |
| Rank Allocation | Default days per leave type per rank | Rank Allocation |
| Leave Report | A placeholder today; use the exports on Records and Calendar | Leave Report |
| Leave Setup | Leave years, leave types, staffing floors, statutory rules, jobs | Leave Setup |
| Portal → Leave | The employee's balances, requests and withdrawals | The Employee's Side |
| HR → My Approvals | The cross-module approval inbox, where leave requests also arrive | Approving Leave |
Reading order
New to the module? Read in this order:
- Key Concepts — the leave year, leave types, entitlement, the two statuses, approval routing
- Status Reference — every chip, pill and label the screens show, and exactly when each appears
- Leave Setup and Rank Allocation — what to configure before the first request
- Entitlements — the balance register and how each figure is reached
- The Employee's Side and Leave Requests — raising a request
- Approving Leave — the four places a decision can be made and the rules they share
- Leave Records, Leave Calendar, Leave Dashboard — the working screens
- Year End and Jobs — what runs on its own, and the close
- FAQ and Known Limits · Glossary
Key Concepts
Learn these eight ideas and every screen in the module makes sense.
1. The leave year
Leave is measured inside a leave year: an accounting period with a start date, an end date, and four settings that shape everything else.
| Setting | What it does | Default when the module is first set up |
|---|---|---|
| Carry-over cap | Days an employee may push into the next year. Anything above it is forfeited at the close. | 5 days |
| Forfeit date | The day those days are lost. Usually the year end. | 31 December |
| Forfeit warning | How far ahead the dashboard starts warning people. | 60 days |
| Approval SLA | Working days an approver has before a request counts as late. | 2 days |
| Liability ceiling | The board's tolerance for accrued untaken days, in days. Drives the liability verdict. | not set |
A leave year is created in exactly two ways: by Write the defaults on the setup page (the current year), or by the year-end close of the previous year. Looking at a screen never creates one. A year that does not exist shows the "not set up" banner instead of inventing figures.
A closed year is read-only. Its figures are final, and nothing further can be granted or credited against it.
2. Leave types and categories
A leave type is what the employee picks when requesting: Annual, Sick, Maternity, Study, Unpaid and so on. Each type has a category that tells the system how it behaves, plus five flags the category fills in and HR can override:
| Flag | Meaning | Annual | Sick | Maternity / Paternity / Compassionate / Study | Unpaid |
|---|---|---|---|---|---|
| Accrues | Earned month by month rather than available in full from day one | yes | no | no | no |
| Carries over | Unused days are brought into the next year, up to the cap | yes | no | no | no |
| Counts as liability | Unused days sit on the balance sheet | yes | no | no | no |
| Paid | Unpaid leave is deducted from pay and pauses accrual while taken | yes | yes | yes | no |
| Certificate after (days) | A spell longer than this needs a supporting document | never | 3 | never | never |
Three things follow from this table:
- Exactly one type accrues. It is the one that carries over, forfeits and forms the liability. The system refuses a second accruing type.
- A flat allowance is not pro-rated. A joiner in August gets the full twelve sick days, not five. You are either employed or you are not.
- Retro-dating is fine for sick and compassionate leave. You fall ill, you call in. The "approval before start" control check only applies to annual and study leave.
Each leave type also declares which approvals it needs: Supervisor, Department head, HR, in any combination. That is what builds the approval route in section 5.
3. Entitlement: where a balance comes from
Every employee has one entitlement row per leave year. Its figures are reached in a fixed order.
Base entitlement is the first figure found in this chain:
- an individual arrangement typed on the employee's row on the Entitlements page,
- otherwise the rank allocation for the employee's current rank,
- otherwise the leave type's default days.
An individual figure is never overwritten by a rank change. That is the point of typing it.
Pro-rata. The base is scaled by the months of the leave year the employee is in service. A month counts if the employee served at least half of it. The same rule applies to joiners, leavers and months mostly spent on unpaid leave.
Accrual is monthly, in arrears. A month is credited only once it has ended, so the accrued figure sits flat inside a month and steps up at month end. Finance can quote it mid-month without it moving. Accrued days are rounded to the nearest half day.
Worked example. Annual entitlement 30 days, leave year January to December, employee joined 12 April. Eligible months are April to December, nine of twelve, so entitled = 30 × 9 ÷ 12 = 22.5 days. On 31 August five months have completed (April to August), so accrued = 22.5 × 5 ÷ 9 = 12.5 days. On 15 September the figure is still 12.5; on 30 September it becomes 15.
Carried in is written once, at the previous year's close: the smaller of what was left and the carry-over cap. It is never recomputed, so leave booked late in the old year cannot quietly change the new year's opening balance.
Adjustments are dated, reasoned credits outside the ordinary entitlement: time off in lieu for a public holiday worked, a goodwill award, a balance transferred in, or a correction. A negative adjustment claws days back. The total on the row is the sum of these records and is never typed directly.
Taken, booked and pending come from the requests themselves, and only the decision axis matters:
| Bucket | Rule |
|---|---|
| Taken | Approved, and the last day is on or before today |
| Booked | Approved, and the last day is after today |
| Pending | Awaiting a decision. Shown, but not deducted |
| ignored | Rejected, withdrawn, expired, cancelled |
Remaining = available − taken − booked − encashed − forfeited. Unbooked = remaining − pending: the days nobody has even asked for, which is next December's bottleneck visible now.
Liability = accrued-but-untaken days × the employee's own day rate (latest basic pay ÷ 21.67). Untaken leave concentrates in senior staff, so a company-average rate would understate it. The dashboard prints both rates so the gap is visible.
4. A request has two statuses
This is the single most important idea on every leave screen.
The decision axis (approvalStatus) says whether the request was agreed: Awaiting decision, Approved or Rejected. It is written once, when the last mandatory approver decides, and never changes afterwards. Everything that consumes entitlement or counts against cover keys off this one test: is it Approved?
The lifecycle axis (leaveStatus) says where the request is now: Submitted, Undergoing approval, Scheduled, In progress, Ended, or one of the three voided states Withdrawn, Expired, Cancelled. The nightly job moves it along the dates; people move it only by withdrawing or cancelling.
Why two? An earlier design had one status. When the nightly job moved an approved request past "Approved" to "In progress", it silently stopped counting against the balance. With two axes, "does this consume entitlement?" and "where is it?" have separate, stable answers.
Two consequences worth remembering:
- A rejection has no lifecycle state. The lifecycle simply stops at Undergoing approval and the decision chip says Rejected.
- A withdrawn request stays "Awaiting decision" on the decision axis forever, because that axis is only written when the workflow concludes. The screens read both axes and show Withdrawn, and the edit and withdraw buttons disappear.
The full list of labels, with the exact condition behind each, is in the Status Reference.
5. Approval routing
When a request is raised, the leave type's approval flags are turned into a list of reviewers, in this order and without duplicates:
- Supervisor — the employee's supervisor, if the type requires supervisor approval
- Department head — the head of the employee's department, if the type requires it
- HR — whoever holds the HR Leave Approval Manager management role, if the type requires it
plus any reviewers configured on the company's workflow for leave requests. The request is then Undergoing approval and appears in each reviewer's My Approvals inbox and on the Leave Dashboard queue.
- The request is Approved when every mandatory reviewer has approved. It is Rejected the moment any mandatory reviewer rejects.
- Unless the workflow is configured as sequential, reviewers may decide in any order.
- Only the reviewer a request is waiting on can decide it. An HR manager who can see the whole queue still cannot approve a stage that belongs to a supervisor. The refusal reads "This request is not waiting on you".
- An approver who has no portal login cannot be registered as a reviewer. The system reports this rather than dropping them silently, but the request will still show no approver resolved for that stage.
- Approvers who are themselves on leave are reported, not routed around. The dashboard's Approvers away tile names who is blocking the queue and who their cover is. The cover cannot act on their behalf.
Approval timing is measured per stage: a request that cleared two stages in an hour is not reported as six days late at the third. Age is compared against the leave year's SLA to colour the queue.
6. Coverage: floors and critical roles
A staffing floor is the minimum number of people a department (or a named sub-unit such as "Line 2") must keep available. Approved leave is counted against it per day on the calendar and per week on the dashboard:
| Verdict | Meaning |
|---|---|
| covered | available staff is above the floor |
| tight (● "at floor") | available staff equals the floor exactly |
| breach (▲ "below floor") | available staff is below the floor |
Undecided leave never counts against cover, whether or not it is drawn. Rejected leave is not drawn at all.
A critical role is a job title so thin that two holders away together is itself a risk, even when the department is comfortably above its floor. Declare the role name (it must match the job title exactly) and how many people hold it; the calendar flags the clash.
7. Compliance and patterns
A statutory rule is a check the records are tested against, carrying the clause it rests on. The Ghana defaults written by setup are: at least 15 working days of annual leave (Labour Act 651, s.20), at least 12 weeks of maternity leave (s.57), a medical certificate after the sick leave type's threshold, leave taken within the leave year, approval recorded before the start date, and leave taken matching the payroll deduction. All of them are ordinary editable configuration.
The Bradford factor is spells² × days over the year. Five one-day absences score 125; ten spells over ten days score 1,000. Frequent short absence disrupts a roster far more than one long spell, and the squaring is what surfaces it. Scores of 200 and above are flagged.
8. What runs on its own
Three things happen without anyone pressing a button. Every night at 01:30 the lifecycle is advanced, the accrual is recomputed for every active employee, and returns are reconciled against attendance. On the first of every month at 02:30 the liability is frozen into a snapshot. The year-end close is the one thing that is never automatic. Details in Year End and Jobs.
Status Reference
Every chip, pill and label the leave screens show, grouped by screen, with the exact condition that produces it. Colours follow one convention throughout the module: green is fine or agreed, amber needs attention, red is a problem or a refusal, grey is neutral or closed, blue is informational.
A request's decision (all screens)
Shown as the Decision chip on Leave Records and the Leave Calendar, and as the main chip on the employee portal.
| Label | Colour | When |
|---|---|---|
| Awaiting decision | amber | The decision axis is PENDING and the request has not been voided |
| Approved | green | Every mandatory reviewer approved. Written once and never changes |
| Rejected | red | Any mandatory reviewer rejected |
| Unknown | grey | The request has no decision recorded at all. Only seen on data written before the module was rebuilt; run Normalise older requests on Leave Setup |
A request's lifecycle (all screens)
Shown as the Stage filter on Leave Records, the "Recorded stage" line in the request dialog, the secondary line on the portal, and printed raw (for example UNDERGOING_APPROVAL) on the older Leave Requests screen.
| Label | Raw value | Meaning | Who or what sets it |
|---|---|---|---|
| Submitted | SUBMITTED | Raised; the approval workflow has not been initiated | Set at creation. Requests HR raises on the Leave Requests screen stay here even after approvers hold them; portal requests move on at once |
| Undergoing approval | UNDERGOING_APPROVAL | With the approvers. A rejected request also stays here | The portal, on submission; HR, on a revert |
| Scheduled | SCHEDULED | Approved, and the first day is still in the future | Final approval, when the start date is later than today |
| In progress | IN_PROGRESS | The employee is out right now | Final approval on or after the start date; otherwise the nightly job on the start date |
| Ended | ENDED | Served; the employee is due back | The nightly job after the end date, or the attendance reconciliation when the person clocks in |
| Withdrawn | WITHDRAWN | The employee pulled it back before a decision | The employee, on the portal |
| Expired | EXPIRED | The start date passed with no decision; it can no longer be served | The nightly job |
| Cancelled | CANCELLED | Approved, but the employee is no longer going | An approver, from the dashboard queue |
Withdrawn, Expired and Cancelled are the voided states. Nothing can act on a voided request: it cannot be edited, withdrawn again, or reviewed. An approver who still has a withdrawn request open on screen is refused with "This leave request has been withdrawn and can no longer be reviewed".
The "When" column (Leave Records)
Derived from the decision and the dates, never stored. Bold text, no chip.
| Text | Condition |
|---|---|
| Out now | Approved, and today is between the first and last day. A small progress bar shows how far through the leave is |
| Starts today / Starts in N days | Awaiting decision, start date today or ahead. Shown in amber when the start is within 7 days |
| Already started, undecided | Awaiting decision, and the start date has passed. This is the row the nightly job will expire |
| Awaiting a decision | Awaiting decision, no start date recorded |
| In N days / Scheduled | Approved, starts in the future |
| Not taken | Rejected. Shown faint |
| Ended | Approved and the last day has passed. Shown faint, with "N days ago" or "N months ago" underneath |
The view tabs on the same screen use the same rule: Awaiting decision, Out now, Scheduled, Completed, Rejected.
The "waiting on" line
Under an Awaiting decision chip, on Leave Records, the calendar drawer and the portal:
| Text | Condition |
|---|---|
| Supervisor — Ama Mensah (stage — person) | A stage is open and a reviewer is assigned |
| Supervisor — unassigned | The stage exists but nobody holds the role (no supervisor set, no department head, nobody in the HR Leave Approval Manager role) |
| no approver resolved (records) / Awaiting an approver (portal) | Neither a stage nor a reviewer is known. The request can still be decided by whoever holds it; the screen just cannot name them |
| 3/4 decided (dashboard queue chip) | More than one reviewer; this many have already decided |
Reviewer steps (request dialog, Reviewers dialog, My Approvals)
| Label | Colour | Meaning |
|---|---|---|
Awaiting / PENDING | amber (blue on the shared workflow view) | This reviewer has not decided |
| Approved | green | This reviewer approved, with the date and time |
| Rejected | red | This reviewer rejected |
| padlock icon | — | The step is locked because the whole request has concluded |
Entitlements page: the row status pill
One pill per employee row. The tooltip on the pill explains the reason in a sentence; the Calculation dialog repeats it.
| Pill | Colour | Exact condition | What to do |
|---|---|---|---|
| Not accrued | grey outline | The accrual has never written a computed row for this employee and leave year | Press Run accrual |
| Over ceiling | red | Remaining days are below zero: more has been taken and booked than was ever granted | A correction, never a warning. Check the grants and adjustments |
| Near forfeit | amber | Remaining days exceed the carry-over cap and at least 75% of the leave year has elapsed. The tooltip says how many days will be lost and on which date | Get the excess booked before the forfeit date |
| Healthy | green | Everything else. Includes days above the cap while less than 75% of the year has gone; the tooltip says so and that it will be flagged in the last quarter | Nothing |
Other chips on the same page:
| Chip | Where | Condition |
|---|---|---|
| pro-rata 0.75 (amber) | beside the name | The employee joined part-way through the leave year; the factor is the share of the year served |
| blue number in Per year | the Per year column | An individual arrangement is typed on this row. Grey text means the figure is inherited from the rank or the type default |
| +3 (green) | Adjusted column | Days credited outside the ordinary entitlement |
| amber number | Pending column | Days requested and not yet decided; not deducted |
| red number | Remaining column | A negative balance |
| individual arrangement (blue) / inheriting (grey) | Entitlement dialog | Whether an annual or sick figure is typed for this person |
| closed — read only (amber) | Entitlement dialog | The leave year is closed |
| accrues (blue) | Balances table | This is the one leave type that accrues |
Filter chips at the top of the register (Individual arrangement, Inherited, Has adjustments, Near forfeit, Over ceiling, Not accrued) use exactly the same rules and count over every loaded row.
Leave Calendar: coverage
| Chip or glyph | Colour | Condition |
|---|---|---|
| ✓ covered | green | Every day in the window keeps available staff above the floor |
| ● touches its floor / ● at floor | amber | On at least one day, available staff equals the floor |
| ▲ dips to 3 of 5 / ▲ below 5 | red | On at least one day, available staff is below the floor. The first number is the thinnest day |
| no floor set | grey | The department has no staffing floor, so nothing can be checked |
| headcount unknown | grey | The staff roster did not load |
| hatched bar with a dashed border | — | An undecided request (drawn only when Include undecided is on; never counted against cover) |
| bar with a squared-off end | — | The leave runs in from before the window or out beyond it |
| flag icon beside a name | — | This person holds the unit's critical role |
In the "If you approve this" panel of the request drawer: green means the unit stays comfortably covered, amber means it lands exactly on its floor, red means it drops below. The figure already includes the request being viewed.
Leave Dashboard
Tiles carry a coloured rail. Chips in tables follow the severity the server computed:
| Chip | Colour | Where | Condition |
|---|---|---|---|
| N d (age) | red | approval queue | Age at the current stage is more than twice the SLA, or the request is retro-dated, or the leave starts within 7 days |
| N d (age) | amber | approval queue | Age is more than the SLA |
| N d (age) | green | approval queue | Within the SLA |
| retro | amber | beside the reference | Filed after the leave had already begun |
| soon | red | Starts column | Starts within 7 days |
| not assigned | red | Cover column | Approved leave with nobody assigned to cover the desk |
| at risk | amber | compliance | A forward-looking rule (minimum days, taken in year) is currently failing |
| gaps | amber | compliance | A control rule (certificate, approval before start, payroll) has failing records |
| clear | green | compliance and "weeks that will not clear" | Nothing fails |
| red outline on a heat-grid cell | red | eight-week grid | That unit is below its staffing floor that week |
| ≥ 8 per head | red | liability by department | Eight or more accrued untaken days per head; 6 to 7.9 is amber |
Leave Setup
| Pill | Colour | Meaning |
|---|---|---|
| Open / Closed | green / grey | Whether the leave year is still being accrued. Closed years are read-only |
| Active / Retired | green / grey | Whether a staffing floor is still checked. Retired rules are kept for the record |
| Active / Off | green / grey | Whether a statutory rule is still checked |
| accrues, carries over | grey | Leave type behaviour flags |
| liability | amber | Unused days of this type sit on the balance sheet |
| unpaid | red | This type is deducted from pay and pauses accrual while taken |
| cert > 3d | grey | A spell longer than this many days needs a certificate |
Employee portal
| Chip | Colour | Condition |
|---|---|---|
| N left | green | Balance of 2 days or more |
| N left | amber | Balance below 2 days |
| N left | red | Balance of zero or below |
| Approved / Rejected / Awaiting decision | green / red / amber | The decision axis, as above |
| Withdrawn / Expired / Cancelled | grey | A voided request; edit and withdraw disappear |
| Scheduled (blue), In progress (green), Ended (grey) | — | The lifecycle line under an Approved chip |
| with Supervisor — Ama Mensah | — | The "waiting on" line under an Awaiting decision chip |
Leave Setup
Everything leave runs on, in one tabbed workspace: the leave year, the leave types, the staffing floors, the statutory checks, and the buttons that run the module's jobs by hand.
Where: HR → Leave Management → Leave Setup · Who: HR administrators
Before you start: the company's departments, ranks and supervisors should be in place, because approvals are routed through supervisors and department heads, and rank allocations attach to ranks. If you want HR as a final approver, assign someone the HR Leave Approval Manager role under Management Roles.
First-time setup, in order
- Defaults and Jobs → Write the defaults. Creates the current leave year (January to December, cap 5, warning 60 days, SLA 2 days), the six Ghana statutory rules, a staffing floor per department at 70% of headcount, and classifies your existing leave types by name. Safe to repeat.
- Leave Years. Correct the dates, cap, forfeit date, SLA and liability ceiling if the defaults are not your policy.
- Leave Types. Check each type's category and flags. Make sure exactly one type accrues.
- Staffing Floors. Replace the 70% guesses with real minimums, and declare critical roles.
- Statutory Rules. Review the citations and remedies; switch off any that are not your policy.
- Set days per year on Rank Allocation, then run the accrual from Entitlements or from the last tab here.
The Leave Dashboard offers the same first step as a banner, Set up leave accounting, which writes the defaults and runs the accrual in one go.
Tab: Leave Years
The accounting period leave is measured in. A year is created here or by the year-end close, never by simply looking at a screen.
| Column | Meaning |
|---|---|
| Year | The title, or the year code |
| Starts / Ends | The accounting period |
| Carry cap | Days that may be pushed into the next year |
| Forfeits | The date days above the cap are lost |
| SLA | Working days an approver has before a request is late |
| Ceiling | The board's tolerance for accrued untaken days |
| State | Open (green) or Closed (grey) |
New leave year opens a dialog with these fields. The year code cannot be changed once the year exists.
| Field | Meaning | Dialog default |
|---|---|---|
| Year code | The year number, e.g. 2026 | current year |
| Title | Display name | "2026 Leave Year" |
| Starts / Ends | The period | 1 January to 31 December |
| Carry-over cap (days) | Days above this are forfeited at close | 0 |
| Forfeit date | When that happens | blank |
| Warn before (days) | Lead time on the forfeit warning | 30 |
| Approval SLA (working days) | Drives the age colouring on the dashboard queue | 3 |
| Liability ceiling (days) | Draws the ceiling line on the liability chart; blank means no ceiling | blank |
Changing the cap or the dates changes what the accrual computes. Run the accrual afterwards rather than waiting for the night.
Close year starts the year-end close, which is described step by step in Year End and Jobs. It always previews who loses what before anything is written.
Tab: Leave Types
The category replaces guessing a type's behaviour from its name. It fills the flags in; every one stays editable.
| Column | Meaning |
|---|---|
| Name | The type, with its description underneath |
| Category | Annual, Sick, Maternity, Paternity, Compassionate, Study, Unpaid or Other |
| Default days | The allowance used when neither an individual figure nor a rank allocation exists |
| Behaviour | Chips: accrues, carries over, liability (amber), unpaid (red), cert > Nd |
| Approval | Which stages the type routes through: Supervisor · Dept head · HR |
The dialog has these fields:
| Field | Meaning |
|---|---|
| Name, Description | What the employee sees in the picker |
| Category | Choosing one overwrites the four flags and the certificate threshold with that category's defaults (see Key Concepts). Adjust afterwards if your policy differs |
| Default days | Fallback allowance |
| Certificate required after (days) | Zero means never. The statutory certificate rule reads this figure |
| Accrues monthly | Only one type may accrue. It is the one that carries over, forfeits and forms the liability |
| Carries over | Into the next leave year, up to the cap |
| Counts as liability | Off for sick leave: you do not owe unused sick days |
| Paid | Off for unpaid leave: it is deducted from pay and pauses accrual on other types while taken |
| Supervisor / Department head / HR approval | The approval route. A new type defaults to supervisor only |
The system refuses a second accruing type, naming the one that already accrues. If you genuinely need two, that is a policy conversation, not a checkbox.
The old standalone Leave Types menu item now redirects here.
Tab: Staffing Floors
The minimum a unit must keep on the floor. Without one the eight-week absence grid is only a count; the floor is what turns it into a warning.
| Field | Meaning |
|---|---|
| Department | Required |
| Sub-unit (optional) | "Line 2", "Dispatch". A department may have several rules; its effective floor is the largest minimum across them |
| Minimum staff | People who must be available. Below this the day or week is a breach |
| Critical role | A job title so thin that two holders away together is itself a risk. Must match the employees' job title exactly (case does not matter) or the clash check never fires |
| Holders of that role | How many people hold it. With one holder, that person being away is itself a clash |
| Active | Retire a rule rather than deleting it; it stops raising warnings but stays on record |
State pill: Active (green) or Retired (grey).
Tab: Statutory Rules
Each check carries the clause it rests on, because a compliance row that cannot cite its basis is an opinion.
| Field | Meaning |
|---|---|
| Title, Rule code | The check as it appears on the dashboard, and a stable code such as MIN_ANNUAL_DAYS |
| Check | One of: Minimum days taken, Certificate required, Taken inside the year, Approval before start, Reconciled with payroll |
| Applies to | One leave type, or all |
| Basis (the clause) | Printed verbatim, e.g. "Labour Act 651, s.20" |
| Jurisdiction | Defaults to Ghana |
| Minimum days / Threshold days | Used by the minimum-days and certificate checks |
| Remedy shown when it fails | Becomes the tooltip on the dashboard's compliance row |
| Active | An inactive rule is kept but not checked |
What each check fails on:
| Check | Fails when |
|---|---|
| Minimum days taken | An employee's taken + booked days of that type fall short of the minimum |
| Certificate required | A committed spell longer than the threshold has no certificate recorded |
| Taken inside the year | An employee's remaining balance exceeds the leave year's carry-over cap |
| Approval before start | The request was filed after the leave began (annual and study leave only) |
| Reconciled with payroll | Committed unpaid leave has no pay period attached, so it was never deducted |
The rule coded MIN_ANNUAL_DAYS is special: the dashboard reads its minimum for the "Tracking below the statutory minimum" row. Deleting it falls back to 15.
Tab: Defaults and Jobs
Five buttons that do by hand what otherwise runs on a timer or at a milestone.
| Button | What it does | When to press it |
|---|---|---|
| Write defaults | Creates the current leave year, the statutory checks, a 70% staffing floor per department, and classifies existing leave types. Idempotent | Once, at go-live. Again if a rule was deleted by mistake |
| Run accrual | Advances every request's lifecycle, recomputes every entitlement row, reconciles returns against attendance. The nightly 01:30 job does the same | After changing a leave year, a rank allocation or a grant, so the figures do not wait for the night |
| Snapshot | Freezes this month's liability so the trend chart has a point. The month-end job does this on the 1st | To backfill a missing month |
| Normalise | Converts requests written before the module gained separate decision and lifecycle statuses. Safe to repeat | Once, after upgrading. Again if any request still shows Unknown |
| Propose (exit settlements) | Raises a settlement proposal for every leaver still holding an accrued balance. Nothing is paid or written off here | Before a payroll run that includes final pay |
Common questions
The dashboard says leave accounting is not set up, but I have leave types. Types alone are not enough. The accrual has never written entitlement rows. Press Write defaults then Run accrual, or use the dashboard banner.
Balances are all zero after the accrual. No entitlement could be resolved: no individual figure, no rank allocation, and the leave type's default days are zero. Set one of the three.
I changed the category and my custom flags vanished. Choosing a category deliberately lays down its defaults first. Re-tick the flags you want, then save.
Can I delete a leave year? No. Close it. A closed year is read-only and its figures are final.
Rank Allocation
Default days per leave type for every employee on a rank. This is the middle tier of the entitlement chain: an individual figure on the Entitlements page wins over it, and the leave type's default days apply when neither exists.
Where: HR → Leave Management → Rank Allocation · Who: HR administrators
Before you start: the ranks under HR setup and the leave types on Leave Setup must exist.
The screen
The left panel, Add/Edit Leave Per Rank, is a three-field form. The right panel, List of Leaves Per Rank, is every allocation already saved.
| Field | Meaning |
|---|---|
| Rank | The grade the default applies to |
| Leave Types | Which leave type |
| Days | Days per full leave year for everyone on that rank who has no individual figure |
Steps
- Pick the rank and the leave type, type the days, press Save. The row appears in the list.
- To change one, press the pencil on its row; the form fills; press Save again.
- To remove one, press the bin. You are asked "Do you really want to delete permanently?".
- Run the accrual (from Entitlements or Leave Setup) so the new figure reaches the balances without waiting for the nightly job.
What happens next
The accrual resolves each employee's base entitlement as individual figure, otherwise rank allocation, otherwise type default. For the accruing type the rank figure is then pro-rated by months of service. For a flat type such as sick leave it is used whole.
The Entitlements page shows where a figure came from: an inherited figure is printed in grey with a tooltip such as "Inherited — 24 days · Officer rank", and its Calculation dialog names the source on the Base entitlement line.
Common questions
Somebody was promoted mid-year. Which rank counts? The employee's current rank at the time the accrual runs. Because the accrual recomputes the whole year at the new rate, a mid-year change is retrospective. Type an individual figure on the Entitlements page if you want to freeze the old rate.
I saved but nothing appeared. This older screen does not show a success or failure message. Check the list on the right; if the row is missing, the save was refused (usually a missing rank or type). Press Refresh on the Entitlements page rather than on this screen; the refresh button here does nothing.
Do I need an allocation for every leave type? Only the ones whose allowance differs by rank. A type with a sensible Default days on Leave Setup needs no rank rows.
Entitlements
The leave register: one row per employee for the leave year, showing what was granted, what has been used, what is left, what it is worth, and a status pill saying whether anything needs attention. It is also where HR types an individual arrangement and credits extra days.
Where: HR → Leave Management → Entitlements (the old Leave Balances and Leave Allocations items redirect here) · Who: HR
Before you start: the accrual must have run at least once, otherwise every row reads Not accrued. Press Run accrual on this page.
The header
The strapline names the leave year, the carry-over cap, when the accrual last ran, and Closed — figures are final when the year is closed. Controls:
| Control | What it does |
|---|---|
| Department | Narrows the register to one department |
| Leave year | Which year's rows to show |
| Export | The register as filtered, with its totals, as an Excel file |
| Run accrual | Recomputes every employee's position from today's date. Hidden when the year is closed |
If the accrual is more than 12 hours old, an amber banner says so: "These figures are N hours old", with a Run accrual now button. Taken and booked days may lag decisions made since the last run.
The Position band
| Tile | Meaning |
|---|---|
| On the register | Employees with a row, and how many are on an individual arrangement |
| Granted this year | Entitled + carried in + adjusted, over the rows shown |
| Accrued, untaken | Days earned to date and still owed |
| Liability | Those days in money, with the average day rate |
| Needs a look | Rows that are over ceiling, near forfeit or not accrued. Press it to filter to them |
Narrowing the register
A search box (name or staff ID) and a row of filter chips: All, Individual arrangement, Inherited, Has adjustments, Near forfeit (only when a cap is set), Over ceiling, Not accrued. Each chip shows how many rows match across the whole register.
The columns
The header groups the columns into Granted, Available, Committed and Position. Every figure is explained in Key Concepts; the diagram is repeated here because this is the screen you will be reading it against.
| Column | Meaning |
|---|---|
| Employee | Name, staff ID and department. An amber pro-rata 0.75 chip means they joined part-way through the year |
| Per year | The base figure. A blue pill is an individual arrangement typed on this row. Grey text is inherited from the rank or the type default; hover to see which |
| Entitled | Per year × pro-rata |
| Carried | Brought forward from last year's close, already capped |
| Adjusted | Credits outside the ordinary entitlement, as a green +N |
| Available | Entitled + carried + adjusted |
| Taken | Approved leave whose last day has passed |
| Booked | Approved leave still to come |
| Pending | Requested, undecided. Amber, and not deducted |
| Remaining | Available − taken − booked − encashed − forfeited. Red when negative |
| Liability | Accrued-but-untaken days × the employee's day rate |
| Status | The pill, explained below |
The footer totals every numeric column for the rows shown.
The status pill
| Pill | Colour | Exact condition | What it means for you |
|---|---|---|---|
| Not accrued | grey | No computed row exists yet | Run the accrual |
| Over ceiling | red | Remaining is below zero | More was taken and booked than was ever granted. Always a correction: check the grant, the rank allocation and the adjustments |
| Near forfeit | amber | Remaining exceeds the carry-over cap, and 75% or more of the leave year has elapsed | The tooltip says "N days above the cap will be lost on [date]". Get them booked |
| Healthy | green | Everything else | Nothing at risk. If days sit above the cap early in the year the tooltip says so and notes they will be flagged in the last quarter |
The 75% threshold is measured against the leave year's own start and end dates, not the calendar year.
The three row actions
Rows are not clickable. Three icon buttons sit in a fixed column on the right.
Entitlement (pencil)
Set the annual and sick days. Hidden when the year is closed.
The dialog shows an identity card with either an individual arrangement or inheriting pill, then:
| Field | Meaning |
|---|---|
| Annual leave days | Leave blank to inherit from the rank, then the type default. A value here is a deliberate individual arrangement and survives a rank change. The hint shows what the figure would be without it |
| Sick leave days | Same idea; blank takes the type's default |
| Why this arrangement exists | "Negotiated on hire", "long service". Recorded with who set it and when |
Below the form, a read-only Balances table lists every leave type for this person: entitled, accrued (only for the accruing type), taken, booked, remaining.
Adjustments (plus)
Credit days outside the ordinary entitlement. Hidden when the year is closed. The button carries a green badge with the days already credited.
The dialog lists every adjustment for the year: days (green for credits, red for claw-backs), reason, which leave type it applies to, effective date, who granted it, remarks. The total on the register row is the sum of these records and is never typed directly.
Credit days opens a second dialog:
| Field | Meaning |
|---|---|
| Days | Positive credits, negative claws back. Required |
| Reason | Compensatory (time off in lieu), Goodwill award, Transferred in, Correction |
| Applies to | A leave type; blank credits the accruing type |
| Effective date | The day the days were earned or granted, not the day they were keyed |
| Remarks | "Worked the public holiday on 21 Sep" — what somebody querying this a year from now would need |
Removing an adjustment asks for confirmation and recalculates the total. A closed year refuses: "Leave year N is closed and cannot be adjusted".
Calculation (calculator)
How every figure on this row was reached. Always available, writes nothing.
Three sections: the chain from base to remaining, the chain from accrued to liability, and a line-by-line table naming each figure, its formula, and where it came from (for instance "no individual figure — Officer rank"). It ends by repeating the status pill's reason and, for Near forfeit, how many days to book to avoid the loss. The footer records when the nightly accrual computed the row.
What happens next
- An individual figure or an adjustment changes the balance on the next accrual run. Press Run accrual rather than waiting for the night.
- The balances feed the approver's view on every approval screen, the employee's portal, and the dashboard's balance and liability bands.
Common questions
The remaining balance dropped before the leave was taken. Correct. Approved leave is booked the moment it is approved and comes off the balance then; it moves from booked to taken after the last day.
An employee says their balance is wrong. Open Calculation on their row. Every figure names its source. The usual causes are a rank allocation they did not expect, a pro-rata factor from their joining month, or a request still pending that they assumed was approved.
Why is the sick balance not pro-rated for a joiner? A flat allowance is not pro-rated. You are either employed or not. Only the accruing type is scaled by months of service.
Why can I not type days for maternity leave here? Only annual and sick days vary per person. Maternity, paternity, compassionate and study leave are statutory or policy and come from the leave type's default or a rank allocation.
Leave Requests
Raising, correcting or removing a leave request on an employee's behalf. Employees normally request from the portal; this screen is for HR capturing a paper or verbal request, or fixing one.
Where: HR → Leave Management → Leave Requests · Who: HR
Steps
Find the employee in the left panel: type a name or employee ID, optionally narrow by employment status, press Search, then click the person. Their profile banner (department, employment date, classification, ID, rank) and their existing requests load on the right.
Fill the form.
Field Meaning Type The leave type Start Date / End Date First and last day of leave Leave Status The lifecycle stage. Leave it blank for a new request; it is set for you Comment The reason, visible to approvers Press Save Changes. The request appears in the table and is routed to the approvers the leave type requires.
The table
Every request this employee has raised: leave type, start, end, resumption date, status (the raw lifecycle value such as UNDERGOING_APPROVAL; see the Status Reference for what each means), number of days, and an edit and delete button.
How the days are counted
The server counts working days between the two dates: Saturdays, Sundays and the company's public holidays are excluded. A request whose start and end are the same day counts as one day. A half day counts as 0.5, and can only be requested from the portal, for a single-day request.
What happens next
- The request is routed exactly as a portal request would be, and shows on the Leave Dashboard queue and in each approver's My Approvals.
- Requests raised on this screen keep the stage Submitted on the lifecycle axis even while approvers hold them. That is cosmetic: the Decision chip on Leave Records still reads Awaiting decision and the approvers see it. A portal request moves to Undergoing approval at once.
- Editing a request that has already been approved or rejected is refused: "Cannot edit approved or rejected leave". Revert the decision first from Leave Records.
- Editing a pending request re-routes it: approvals recorded against the old dates are not approvals of the new ones.
Common questions
Nothing happened when I pressed Save. This older screen shows no success or failure message. If the row did not appear, the server refused it, most often "Start Date is after End Date" or "Specify Valid Leave Type". Also make sure an employee is selected before saving.
Should I delete a request the employee no longer wants? Prefer the portal: the employee can withdraw it, which keeps the record and the trail. Delete on this screen removes the request permanently; use it only for a request keyed in error.
The day count looks off. It is working days. Check the public-holiday calendar under settings if a holiday is missing, and remember a single-day request always counts one day even on a weekend.
Approving Leave
Where decisions are made, who may make them, and what a decision does. Four screens can record a decision, and they all share one rule set.
Who: whoever a request is waiting on: the employee's supervisor, the department head, or the holder of the HR Leave Approval Manager role, as the leave type requires. HR may revert a decision.
The four places
| Screen | Best for | What you can do |
|---|---|---|
| Leave Dashboard → The approval queue | Working the whole queue, longest wait first, with age and stage | Approve, reject, and in bulk. Assign cover. Cancel approved leave |
| HR → My Approvals | Your cross-module inbox: leave sits beside cash requests and everything else routed to you | Approve or reject with remarks |
| Leave Records | Deciding in context: the full request, the reviewers so far, and every other request in the register | Approve, reject, revert |
| Leave Calendar → request drawer | Deciding with the roster in front of you: what this approval does to cover | Approve, reject |
The employee's balances and prior requests are shown on all of them. Deciding from one place or another is the same act: the same workflow step is written, so the trail is identical wherever you pressed the button.
The rules every screen shares
- Only the reviewer a request is waiting on can decide it. Being able to see the queue does not grant authority. Trying to decide someone else's stage is refused with "This request is not waiting on you", and the dashboard reports "N not waiting on you" on a bulk decision.
- Approval is complete when every mandatory reviewer has approved. One rejection ends it. Unless the workflow is configured as sequential, reviewers may act in any order; a sequential workflow refuses an out-of-turn reviewer with "[Name] has to Approve Before You. You are Number N in the Approval Order".
- An intermediate approval is acknowledged, with the message that other reviewers are still pending before a final status can be determined.
- A voided request cannot be reviewed. If the employee withdrew it after you opened it, you are told "This leave request has been withdrawn and can no longer be reviewed".
- A decision is written once. The Decision chip never changes afterwards, except by an explicit Revert.
- Suspended employees. Approving from Leave Records for an employee under an active disciplinary suspension is refused: "This employee is under an active suspension - leave cannot be approved until it is lifted". The other screens do not apply this check, so use Leave Records when in doubt about a discipline case.
What each decision does
| Decision | Effect |
|---|---|
| Approve (final) | The decision axis becomes Approved. The lifecycle becomes Scheduled, or In progress if the start date has already arrived. The days move from pending to booked on the employee's balance, the leave appears on the calendar and the coverage grid, and the employee sees Approved on the portal |
| Reject | The decision axis becomes Rejected. Nothing is deducted; the leave is never drawn on the calendar. The employee sees Rejected |
| Revert (Leave Records only) | Puts a decided request back to Awaiting decision and rebuilds the approval route from the start, so it cannot return to pending with nobody owing a decision. The outcome already communicated no longer stands |
| Cancel (dashboard) | For approved leave the employee will no longer take. The lifecycle becomes Cancelled, the days return to the balance, the reason is recorded |
| Assign cover (dashboard) | Names who holds the desk while the person is away. Approval and backfill are one decision; the dashboard flags approved leave with cover not assigned |
Deciding on the dashboard queue
The queue is sorted longest wait first. Each row shows the reference, employee and unit, leave type and days, start date (a red soon chip inside seven days), the stage and person it is waiting on, and its age at the current stage coloured against the SLA. A retro chip marks a request filed after the leave had begun.
- The tick and cross on a row decide that one request. Approve acts immediately; Reject asks for confirmation.
- Tick several rows (or the header box) and a batch bar appears with Approve and Reject, plus a comment box. The comment is recorded against every decision in the batch.
- A batch is deliberately not all-or-nothing. A row a colleague decided seconds ago comes back as Already approved or Already rejected; rows not waiting on you are counted and reported; everything else goes through. The result message says how many applied.
Deciding in My Approvals
Each row is a request routed to you, with its type, requester, record number, your remarks and status. The eye icon opens the request: the left side is the full leave request with the employee's balances and history, the right side is Enter Your Review: remarks, an Approve or Reject radio, and Submit Review. Once the whole request has concluded the step is locked and shown read-only with a padlock.
Deciding on Leave Records
Open the row's eye icon. The dialog shows the request, where it stands, and a Reviewers timeline with every stage: who, whether they have decided, when, and their remarks. Approve and Reject sit at the bottom while the request is pending; otherwise the row offers Revert decision. Every action confirms first with the employee's name and dates, and the register updates in place.
Deciding on the calendar
Click a hatched (undecided) bar. The drawer shows the request, whose desk it is on, the reviewers so far, and an If you approve this panel: the unit's thinnest day, the available count against its floor, and a green, amber or red verdict. The figure already includes this request. Approve and Reject act immediately, with no confirmation.
When an approver is away
The dashboard's Approvers away tile counts approvers who are themselves on approved leave today while holding open requests, and names their cover (their own supervisor). The system does not re-route the request to the cover; it reports the stall so somebody can act. If a stage is regularly blocked this way, add a second reviewer on the workflow or use Revert to rebuild the route once the supervisor has changed.
Common questions
I can see the request but the buttons do nothing / I am told it is not waiting on me. You are not the reviewer for the open stage. Check the Waiting on column.
The queue shows "no approver resolved". The stage exists but nobody holds the role: the employee has no supervisor, the department has no head, or nobody holds the HR Leave Approval Manager role. Fix the setup; the request can still be decided by whoever does hold it.
Can I approve leave for a date that has already passed? Yes. The request goes straight to In progress or Ended as the dates dictate. It is marked retro and counts against the "approval before start" control for annual and study leave.
An approved request needs new dates. Revert it from Leave Records, have the employee edit it on the portal (or edit it on Leave Requests), and let it route again.
Leave Records
The company-wide register: every leave request, what was decided, and where the leave itself stands. This is the working screen for anyone who needs the truth about a request, and the place HR reverts a decision.
Where: HR → Leave Management → Leave Records · Who: HR, approvers
The header
Every leave request, what was decided, and where it stands, the number of requests loaded, and the period in view. Export downloads the rows in view as an Excel file with the filters they were found under; Reload refreshes.
What needs doing
Five tiles, counted over everything loaded. Press one to filter to it.
| Tile | Meaning |
|---|---|
| Awaiting decision | Nobody has said yes or no yet. Red while non-zero |
| Starts within 7 days | Undecided and imminent: the employee cannot plan |
| Out today | Approved, and today falls inside the leave. The hint says how many are back tomorrow |
| Scheduled ahead | Approved, not yet started |
| Days in view | The sum of days across the rows shown |
Views and filters
Six tabs over one list: All, Awaiting decision, Out now, Scheduled, Completed, Rejected. Each shows its count across everything loaded.
| Filter | What it does |
|---|---|
| Search | Name or staff ID, narrowing the loaded rows |
| Department, Leave type | Re-query the server |
| Decision | Awaiting decision / Approved / Rejected |
| Stage | The lifecycle: Submitted, Undergoing approval, Scheduled, In progress, Ended, Withdrawn, Expired, Cancelled |
| From / to | Date range on the start date |
| Clear | Resets every filter and reloads |
Arriving here from a dashboard tile shows the full register; press the tab you want.
The columns
| Column | Meaning |
|---|---|
| Employee | Name, staff ID, department |
| Leave type | |
| From / To / Back at work | First day, last day, resumption date |
| Days | Working days; "half day" underneath when it is one |
| When | Where the leave itself has got to, derived from the decision and the dates: Out now (with a progress bar), Starts in N days, Already started, undecided, In N days, Not taken, Ended. Amber when undecided and starting within a week; faint when finished or refused |
| Decision | The chip: Awaiting decision (amber), Approved (green), Rejected (red), Unknown (grey). Under a pending chip: stage — person it is waiting on, or no approver resolved. Under a decided chip: the recorded lifecycle stage |
| Actions | View detail, approval trail, then Approve and Reject for a pending row or Revert decision for a decided one |
The footnote under the table is worth repeating: Decision is whether the request was approved; When is where the leave itself has got to. They are different questions, which is why one status column could not answer either. The Status Reference lists every value of both.
The request dialog
Opened by the eye icon. An identity card with the Decision chip, then three sections:
- The request: leave type, first and last day, back at work, days, the reason given.
- Where it stands: the decision (and whose desk it is on), the leave itself, the recorded stage.
- Reviewers: a timeline of every stage with who, Awaiting / Approved / Rejected, the date and time, and remarks.
Approve and Reject appear while the request is pending. The Reviewers icon on the row opens the shared workflow view of the same trail.
Approve, reject, revert
Each confirms first, naming the employee and dates:
- "Approve 3 days of Annual leave for Ama Mensah, 8 Sep to 10 Sep?"
- "Reject Ama Mensah's Annual leave request for 8 Sep to 10 Sep? They are told the outcome."
- "Put Ama Mensah's request back to awaiting a decision? The outcome already communicated no longer stands."
The rules for who may decide, and what each decision does, are in Approving Leave. Approving from this screen also applies the disciplinary-suspension check.
Export
An Excel sheet of the rows in view with a preamble (view, department, leave type, period) and columns for employee, staff ID, department, type, dates, days, half day, decision, who it is waiting on, stage, the "When" sentence and the reason given, with a totals row. This is the report most people mean when they ask for a "leave report".
Common questions
A request shows Approved but the stage says Undergoing approval. The record predates the module's rebuild. Run Normalise older requests on Leave Setup; it places each old request on the lifecycle by its dates.
Why does a rejected request still appear in the register? Because it happened. It is never drawn on the calendar and never deducted; use the Rejected tab to see or hide them.
Someone withdrew a request but it still shows Awaiting decision in the Decision filter. The decision axis is only written when the workflow concludes, so a withdrawn request keeps Awaiting decision there. The chip on the row reads the lifecycle too and shows Withdrawn; filter by Stage → Withdrawn to find them.
Leave Calendar
Who is away, when, and where cover runs thin. Three views over one window of dates: a Planner (people by day), a Month grid, and a Coverage table (units by week). Approvers use it to see the roster consequence of a request before deciding.
Where: HR → Leave Management → Leave Calendar · Who: approvers, HR, rostering managers
Before you start: coverage verdicts need a staffing floor per department on Leave Setup. Without one the calendar still shows who is off, but can never say a day is short.
What the window is telling you
Five tiles counted over the days in view. Press one to jump to it.
| Tile | Meaning |
|---|---|
| Out today | People on approved leave today, as a share of tracked headcount |
| Back this week | Approved leave ending by Sunday |
| Awaiting decision | Undecided requests overlapping the window, drawn hatched |
| Coverage breaches | Unit-weeks below the staffing floor |
| Critical-role clashes | Both holders of a thin role off together |
The scope tray
| Control | What it does |
|---|---|
| Department, Leave type | Narrow the leave loaded |
| Window | 2 weeks, 4 weeks, 5 weeks (default) or a quarter. The window always starts on a Monday and opens showing last week |
| Include undecided | Draw pending requests, hatched. Undecided leave is never counted towards cover, drawn or not |
| Show staff with no leave | Add a row for everyone on the roster, not only people with a bar |
| ‹ Today › | Move the window |
Rejected leave is never drawn: it was never taken.
Planner view
Rows are people grouped by department; columns are days; leave is a bar in the leave type's colour.
Group header. Each department shows its headcount, floor and a chip: ✓ covered (green), ● touches its floor (amber), ▲ dips to 3 of 5 (red, the thinnest day), no floor set or headcount unknown (grey).
A bar. Solid for approved leave; hatched with a dashed border when undecided; starting half-way across the cell for a half day; squared off at the edge when the leave runs in from before the window or out beyond it. The tooltip gives the person, type, dates, working days and either Approved or Awaiting [stage] — [person]. Click a bar to open the drawer.
The coverage rail under the grid has two rows. Available (single department) or People off (several) gives the count per day. Cover gives the day's verdict against the floor: ✓, ● or ▲, coloured green, amber or red; grey on weekends and where no floor exists. A day's verdict is the worst across every unit in scope: one department below its floor is a problem whatever the others are doing.
Days. The calendar counts working days between the dates, excluding weekends, minus half a day for a half-day request. Public holidays are not yet shaded or excluded here, so a request spanning a holiday shows one more day on the calendar than on the register, which uses the server's count.
Month view
A conventional month grid. Each day shows up to three name chips in leave-type colours (hatched when undecided) and +N more beyond that. The corner of a day carries ● or ▲ when any unit in scope is at or below its floor; hover to see which. The month moves independently of the planner window.
Coverage view
Available staff per unit, per week. Approved leave only: cover you have not lost yet is cover you still have.
One row per unit with its headcount, floor and critical role, then one cell per week. Each cell shows the available count and a caption: available, ● at floor, or ▲ below N. A week is judged by its worst working day, not its average; a fine week is tinted by how many people are off.
Where it breaks lists, worst first, every unit-week below its floor ("Dispatch falls 2 below its floor in the week of 14 September") and every critical-role clash ("Both Shift Engineers are away in the week of…"). With floors configured and nothing wrong, it says so in green.
The request drawer
Click any bar or chip. The drawer shows the person, leave type, decision chip, dates, working days and back-at-work date, the reason given, whose desk it is on, and the approval trail.
For an undecided request it adds If you approve this: the unit's thinnest day, the available count against the floor, and a verdict. Green: stays comfortably covered. Amber: lands exactly on its floor. Red: drops below. The figure already counts this request. Approve and Reject act at once, with no confirmation, and the calendar reloads. See Approving Leave.
Export
Two Excel sheets. Leave: every request in view with dates, days, decision, stage and who it is waiting on. Coverage: available staff per unit per week, flagged (below floor) or (at floor), followed by the list of breaching weeks and critical-role clashes.
Common questions
Somebody on maternity leave is missing from the planner. They should not be: the calendar loads leave starting up to a year before the window so long absences are kept. If they are missing, the request was rejected, withdrawn or never approved.
The rail says "no floor configured" but the group chip is green. A unit without a floor is treated as fine because there is nothing to check it against. Set a floor on Leave Setup.
Coverage is red but the department is far above its floor. Look for a critical-role clash. Two shift engineers off together is a risk even when ninety other people are in.
Leave Dashboard
The leave overview for HR and approvers, ordered by how fast each part's clock runs: decisions first, the roster second, balances and money third, patterns and the year ahead last. Every tile clicks through to the list that produced it; every metric carries a comparison or a threshold; the approval queue is a workspace, not a report.
Where: HR → Leave Management → Leave Dashboard · Who: HR, approvers, managers
The header
Company, leave year, how many people are out today, how many decisions are waiting, and when the page last refreshed. Department narrows every band. Leave year changes bands 3 to 6 only: a late decision is late today and a person out this afternoon is out whichever year you look at, so bands 1 and 2 ignore it. Each band loads on its own and shows its own progress bar.
First run. A company that has never run the accrual sees Leave accounting has not been set up yet with a Set up leave accounting button. It writes the statutory defaults and staffing floors, then runs the accrual once. Until then the balance, liability and compliance bands are honestly empty.
Band 1: Decisions waiting
Current state. A decision six days late is late today, whatever year it belongs to.
| Tile | Reading it |
|---|---|
| Awaiting decision | Requests nobody has decided. The hint gives the age of the oldest; react to that, not the count |
| Starting within 7 days | Undecided and imminent. Always urgent |
| Retro-dated submissions | Filed after the leave began. A control weakness, not an admin nuisance |
| Median time to decision | Half of this month's decisions were faster. Amber when above the SLA |
| SLA breaches this month | Decisions slower than the SLA, out of all decisions this month |
| Approvers away | Approvers on leave themselves with open requests. The commonest cause of a stalled queue |
The approval queue, longest wait first: reference (with a retro chip), employee and unit, type and days, start (with a soon chip), the stage and person it is waiting on (with a 3/4 decided chip when several reviewers), and age at the current stage coloured against the SLA. Approve and reject act in place, singly or in bulk. Deciding is described in Approving Leave.
Where the queue is stuck: one card per stage with how many requests sit there and the median age, then the approvers with open work, their median decision time over 90 days, and their approval rate. The approval rate is a fairness signal, not a target: an approver at 60% when everyone else is at 90% is worth a conversation; so is one at 100% who has never questioned anything.
Clicking a reference opens the request; clicking a name opens the employee's leave ledger: every leave type with entitlement, carried in, taken, booked, remaining and liability, and their recent requests.
Band 2: Out of office
The picture a supervisor needs before answering the request in front of them.
| Tile | Reading it |
|---|---|
| Out today | On approved leave now, as a share of tracked staff |
| Out this week | Leave touching Monday to Sunday |
| Returning today | Expect them on the roster |
| Overdue returns | Past their resumption date and not clocked in. Reconciled nightly against attendance |
| Absent, no request | Days the attendance register calls an absence with no approved leave behind them. Each is unpaid leave nobody deducted or leave nobody recorded |
| Coverage breaches | Weeks in the next eight where a unit drops below its floor |
Next eight weeks: one row per unit, one column per week, each cell the people booked off, on a blue ramp. A red outline means that week breaches the staffing floor. A unit with no floor shows counts but can never breach.
Out now and in the next fortnight: who is away, when they are back, and who is covering. not assigned in red is the row to act on.
Coverage risk: each unit's worst week in the window with its floor, available count and gap, worst first. Notes underneath name a critical-role clash or the first overdue return.
Band 3: Entitlement and balances
From here down the leave-year filter applies.
| Tile | Reading it |
|---|---|
| Entitlement | The year's entitlement for everyone in scope, with the portion accrued so far |
| Carried in | Brought forward, already capped |
| Taken | Served, as a share of entitlement |
| Booked ahead | Approved, still to come |
| Still unbooked | Not spoken for at all, with the forfeit date. Next December's problem, visible now |
| Taken nothing this year | People with no leave at all, and the days they hold. A burnout signal before it is a liability |
What needs fixing before the forfeit date lists four exposures with their deadlines: days that will be lost above the carry cap, people tracking below the statutory minimum, people who have taken nothing, and balances already negative (always a correction). Balance spread is a histogram of days remaining per employee: the shape matters more than the average.
Band 4: Liability
| Tile | Reading it |
|---|---|
| Accrued and untaken | The liability in days, against the board ceiling if one is set |
| Balance-sheet value | The same in money, and days per head |
| Movement since last month | Positive means leave is accruing faster than it is taken |
| Forecast at year end | If the current booking rate holds |
| Average day valued | The weighted value of a day in the liability, beside the company mean. Senior staff hold the untaken leave, so the first is usually higher |
| Cost of leave taken | What the leave served this year cost |
Liability trend draws month-end snapshots, not a re-derivation; a missing month means its snapshot was never written (see Year End and Jobs). A dashed red line marks the ceiling. By department sorts by days per head, the column size cannot hide behind; 8 or more per head is red, 6 to 8 amber.
Band 5: Patterns and compliance
| Tile | Reading it |
|---|---|
| Sick days | Total and per employee |
| Sick, no certificate | Spells past the threshold with no document |
| Bradford factor flags | Employees scoring 200 or more (spells² × days) |
| Monday / Friday sick | Share of sick spells starting Monday or ending Friday, against the 40% chance alone gives. A conversation, not a verdict |
| Absent with no request | The attendance-versus-leave reconciliation again |
| Half-day requests | Volume in the year |
Statutory and policy checks: one row per rule with the clause it rests on, how many records fail, and a status: clear (green), at risk (amber, forward-looking rules) or gaps (amber, control rules). Hover a row for the remedy. Leave type mix shows days taken by type; watch the shape rather than the totals.
Band 6: The year ahead
Booking curve: cumulative days taken and booked, month by month, against the same point last year. Running behind in August means the days are still coming, compressed into fewer weeks. Weeks that will not clear: where the days people want exceed what the roster can release above its floors. What to do about it: recommendations generated from the numbers, each naming the figure that produced it, such as Open a leave window before the forfeit date or Set delegates for N absent approvers. Holiday pressure: public holidays for the rest of the year and how many requests pile up against each.
Common questions
Bands 3 to 6 are empty. The accrual has never run. Use the banner, or Run accrual on Leave Setup.
The trend chart is empty. No month-end snapshots exist yet. They accumulate from the first month end after go-live; backfill with Snapshot on Leave Setup.
Approvers away is zero but the queue is stalled. The tile only counts approvers on approved leave today. Somebody simply not looking at their inbox shows up in the approver table under Where the queue is stuck instead.
Leave Report
Where: HR → Leave Management → Leave Report
This menu item currently opens a placeholder: a From and To date and a button that produces nothing. It is kept on the menu for the report that will replace it.
For leave reporting today use the exports, which produce Excel files from the real figures:
| Need | Where | What you get |
|---|---|---|
| Every request in a period, with its decision, stage and who it is waiting on | Leave Records → Export | One sheet, filtered as the screen is, with totals |
| Who is away in a window and what it does to cover | Leave Calendar → Export | Two sheets: the leave, and available staff per unit per week with breaches and clashes |
| Balances, accrual and liability per employee | Entitlements → Export | The register with every computed column and a status per row |
| The liability trend by month and by department | Leave Dashboard | On screen; snapshots are written monthly |
The general HR Reports screen covers headcount and payroll periods and does not include leave.
The Employee's Side
Everything an employee does with leave lives in the employee portal under Leave. Every call is scoped to the signed-in employee: nobody can see anyone else's balances or requests. The same page is documented for employees themselves under Employee Portal → Leave.
Your balances
One card per leave type: the days left as a chip, the allocation, a meter of how much is used, and the days taken this year. The chip is green with two or more days left, amber below two, red at zero or below. Clicking a card opens the detail: allocated, taken, remaining, and the number of requests.
An employee with no allocation sees No leave allocation set up yet. Talk to HR if that looks wrong. That means no individual figure, no rank allocation and a zero default on the leave type.
Requesting leave
Request leave opens the form:
| Field | Notes |
|---|---|
| Leave type | Only types HR has configured |
| Start date / End date | Working days between them are counted for you: weekends and public holidays do not count |
| Half day only | Appears only when start and end are the same day |
| Reason | "Anything your approver should know" |
Submit request sends it straight to the approvers the leave type requires. The request then shows in Your requests with its status.
Following a request
Each request shows type, dates, days and up to three lines of status:
- The decision chip: Awaiting decision (amber), Approved (green), Rejected (red), or Withdrawn / Expired / Cancelled (grey) once it is closed.
- The stage, when it adds something: Scheduled, In progress, Ended.
- Whose desk it is on while pending: with Supervisor — Ama Mensah, or Awaiting an approver if the stage has nobody assigned yet.
The meanings are in the Status Reference.
Editing and withdrawing
While a request is Awaiting decision the employee may Edit it (which re-routes it: approvals of the old dates are not approvals of the new ones) or Withdraw it. Withdraw asks "Withdraw this leave request? It stays on your record as withdrawn." and keeps the record with a Withdrawn label; nothing is deleted, and approvers who still had it open are refused when they try to act.
Once decided, both buttons disappear. The server enforces the same rule: "This request has already been decided. Ask HR to cancel it instead." An approver cancels approved leave from the Leave Dashboard; HR reverts a decision from Leave Records.
What the employee never sees
Other employees' leave, the coverage verdicts, the liability figures, and reviewers' internal remarks on other steps. The portal shows the employee's own trail only.
Year End & Jobs
What runs on its own, what HR must do by hand, and the one thing that is never automatic.
The nightly job (01:30)
For every company, in this order:
- Lifecycle. Undecided requests whose start date has passed become Expired (closure reason Start date passed without a decision). Approved requests whose start date has arrived become In progress. Requests in progress whose end date has passed become Ended.
- Accrual. Every active employee's entitlement row for the current leave year is recomputed: entitled, accrued, carried in, adjustments, taken, booked, pending, day rate. A closed year is never recomputed.
- Return reconciliation. Anyone whose leave has ended and who has since clocked in (attendance Reported or Reported late on or after the resumption date) has their actual return date written and the request marked Ended.
Without step 1 every approved request would stay "approved" forever and "out today" would include people who came back in March. Without step 2 balances would be a guess. Run accrual on Leave Setup or Entitlements does all three on demand.
The Entitlements page warns when its figures are more than 12 hours old, and the dashboard recomputes on the spot if no rows exist at all, so a new company sees real numbers on its first visit.
The month-end job (02:30 on the 1st)
Freezes the previous day's liability into a snapshot: one company-wide row plus one per department, with headcount, untaken days, value, average day rate and days taken in the month. The dashboard's liability trend draws these snapshots rather than re-deriving history, so last March does not quietly change when somebody edits an old request. Snapshot on Leave Setup writes one by hand, for backfilling.
The year-end close (HR, by hand)
Nobody's days are forfeited by a timer. The close is an explicit HR action from Leave Setup → Leave Years → Close year, and the dashboard prompts for it from the forfeit-warning date onward.
Step 1: preview. The dialog states, before anything is written: Closing 2026 will forfeit N days across N employees, carry N days forward into 2027, and create that leave year, with a table of every affected employee showing remaining, carried and forfeited days. If nobody loses anything it says so. This cannot be undone. Employees should have had the forfeit warning before you continue.
Step 2: confirm. Pressing Close 2026 does, in order:
- Forfeits each employee's days above the carry-over cap and writes them to the row.
- Marks the year Closed. Its rows become read-only: no grants, no adjustments, no accrual.
- Creates the next leave year, rolling the dates forward and copying the cap, warning days, SLA, ceiling and encashment settings.
- Carries each employee's grants forward and writes carried in = the smaller of what was left and the cap, once. It is never recomputed, so leave booked in the old year after the new one opened cannot change the new year's opening balance.
Per employee: carried = min(remaining, cap); forfeited = remaining − carried; both zero when remaining is zero or negative.
Before you close: run the accrual, work the dashboard's What needs fixing before the forfeit date list, and confirm the next year's settings are what you want, because the new year inherits them.
Exit settlements
Accrued leave has to be paid out on termination. Propose on Leave Setup raises, for every exited employee still holding accrued untaken days of the accruing type, a settlement proposal at their own day rate. Proposals are not payments: HR authorises, payroll pays, and only then are the days written off the balance, so nothing disappears from a record without a countersigned trail.
Normalising older requests
Requests written before the module gained separate decision and lifecycle statuses carry a single legacy status. Normalise on Leave Setup converts them: pending becomes Undergoing approval / Awaiting decision, rejected becomes Undergoing approval / Rejected, approved becomes Approved with the lifecycle placed by its dates. Safe to repeat.
Troubleshooting
| Symptom | Cause | Fix |
|---|---|---|
| Balance, liability and compliance bands empty | The accrual has never run | Dashboard banner, or Run accrual |
| Balances all zero | No entitlement resolvable: no individual figure, no rank allocation, type default 0 | Set days on the type or the rank |
| Liability trend empty | No snapshots yet | Snapshot, once per missing month end |
| Eight-week grid shows counts but never a breach | No staffing floors | Write defaults, or set floors by hand |
| Queue shows no approver resolved | Nobody holds the stage's role | Set the supervisor, the department head, or the HR Leave Approval Manager |
| Absent, no request is high on first run | Attendance and leave have never been compared before | Work the list once; it stays small afterwards |
| A request shows Unknown decision | Legacy data | Normalise |
FAQ & Known Limits
Balances
Why did the balance drop when the leave has not started? Approved leave is booked the moment it is approved and comes off remaining then. It moves from booked to taken after the last day. Pending leave is shown but never deducted.
Why does an August joiner get the full sick allowance but a fraction of annual leave? Only the accruing type (annual) is pro-rated by months of service. A flat allowance is not: you are either employed or not.
The accrued figure has not moved for two weeks. Accrual is monthly, in arrears. It steps at month end and sits flat in between, on purpose, so a liability quoted mid-month has not moved by the time anyone reads it.
Who can change the days per year? HR, on the Entitlements page (individual) or Rank Allocation (a whole rank). Nothing else writes those figures. Everything else on the register is computed.
Can I fix a wrong balance by typing the remaining days? No. Remaining is derived. Credit or claw back days with an adjustment, which is dated, reasoned and attributable, or correct the grant.
What happens to days above the cap? They are forfeited at the year-end close, not before, and only after HR has seen the preview. From 75% of the year onward the Entitlements page flags the row Near forfeit.
Requests and approval
Why does a request have two statuses? Was it approved? and where is it now? are different questions. See Key Concepts.
Who approves? The stages the leave type requires: supervisor, department head, the HR Leave Approval Manager, plus any reviewer on the company's leave workflow. Only the reviewer a request is waiting on can decide it.
I am HR. Why can I not bulk-approve the queue? Authority comes from holding the approval, not from seeing the dashboard. If HR should be able to decide every request, make HR approval a stage on the leave type.
Can a request be edited after approval? No. Revert it from Leave Records, edit it, and let it route again.
How do I cancel approved leave? From the dashboard queue's cancel action, with a reason. The days return to the balance and the request shows Cancelled.
What does "retro" mean on the queue? The request was filed after the leave began. For annual and study leave it counts against the "approval before start" control. Sick and compassionate leave are legitimately filed after the fact.
A request expired. Can it be revived? No. Expired is a voided state. Raise a new request.
Coverage
Why is nothing ever red on the calendar? No staffing floor is configured for the department. Set one on Leave Setup.
Why does undecided leave not affect the coverage verdict? Cover you have not lost yet is cover you still have. Undecided leave is drawn hatched so you can see it, but never counted.
Data rules the system enforces
- Only one leave type may accrue.
- A leave year is created only by setup or by closing the previous year.
- A closed year cannot be granted, adjusted or recomputed.
- An adjustment of zero days is refused.
- A voided request (withdrawn, expired, cancelled) cannot be edited, withdrawn or reviewed.
- A decision is written once; only an explicit revert changes it.
- Rejected leave is never deducted and never drawn.
- Forfeit is never automatic.
Known limits, as of September 2026
- Leave Report is a placeholder. Use the exports on Leave Records, Leave Calendar and Entitlements.
- Public holidays are not shaded on the calendar, and its day count excludes weekends only. The register and the request form use the server's count, which does exclude the company's holidays.
- HR-raised requests keep the stage "Submitted" while approvers hold them. The Decision chip is right; only the stage label lags.
- The Leave Requests and Rank Allocation screens show no success or failure message. Check the list after saving.
- Delegation reports rather than routes. The dashboard names an absent approver and their cover, but the cover cannot act on the request.
- The disciplinary-suspension check applies only when approving from Leave Records. The dashboard queue, My Approvals and the calendar drawer do not apply it.
- Deleting from the HR Leave Requests screen removes the record permanently. The portal's withdraw keeps it.
- A dashboard tile linking to Leave Records opens the full register, not the filtered view; press the tab.
- Encashment other than on exit (year-end buy-back, policy buy-back) is not built.
Glossary
Every term the Leave Management module uses, in plain language. Where a figure comes from the Labour Act, 2003 (Act 651), the section is cited.
The period
Leave year
The accounting period leave is measured in: a start date, an end date, a carry-over cap, a forfeit date, an approval SLA and a liability ceiling. Created by setup or by closing the previous year, never by looking at a screen.
Carry-over cap
Days an employee may push into the next leave year. Everything above it is forfeited at the close. Default 5.
Forfeit date / forfeit warning
When days above the cap are lost (usually the year end), and how many days ahead the dashboard starts warning (default 60).
Year-end close
HR's explicit act of finishing a leave year: forfeit above the cap, mark the year closed, open the next year, write carried-in days once.
Closed year
A finished leave year. Read-only: no grants, adjustments or recomputation.
Leave types
Leave type
What the employee picks: Annual, Sick, Maternity and so on. Carries a category, five behaviour flags, a default number of days, and the approval stages it requires.
Category
Which standard kind of leave a type behaves as: Annual, Sick, Maternity, Paternity, Compassionate, Study, Unpaid, Other. Supplies defaults for the flags.
Accruing type
The one leave type that is earned month by month, carries over, forfeits and forms a liability. Normally annual leave. The system refuses a second.
Flat allowance
Any non-accruing type. Available in full from day one, not pro-rated, not carried over, not a liability.
Paid / unpaid
An unpaid type is deducted from pay, and months mostly spent on it do not earn accrual on the accruing type.
Certificate threshold
Days beyond which a spell of that type needs a supporting document. Default 3 for sick leave. Reported, not blocking.
Entitlement
Entitlement row
One record per employee per leave year holding the grant, the adjustment total, and everything the accrual computed.
Base entitlement
Days per year before pro-rating: the individual arrangement if typed, otherwise the rank allocation, otherwise the type's default days.
Individual arrangement
An annual or sick figure typed for one employee on the Entitlements page. Wins over the rank and survives a rank change.
Rank allocation
Default days per leave type for everyone on a rank.
Pro-rata factor
The share of the leave year the employee is in service, in whole months. A month counts if at least half of it was served.
Entitled
Base × pro-rata. This year's own allowance.
Accrued
The part of entitled that has been earned so far: completed months of service, in arrears, rounded to the half day.
Carried in
Days brought from the previous year at its close, already capped. Frozen; never recomputed.
Adjustment
A dated, reasoned credit (or claw-back) outside the ordinary entitlement: compensatory (time off in lieu), goodwill, transfer in, correction. Typed against a leave type.
Available
Entitled + carried in + adjusted. Everything granted for the year.
Taken / booked / pending
Approved leave already served / approved leave still to come / requested but undecided. Only the first two are deducted.
Remaining
Available − taken − booked − encashed − forfeited. What can still be booked.
Unbooked
Remaining − pending. Days nobody has even asked for.
Encashed
Days paid out in cash rather than taken. Today only on exit.
Forfeited
Days lost above the cap at the last close.
Accrued untaken
Accrued + carried in + adjusted − taken − encashed − forfeited. The liability in days.
Day rate
The employee's own latest basic pay ÷ 21.67 (260 working days over 12 months).
Liability
Accrued untaken × day rate, per employee, summed. Frozen monthly into a snapshot.
Liability ceiling
The board's tolerance for accrued untaken days. Sets the verdict and the reference line on the trend.
Requests
Request
An employee's application for leave: type, first and last day, half day, reason. Also raised by HR on their behalf.
Decision (approval status)
Whether the request was agreed: Awaiting decision, Approved, Rejected. Written once when the workflow concludes.
Stage (lifecycle status)
Where the request is now: Submitted, Undergoing approval, Scheduled, In progress, Ended, Withdrawn, Expired, Cancelled.
Voided
Withdrawn, Expired or Cancelled. Closed without the leave being served; nothing can act on it again.
Withdrawn
Pulled back by the employee before a decision. Kept on record.
Expired
The start date passed while undecided. Set by the nightly job.
Cancelled
Approved leave the employee will no longer take. Set by an approver, with a reason.
Revert
HR putting a decided request back to Awaiting decision, rebuilding the approval route from the start.
Retro-dated
Filed after the leave began. A control breach for annual and study leave; normal for sick and compassionate.
Half day
A single-day request counted as 0.5.
Resumption date / back at work
The day the employee is due back: the recorded resumption date, or the first working day after the end.
Actual resumption
When the employee actually clocked in again, reconciled nightly from attendance.
Cover
The colleague assigned to hold the desk while the employee is away.
Approval
Reviewer / approver
A person a request is routed to: supervisor, department head, HR Leave Approval Manager, or a reviewer configured on the workflow.
Mandatory reviewer
A reviewer whose decision is required. The request is approved when every mandatory reviewer approves; one rejection ends it.
Sequential / parallel
Whether reviewers must decide in order or may decide in any order. Set on the company's workflow.
HR Leave Approval Manager
The management role whose holder is the HR stage of leave approval. Assigned under Management Roles.
Approval SLA
Working days an approver has, per stage, before a request is late. Default 2. Drives the age colouring on the queue.
Age at stage
Days since the current stage opened, not since submission.
Approvers away
Approvers on approved leave today while holding open requests. Reported with their cover; not routed around.
Coverage
Staffing floor
The minimum number of people a department or sub-unit must keep available. Effective floor is the largest across a department's rules.
Breach / tight / covered
Available staff below the floor / exactly on it / above it.
Critical role
A job title so thin that two holders away together is itself a risk. Matched on the exact job title.
Releasable capacity
What a unit can let go in a week: headcount above the total of its floors, in days.
Compliance and patterns
Statutory rule
A check the records are tested against, carrying the clause it rests on. Types: minimum days, certificate required, taken in year, approval before start, reconciled with payroll.
Labour Act 651, s.20
Annual leave of at least 15 working days.
Labour Act 651, s.57
Maternity leave of at least 12 weeks.
Bradford factor
Spells² × days over the year. Flagged at 200 and above. Frequent short absence scores far above one long spell.
Edge-day share
The share of sick spells starting on a Monday or ending on a Friday, against the 40% chance alone would give.
Unmatched absence
An attendance absence with no approved leave behind it.
Automation
Accrual run
Recomputing every entitlement row. Nightly at 01:30, or by hand.
Snapshot
The month-end liability frozen into a record, for the trend chart. On the 1st at 02:30, or by hand.
Normalise
Converting requests written before the two-status model. Run once after upgrading.
Exit settlement
A proposal to pay out a leaver's accrued untaken days. Authorised and paid separately; only then are days written off.
Project Management
Projects
Project register for HR task tracking: name, department, project manager, counterparty (client), goal and dates — the parents that activities and timesheet tasks hang off.
Where: HR → Project Management → Projects
Add New Project with the fields above; Assign Project attaches employees with tasks and assign dates. Assigned employees see their tasks on the portal timesheet.
Activities
The activity catalogue used by timesheets — the "what was the time spent on" list, per project.
Where: HR → Project Management → Activities
Keep activities few and meaningful; every timesheet entry picks one, and reports roll up by it.
Attendance
Attendance
The day's register: who reported, who was late, who is absent — recorded manually here, from the clock-in device, or auto-marked by the nightly job.
Where: HR → Attendance → Attendance
Recording
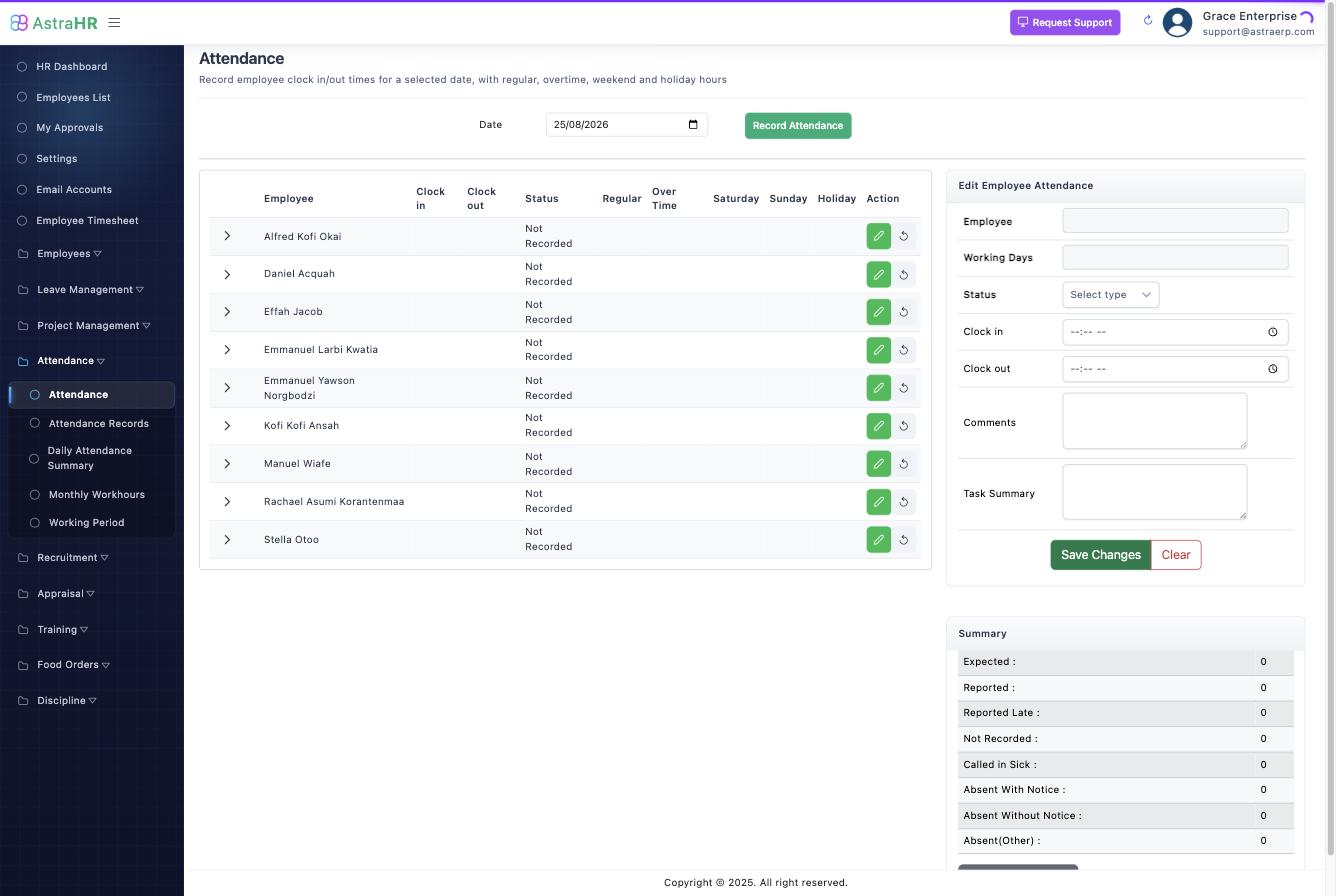
Record Attendance: employee, date, status, clock-in/out times, comments and a task summary. Statuses: Reported · Reported Late · Not Recorded · Called in Sick · Absent With Notice · Absent Without Notice · Absent (Other).
The list shows each employee's clock in/out, status and computed hours (regular, overtime, Saturday/Sunday/holiday).
Where the data comes from
- Manual entry on this screen.
- Clock-in device — pushes events automatically (see Attendance Device).
- Nightly job — initialises the day's register for companies with attendance recording enabled (weekdays), so unrecorded staff surface as Not Recorded instead of disappearing.
- Employee portal — self clock-in where enabled, geo-verified against mapped premises.
What attendance feeds
- Monthly work-hours and payroll (overtime, absence effects) — see Attendance Summaries.
- Discipline auto-triggers: 3+ late reports in a week, or any Absent Without Notice, raises a draft disciplinary incident with the attendance rows attached as evidence — a manager reviews and advances or dismisses it (how that works).
- Suspended employees (discipline) are excluded from capture while suspended, so no absence penalties accrue.
Records
Look up any date's full register: employee, clock in, clock out, present status — and print it.
Where: HR → Attendance → Records
Pick the date, View Attendance, Print for the paper copy.
Summaries & Monthly Hours
Two rollups sit above the daily register:
Daily summary
Where: HR → Attendance → Summary. Per day: expected vs reported, late, not recorded, sick, absent with/without notice — with a holiday flag per day and drill-down to the employees behind each number. Update All recomputes; Download Image exports the table for sharing.
Monthly work-hours
Where: HR → Attendance → Time Sheet (monthly). Per employee for the month: regular, overtime, Saturday, Sunday and holiday hours, and total — the numbers payroll consumes.
Actions across the month: Recompute Summary (rebuild from the daily data) · Confirm All / per-employee confirmation · Lock All / Unlock All (freeze the month against edits) · Post Attendance Summary (hand the confirmed hours to payroll) · Notify All (send each employee their sheet) · Print / Download Zip.
The month-end sequence
- Close out daily gaps (Not Recorded rows) → 2. Recompute → 3. review and Confirm → 4. Lock → 5. Post to payroll.
Common questions
Numbers disagree with the daily screen. Recompute — the summary is a snapshot, not a live view.
Locked month needs a fix. Unlock, fix the day, recompute, re-confirm, re-lock. Every unlock is deliberate; don't leave months unlocked.
Attendance Device
Clock-in hardware registration and the attendance notification rules.
Where: HR → Attendance → Device
Devices: each registered device shows its ID, name, last heartbeat and time elapsed — a device that stops heartbeating is your first clue clock-ins aren't flowing.
Notifications: per notification type, set the recipient number/email (with CC/BCC) and enable/disable — e.g. the daily attendance summary mail.
Working Period
The company's working hours per weekday — start time, end time, break hours — and the overtime rate. This is the base attendance arithmetic: hours beyond the working period count as overtime; Saturday/Sunday/holiday hours are tracked separately.
Where: HR → Working Period
Set each weekday's times once; revisit only when working hours genuinely change (the change affects computations from then on).
Timesheets
Project/task time tracking: assign tasks to employees, employees log time (portal), and HR reviews per month.
Where: HR → Attendance → Time Sheet / Project Management screens
Assigning work
Assign Task: project, task activity, description, assignee, date, duration (hrs), priority, notes. Assigned tasks appear on the employee's portal timesheet.
Reviewing
The list rolls up per employee: assigned vs completed tasks and hours. Filter by period/project/activity, export Excel/PDF.
Monthly Review shows one employee's month as a calendar of entries (project, activity, duration, status, when it was entered — including entered after flags for late logging), exportable as Excel/PDF/calendar image.
Timesheet lapses and discipline
Where timesheet discipline matters, persistent failure to submit is an offence in the seeded discipline catalogue (ATT-04) — handled through counselling notes and cases, not through this screen.
Recruitment
Manage recruitment
Vacancies and applicants in one place: publish a vacancy, collect applications, move applicants through the pipeline.
Where: HR → Recruitments → Manage Recruitment
Vacancies
Add New Vacancy: job title, employment type (classification), work option (on-site/remote/hybrid), opening and closing dates, salary expectation, job description, vacancy status — plus Advertise for me and Show company name on ad for published adverts.
Applicants
Per vacancy: applicant name, gender, phone, email, how soon they can start, application method (online/manual) and date. Update Status moves an applicant through the pipeline (shortlisted, interviewed, offered…); Process converts the successful applicant toward an employee record.
Appraisal
Company Appraisal
An appraisal cycle for the whole company: define the period, initialize it for employees, then manage completion and final ratings.
Where: HR → Appraisal → Company Appraisal
Steps
- Add New Appraisal: period from/to and a label (e.g. "2026 Mid-Year").
- Initialize — creates each employee's appraisal from the question set (Appraisal Questions).
- Manage — track each employee's progress; open any appraisal to see areas, items, self scores/comments and reviewer scores.
- Close with the general comment, final rating and final comment.
Employees complete their self-assessment on the portal; supervisors score their side there too.
Employee Appraisal
One employee's appraisals across cycles — self and supervisor values per assessment item, comments, and the final outcome.
Where: HR → Appraisal → Employee Appraisal
Discipline note: sanctions do not appear here unless the sanction type is explicitly marked visible in appraisal — conduct and capability are deliberately separated.
Appraisal Questions
The question bank appraisals are built from: each question belongs to an assessment area, carries a description, an answer type and a weight.
Where: HR → Appraisal → Appraisal Questions · Areas and answer values are configured alongside (Assessment Values).
Weights drive the scoring roll-up — keep them proportional to what actually matters.
Assessment Values
The answer scales for appraisals: per answer type (e.g. nominal grades, yes/no), the values a reviewer can pick and the weight each value scores.
Where: HR → Appraisal → Assessment Values
Training
Add New
Training events and their trainees: what, where, who supervised, who attended, and each trainee's report.
Where: HR → Training → Add New
Add New Training: department, supervisor, training subject, type, institution, venue, reason, start/expected end dates, remarks. Add Trainee attaches employees; trainee reports are captured per attendee as the training concludes.
Workplace
Announcements
Company-wide or department notices published to the employee portal.
Where: HR → Announcements
Compose with title, body, category and audience (whole company or a department); publish now or schedule with publish-from/until dates; pin to the top for the ones that must stay visible. The list shows each announcement's audience, visibility window and status.
Food Ordering
Staff meal ordering: HR maintains the menu; employees order on the portal; the kitchen list is confirmed per day.
Where: HR → Food Ordering → Menu Setup / Day Food Orders
Menu Setup: food items with name, group and price, arranged per weekday. Save All publishes the menu the portal shows.
Day Food Orders: pick the date, Load Orders — each employee's items and total, with per-order and Confirm All confirmation. Share Summary / Copy to Clipboard produces the kitchen list.
Management Roles
Assign business roles to employees: who is the Leave Approval Manager, HR Officer, HR Manager, Department Head, Managing Director, CEO. These assignments drive leave approvals and the Discipline module's authority and notifications.
Where: HR → Management (roles) · Who: HR administrators
Pick the role, pick the employee, save. One role can be held by more than one person where that makes sense (e.g. HR Officer); the modules that read roles resolve all holders.
Roles have a seniority order (Line Manager < Department Head < HR Officer < HR Manager < Managing Director < CEO) — the Discipline authority matrix uses it to guarantee appeals are heard above the issuer.
Workflow Approvals
Approval requests routed to you from HR flows — review and act in one queue.
Where: HR → Workflow Approvals
Each request shows what it is for, who raised it and its status; approve or decline with the action recorded. (Leave has its own dedicated approval screens; discipline records approvals on the case file itself.)
HR Reports
Cross-cutting HR reporting — headcount and profile listings cut by period and filters, exportable for management.
Where: HR → Reports
Pick the period (From/To) and generate. For module-specific reporting see: Leave Records export, Attendance Summaries, Discipline Dashboard.
Fleet
Fleet Management
Vehicles, drivers and everything that keeps them moving: assignments, requisitions, fuel, maintenance, inspections, insurance and road-worthiness, trip logs and accidents — with a dashboard over cost and compliance.
Where: the Fleet module · Employees interact through the portal (vehicle requests, trip logs). 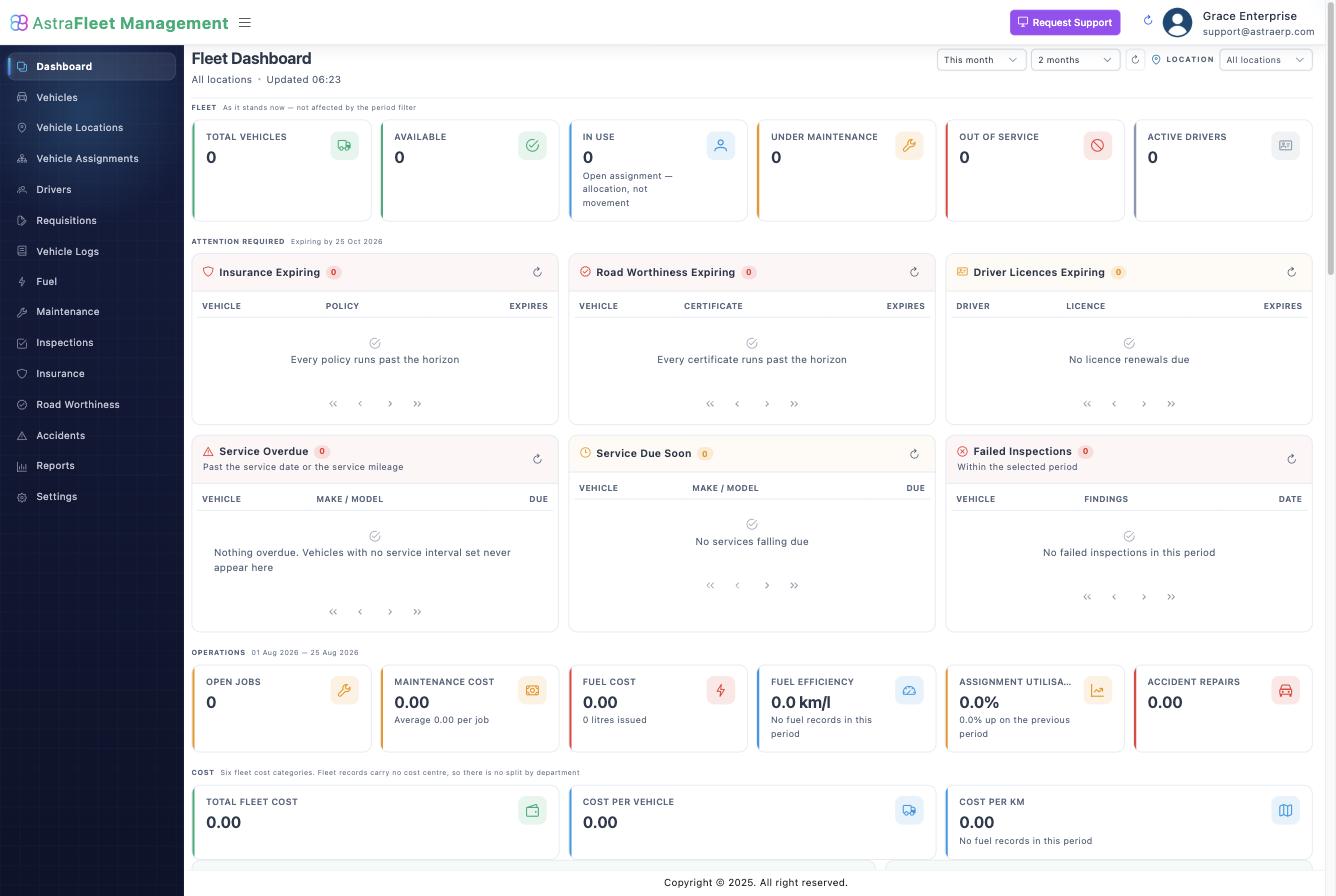
The register
- Vehicles — the fleet list; each vehicle's file holds its documents, assignments, fuel and maintenance history. Vehicle locations track where vehicles are stationed.
- Drivers — who may drive, with licence details.
Day to day
| Screen | What happens there |
|---|---|
| Assignments | Attach a vehicle to an employee/role, dated |
| Requisitions | Vehicle requests (from the portal or here): journey, purpose, passengers → dispatch assigns vehicle & driver |
| Fuel | Fuel fills per vehicle: date, quantity, cost, odometer — consumption falls out of the odometer trail |
| Logs | Trip logs: route, purpose, odometer start/end |
| Maintenance | Service events and costs per vehicle, with schedules |
| Inspections | Periodic checks and their findings |
| Insurance / Road-worthy | Policies and certificates with expiry dates — the compliance clock |
| Accidents | Incident records per vehicle/driver |
Oversight
The dashboard rolls up availability, running costs and expiring documents; Reports cut fuel, maintenance and utilisation per vehicle and period. Settings hold fleet vocabularies (vehicle types, maintenance types…).
Renewal dates (insurance, road-worthy) are the discipline here: keep them current and let the dashboard's expiry warnings do their job.
Point of Sale
POS Guide
The fast lane for over-the-counter sales: a till screen for scanning/picking products, taking payment and printing receipts — feeding the same stock and ledger as everything else.
Where: the POS module (and Account → Sales Till / Cash Register views)
Selling
- Open your till (register) for the day.
- Add items — scan or search; quantities and line prices adjust in place.
- Take payment (cash, MoMo, card per your setup), print/share the receipt.
Stock reduces immediately; the sale posts to the daily summary and ledger.
The day
- Daily Summary (Account) shows the day's takings by register — the cash-up sheet.
- Cash Register records the till's cash movements; count and close at day end.
Off-POS credit sales, orders and invoicing live in Inventory/Account — POS is deliberately the simple path.
CRM
CRM Dashboard
The relationship overview: ticket and lead volumes, pipeline value, activity and tasks — with date-range filtering (the shared From/To + quick-period selector) and drill-through into each workspace.
Where: CRM → Dashboard
Use it as the team stand-up screen: tickets by status, tasks due, recent leads and activity in one view.
CRM Customers
The 360° customer view: profile and contacts on one side; the account position — AR/AP balances, invoices, payments, tickets, opportunities and activity — on the other.
Where: CRM → Customer Records 
Customers/partners themselves are the shared partner register (also used by Sales and Accounts); this workspace is where the relationship is read. The account-position header answers "where do we stand with them" before every call.
Sales
CRM Sales
Prospects before they're customers — the same workspace shape as Tickets: KPI tiles, filter tray, list ↔ board by lead status.
Where: CRM → Leads
Capture a lead with contact details, source and owner; qualify it through your statuses; convert the good ones into an opportunity (pipeline) or straight into a customer. Lead statuses are configurable in CRM settings.
CRM Opportunity
The sales pipeline: deals by stage on a kanban (or list), each with party, value, expected close and owner.
Where: CRM → Opportunities
Drag deals between stages as they progress; stages and their order are configurable in CRM settings. Won deals carry into sales/invoicing; lost ones keep their history for the post-mortem.
Client Management
CRM Interactions
The contact log across every record type: calls, meetings, emails and notes attached to a customer, lead, opportunity or ticket — plus scheduled tasks/activities with due dates, categories, priority and assignee.
Where: CRM → per-record activity panels, and the dashboard's activity/task views
Log as you go; the record's timeline is the institutional memory when people change.
Customer Support
CRM Tickets
Customer support tickets in a workspace rebuilt around flow: KPI tiles, a collapsible filter tray, and a list ↔ board view switcher (the board is a kanban by status — drag a ticket to move it).
Where: CRM → Tickets 
Working the queue
- Tiles (open, due, closed…) are clickable filters.
- Filters: status, party, assignee and the date range selector.
- Open a ticket for the detail panel: description, party, assignment, status history, and responses/activity logged against it.
- Statuses (and their board column order) are configurable under CRM settings — open statuses first.
Creating
New ticket: party (customer), subject, description, source, priority, assignee. The ticket lands in the first open status; work moves it rightward across the board.
Assigned staff see and update their tickets from the employee portal's Tickets & Tasks.
Configurations
CRM Settings
The vocabularies the CRM workspaces run on:
- Ticket statuses — with view order (board column order; open statuses first)
- Opportunity stages — with view order for the pipeline board
- Lead statuses, sources, task categories
Statuses are per-company and editable; records keep working when a status is renamed. Keep the lists short — every extra column dilutes the board.
Configurations
Dashboard
The configuration landing: shortcuts into company details, branding, users & permissions, workflow, templates and module settings — with the company's setup completeness at a glance.
Where: Config → Dashboard · See the Configuration Reference for the full map.
Business Details
Introduction
This page allows you to update your business details, ensuring your information is accurate and current for communication and operational purposes.
How to Update Business Details
Company Name
Enter the full name of your company. This is essential for official records and to ensure accurate identification.Company Address
Enter your company's full address, including the street, city, state, and zip code. Be sure the address is complete and accurate for shipping, billing, and other correspondence.Company Email
Enter the main email address for your company. This email will be used for official communications, inquiries, and customer contact.Contact No.
Enter your company’s primary phone number. This number is crucial for customer service and direct communication with your business.WhatsApp Phone No.
If your company uses WhatsApp for business communication, enter the WhatsApp number here. This provides an additional communication channel for customer interaction.Update
Once you've entered or made changes to the details, click the "Update" button to save them. This ensures that your business information is updated and stored.
Tips and Best Practices
- Double-check all contact details for accuracy to avoid missed communications or errors in official records.
- Keep the business information consistent across different platforms to maintain a professional and unified presence.
Users
Welcome to the User Management Page
This page allows you to view and manage existing users in the system efficiently.
How to Use This Page
User List
The table displays a list of all registered users. Each row represents a user and includes the following details:
- Name: Full name of the user.
- Email Address: The email address associated with the user's account.
- Mobile No.: The user's mobile phone number.
- Is Employee: Indicates whether the user is an employee of the organization.
- Is Agent: Indicates whether the user is an agent or representative of the organization.
- Is Active: Shows whether the user account is currently active or inactive.
- Actions: Each user has the following action options available:
Actions Menu (More...)
Click the "More..." button to access a dropdown menu with these additional actions:
- Edit: Modify the user's information.
- Send Email: Send an email directly to the user.
- Set Password: Reset the user's password.
- Render Inactive: Deactivate the user's account.
- Delete: Permanently remove the user's account from the system.
New User
Click the "New User" button to create a new user account. This allows you to add additional users to the system as needed.
Home
Click the "Home" button to navigate back to the main page or dashboard.
Additional Tips
- Search: Use the search bar to find specific users by entering their name or email address.
- Filter: Apply filters to view only active or inactive users.
- Sort: Sort the list of users by columns such as name, email address, or any other parameter for easier navigation.
By using these features, you can efficiently manage users and ensure that your system remains organized and up to date.
Add New Users/Account
This page allows you to create a new account/user.
Name
Enter the full name of the person or entity you are creating an account for.Mobile Number
Enter their mobile phone number.Email Address
Enter their email address.Designation/Role
Enter their job title or role within the company (if applicable).Is Employee
Check this box if the person is an employee of the company.Is Agent
Check this box if the person is an agent or representative of the company.Save Changes
Once you have entered all the necessary information, click the "Save Changes" button to create the account.Close
To exit without saving, click the "Close" button.Home
Clicking the "Home" button will take you back to the Users page.
Additional Tips
- Make sure to enter all required information accurately.
- If you're unsure about any field, you can leave it blank.
- You can create multiple accounts using this page, making it easy to manage users or entities in the system.
User Locations
The User Locations configuration allows you to assign users to specific locations within the system.
How to Add a User to a Location
- Search for or select the user in the User column.
- Select the desired location(s) in the Location field.
- Click Save Changes to assign the location, or click Clear to reset/remove the selection.
How to Edit a User's Assigned Location
- Click the Edit button next to the user.
- Select a new location for the user.
- Click Save Changes to update the assignment.
How to Delete a User's Assigned Location
- Click the Delete button next to the assigned location.
- Confirm the deletion to remove the location.
Repeat the steps to assign additional users to locations.
New Company
Adding a New Company
- Click the 'New Company' button.
- On the company form:
- Enter the unique company code.
- Provide the Name.
- Input the Contact Number.
- Add the Postal Address.
- Specify the Contact Email.
- Provide the TIN Number.
- Check 'Initialise With Default Data' to include predefined data (e.g., Chart of Accounts).
- Click 'Save Changes' to save the company.
- To exit the page without saving, click 'Close'.
Managing Companies
- Edit Company:
- On the Company Listing page, click the 'Edit' button for the desired company.
- Update the details in the form.
- Click 'Save Changes' to apply updates.
Inviting Users to a Company
- Click the 'Invite User' button next to the company.
- In the dialog box, enter the user's email/phone.
- Click 'Invite'.
The user will receive an email with a link to join the company.
Permissions
The Permissions page allows administrators to control user access to specific modules and pages within the system.
What Are Permissions?
Permissions determine whether a user can access specific modules or pages (e.g., restricting access to "Accounts Expenses"). Without permission, the user cannot view or interact with that page or module.
How to Set Permissions
Step 1: Select a User
- Use the dropdown at the top to select the user.
- The active modules for the user will display.
Step 2: Activate/Deactivate Modules
- To grant full access to a module:
- Click YES under the "Activate" column.
- To restrict module access:
- Click NO under the "Activate" column.
Step 3: Add Permissions for Specific Pages
- Click Pages under the "View" column for the selected module.
- Search for or locate the desired page in the "Account Pages" section.
- Click Add in the "Action" column for the page.
Step 4: Configure User Actions
- In the "User Permissions" section:
- Locate the page and click Actions (or More → Actions).
- Select actions the user can perform:
- Edit: Allows editing of records/items on the page.
- Delete: Grants permission to delete records/items.
- Create: Enables creating new records/items.
- Approve/Disapprove: Allows managing approval statuses.
- Click Save to confirm the changes.
Step 5: Remove Permissions
- Locate the page under "User Permissions."
- Click More → Delete to remove the permission.
Repeat the steps for additional modules or pages as needed.
Permissions User Guide Video
Message Templates
The email/SMS bodies AstraERP sends, per message type (invoices, payslip notifications, account invitations, notifications…). Each template holds email text and SMS text with merge placeholders filled at send time.
Where: Config → Message Template
Defaults are seeded per company; edit to your voice. Keep SMS bodies short — they bill per segment. The message generator sends ad-hoc messages using the same infrastructure.
Logo
Every bulk-upload screen in AstraERP (employees, bank accounts, products, prices, sales, journals, payroll items, statements…) works from a downloadable template. Get the template from the screen you're uploading into (or the Upload Templates page), fill it exactly as laid out — column order and formats matter — and upload. Every upload previews per-row results before processing, and failed rows tell you why.
Mobile App
Getting Started
Screen recordings for these flows are being re-captured against the current app and will appear here.
- Onboarding experience for new users and a reference point for existing users who want to explore the app's capabilities.
Prerequisite
Company Registration
- You will need to have a company registered before you can login the app.
- To register a company
- Tap on the Register on the Login Screen
- Enter details for all the fields. You can register using only your phone number / email.
- Tap on Register
- Go back to the Login screen and login into the app using your valid credentials.
Setting Up your Organisation
Step 1 Create Product
- To create product a product in AstraERP Mobile
- Go to Invoice|Sales
- Select Product|Services
- Tap on the New Button in the top right corner of the page
- Select Product type and complete the required field
- Tap on Save
| Field | Description |
|---|---|
| Product Type | Select whether your product is a goods or service |
| Product Name | Identify the specific goods or service |
| Product are bought/sold in | Indicate how the product is packaged |
| Quantities in Package | If products are sold in boxes or packs, how many individual items make up a full box |
| Cost price | Indicate the amount you bought the product from the suppliers |
| Selling price | Indicate the amount you are going to sell the product to the final consumer |
Step 2- Receive Stock.
- A document indicating the stock a seller has purchased from supplier, its quantities and their prices. To create a Receive stock
- Go to Invoice|Sales
- Tap on Receive Stock
- Tap on the New Button in the top right corner of the page.
- Fill in the required details
- Tap on Save
- Post to Inventory
| Field | Description |
|---|---|
| Date Received | Select the date you bought the product from the suppliers. if you already have the stock and you are a first time user, please select the current date |
| Vendor | Indicate the supplier you bought the goods from. If you do not want to save the suppliers' information, please select Backlog Supplier |
| Paid | Indicate whether you have paid for the goods or payment would be made later. |
| Payment Account | There is a default payment account(Cash-in-hand) in the system. You can add more payments account in the Charts of Account |
| Add item | Add the product you are purchasing from suppliers, its right quantities and cost prices |
Step 3 Cash/Credit Sales
- A financial transaction which confirms the supply of products between the seller and the customer.
- To create Cash/Credit Sale
- Go to Invoice|Sales
- Select credit|cash sale
- Click New Button in the right corner of the page
- Fill in the required details
- Add items
- Click Process
- Add payment details
- Click Save